Outdoor Garden and Patio Furniture – Lutyens Bench

Outdoor Garden and Patio Furniture - Lutyens Bench

Click to enlarge

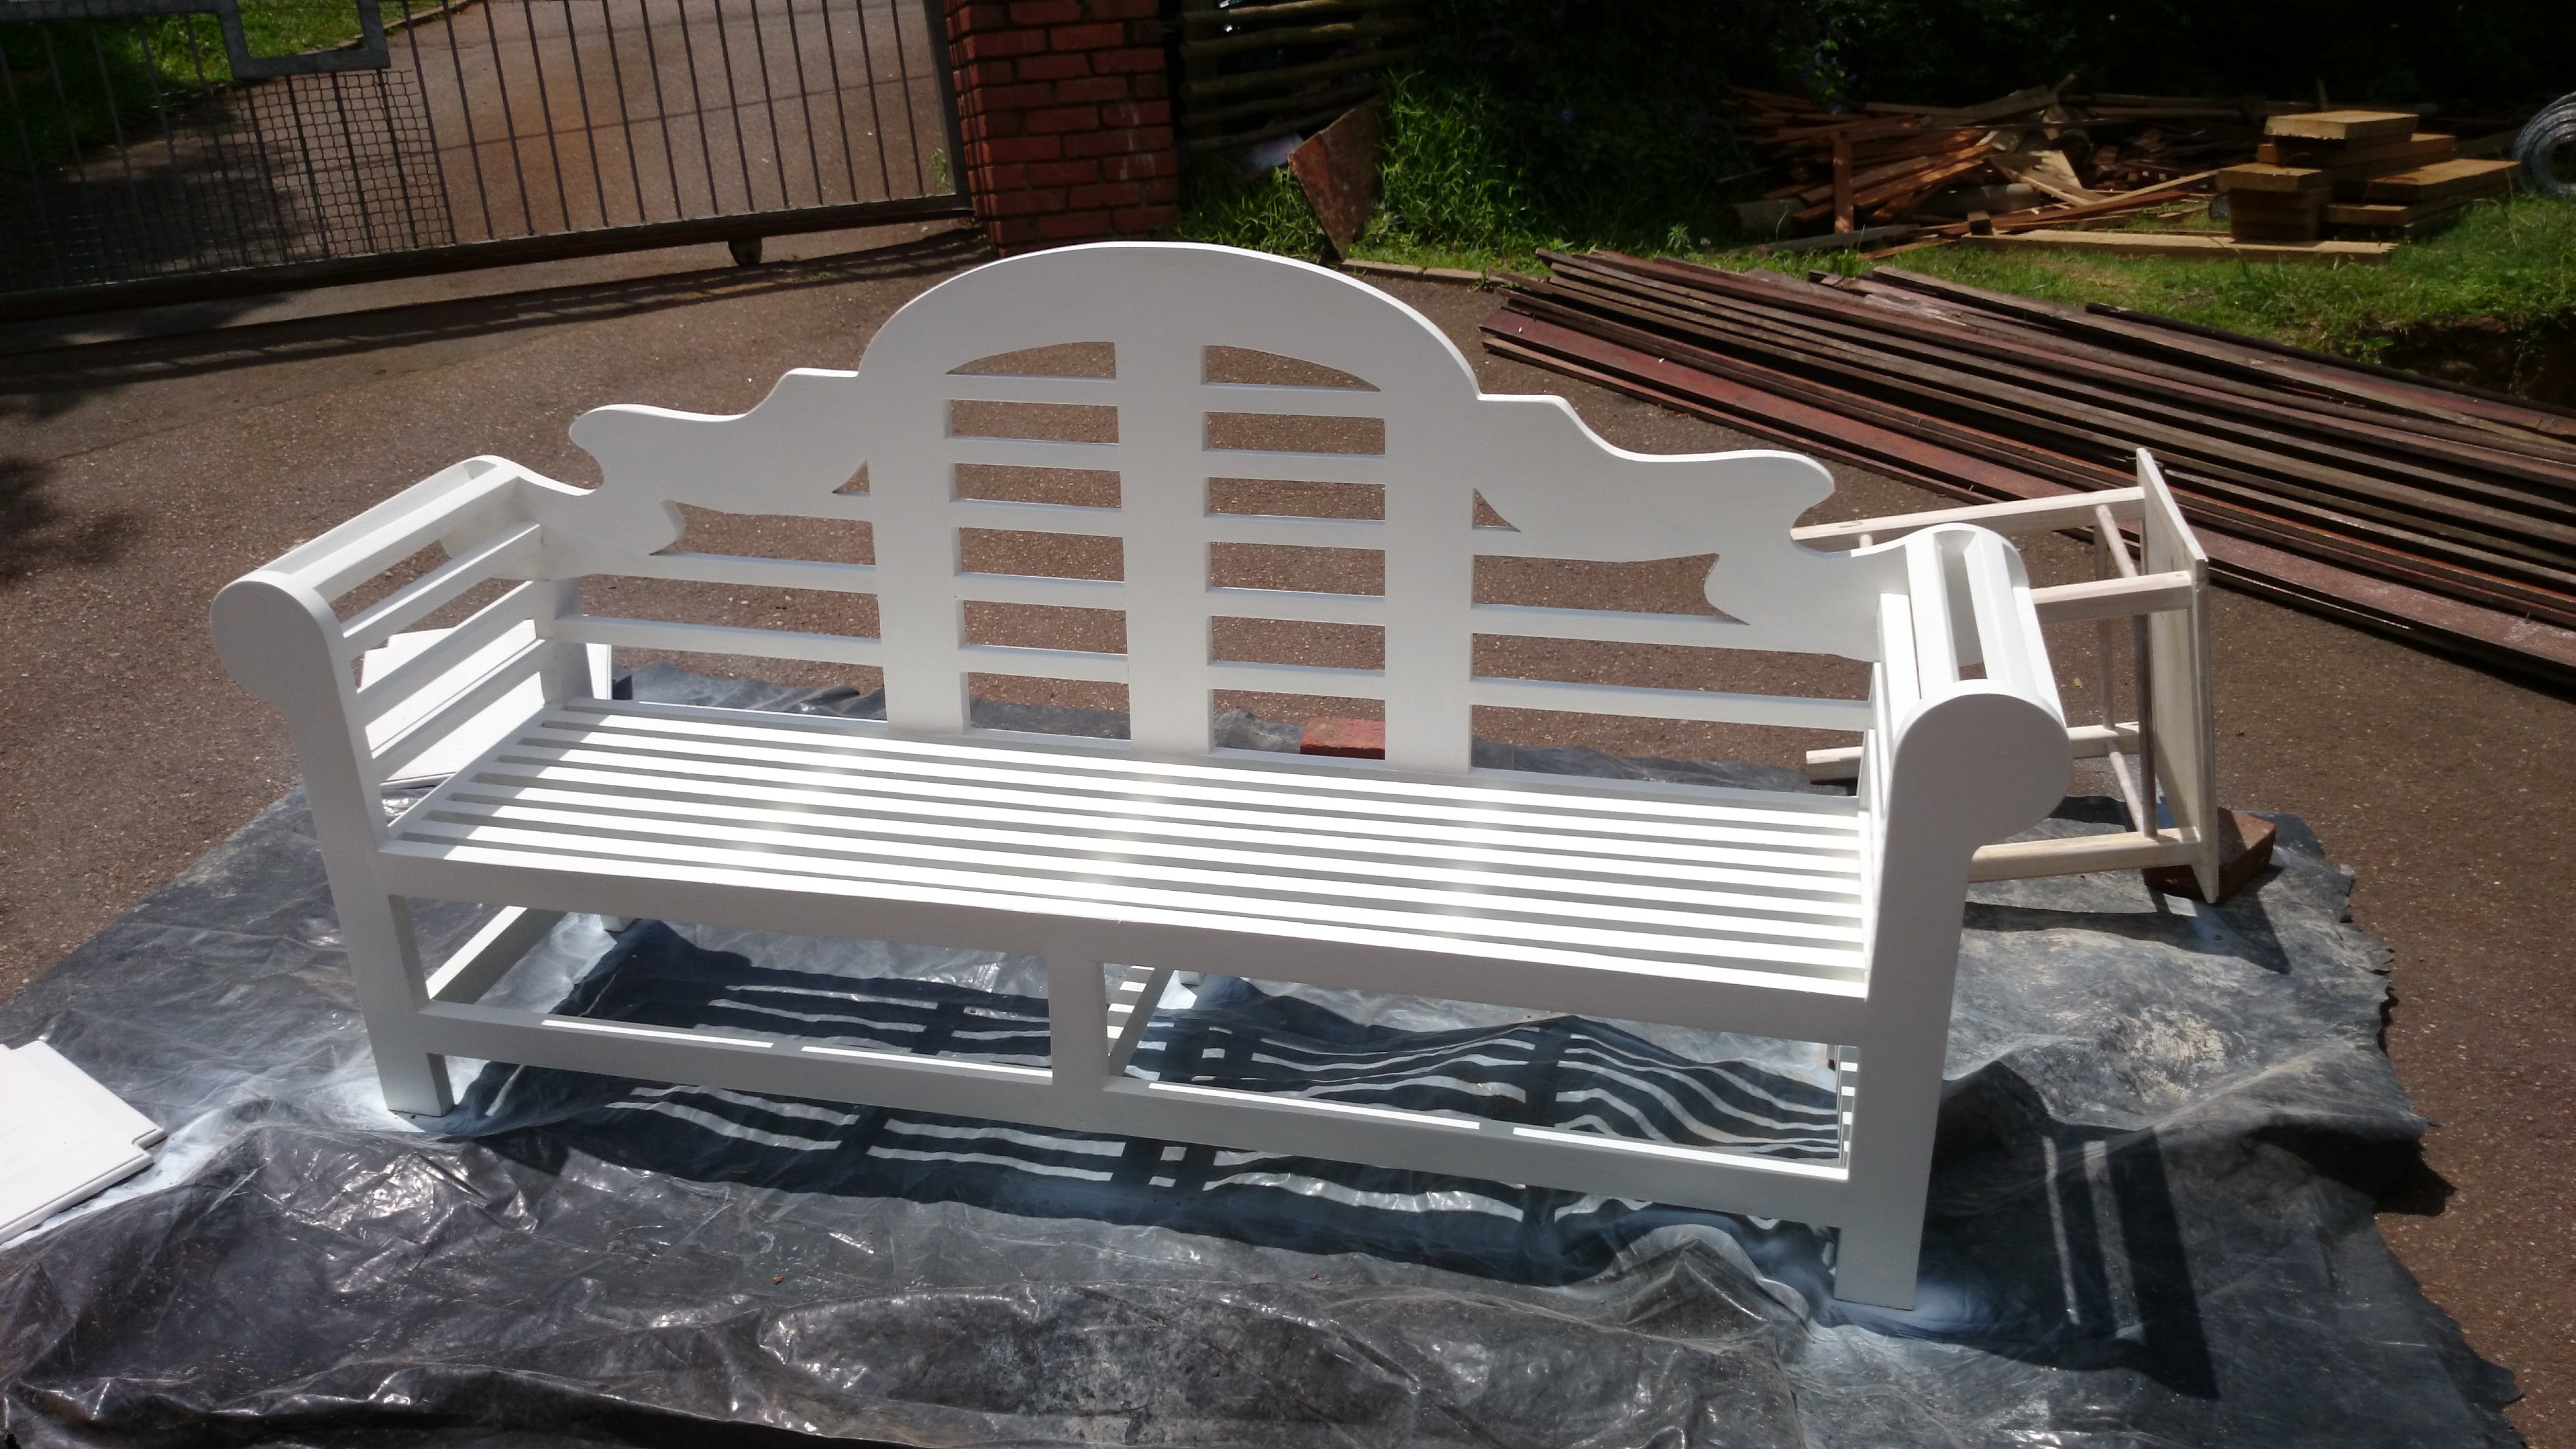
I was commissioned to make another outdoor Lutyens bench in balau, but this time it was to be painted white. I really battled this time around because I had misplaced the plans that were given to me on the first one I made. With the first one I made I was given the plans from the client who had ordered them online. There were not PDF plans but rather printed on A1 paper and posted to him.

Each curved piece was drawn on the plans in real size and needed to be cut out and pasted to a piece of softwood, then cut and shaped to make a template. That is then transposed to the work piece and cut leaving a 5mm or so gap on the edge and then flush trimmed using a flush trim router bit to arrive at a perfectly curved piece. They can then be re-produced quite easily and quickly.

Needless to say I lost my plans and my templates. Eventually I ordered them myself at huge cost only to find my plans when I cleaned my office out. So we started to cut all our shaped pieces. I then modified the plans slightly to make use of standard balau pieces that we use in our decking. I always have off cuts that are too small to use in decking but long enough to use in bench making, so it saves a lot of money which I can pass on to my clients in reduced selling prices. However changing the size of the pieces to make use of standard decking pieces results in some pieces changing length slightly. So now we couldn’t cut to the plans we had to work out how long various pieces needed to be to accommodate the change in thicknesses and widths of the stock we were using.

So it was a painfully slow process, but we eventually got there with our slightly modified design of our Lutyens Bench. We then quickly drew the Lutyens Bench, measured each piece and kept a note of it so that next time we know how long each piece is and we can then pre-cut all our pieces, mark them, domino or dowel them and glue the whole thing up a day or two.

The Lutyens Bench has a very distinctive design and look. It was originally designed and first built prior to 1913 by the Edwardian architect Sir Edwin Lutyens (the Dutch name is pronounced “Lut-chins”).

It has since become very popular and one can find various different styles with small changes. The back rest, together with eth arm rests, however remains pretty much original as that is what defines its unique design.

For a free no obligation quote on the Lutyens Bench or any other garden furniture, wooden decking or outdoor timber construction please feel free to contact us on 082 496 5444 or use the contact us form below.

← Back

Thank you for your response. ✨

Wooden Decks Durban – Paradise Valley Pinetown

Wooden decks Durban

Click to enlarge

This is a follow-up article on a previous article I wrote about a high level wooden deck we are building at Paradise Valley in Pinetown Durban. Click here for the original article.

The poles proved to be quite a story getting up. We were 5 people on the day. The poles were 9m long and we had to get them in to a hole of 1m deep, secure them and then pour concrete. The difficulty was to get the pole up because with 8m in the air and only 1m in the ground you have no leverage to pull the pole vertically plumb. We got two of them in without having to resort to other methods, but our third and final pole proved a bit more difficult as by now we had stays and ropes all over the place holding the poles in position while the concrete set. So there was nowhere that we could actually move the pole to get it into the hole without disturbing the other poles. We ended up pulling it up (3 of us) from the flat which was about 2 stories up, using ropes, while 2 others pushed the bottom into the hole. The top of the pole kept catching underneath the balcony. We eventually got it up over the balcony edge and could then pull it so the foot of the pole went into the hole. We then nailed a 38 x 114 to the top of the pole and pushed it to vertical. Each hole took about 6 barrows of concrete mix. We were lucky enough to be able to mix right where we

Wooden decks Durban

Click to enlarge

were building. I won’t say “never again”, because if challenged with the same task again I will most certainly attempt it. However, I will use a crane truck to get the poles in the hole. 9m is a bit long to handle by hand and although we did it, it was a bit dangerous at times and we had to continually stop to make sure that no one would get injured. A crane truck for a day will simply make the job a lot easier and much safer.

Wooden decks Durban

Click to enlarge

We built our platform which took us a full day. We used 50 x 228 beams and set the platform below the level of our deck so that we could stand on that platform and build our deck. Once we had the 50 x 228 installed on two sides, we cut the same timber to lengths of just over 2m and nailed them down perpendicular to these main beams to create a platform. Needless to say we have taken perfectly good timber and cut it into 3 pieces to create this platform. At some point I suppose we will use them for stair treads or similar, so it is not a complete waste of money.

We strapped ourselves into harnesses, hired a 10m extension ladder and set about building the deck substructure. We had to resort to our old method of installing the substructure of first setting posts, then cutting and notching posts, then installing beams and finally joists. So it took a fair amount of extra time but there is no other way of doing this at that height. The substructure for 20m² took one day and deck boards another full day. The balustrade will go in on Monday and then it’s just a matter of installing diagonal supports to stop any racking (sideways movement), filling, sanding and sealing. As mentioned above I will attempt another high level deck, but I will cost it more accurately and I will use a

Wooden decks Durban

Click to enlarge

crane truck to get the poles in.

For a free no obligation quote, please call us on 082 496 5444 or use the contact form below.

← Back

Thank you for your response. ✨

w

Wooden Decks Durban – Verulam

Wooden decks Durban

Click to enlarge

We recently had a good run of building wooden decks in Durban. With the arrival of summer and Christmas, wooden decks in Durban become a very popular item for consumers to spend their hard-earned cash. Despite trying to get jobs confirmed earlier on in the year, most of our work was confirmed in November and hence we have been running 2 to 3 sites simultaneously. It’s no easy task with the size of our current crew, but we were lucky enough to have most of them take place north of Durban in Durban North, Umhlanga and this one in Verulam. We rented an old beach cottage near Ballito and stayed there with our full crew for 3 weeks so that we didn’t need to fight traffic in the mornings or afternoons and drop and pick up staff in various different areas. However the traffic in Umhlanga and that whole north of Durban area is beyond ridiculous so it still took us hours to get “home” each day. This coupled with the fact that we had a lot of work to get through, made for very early starts and very late finishes.

Wooden decks Durban

Click to enlarge

Wooden decks Durban

Click to enlarge

The pics alongside are work in progress pic and I will update then once we have sanded and sealed the deck.

This job in Verulam was at a complex and this part of the complex consisted of 6 units. We built 3 wooden deck sections, each of about 45m². There was a wooden balustrade on the front of it and on the two ends or sides. The drop down from the first section of wooden deck was about 450mm so we created a step along the entire width of the deck with closed risers. For these closed riser steps we use a mini substructure and then deck it using the standard 19 x 68 balau deck boards. It then becomes a sort of bench as well as a step down.

Wooden decks Durban

Click to enlarge

The step down from the second wooden deck section to the third was about 1, 100mm so we had to build some wooden stairs with open risers of standard width of 1m and clad the section were there were no stairs. We also clad behind the stairs in order to block of the underneath of the deck completely. These wooden stairs were the straight forward design with stringers on either side, and treads placed inside of the stringers using cleats on each side. Hence the risers are open which is why we clad behind it to block off the underneath of the second section. We used 30mm x 102mm stock to build the stairs as there is no support beneath them over the 1m span. Using 30 x 102 stock with no gaps, as opposed to 30 x 140 stock, results in a tread of 306mm compared to 285 (140 + 140 + 5mm gap). So they are slightly wider (by 21mm) but still very comfortable. Also we get to use our 1m off cuts from the capping on the balustrade thereby reducing our cost which we can pass on to our clients through our reduced selling price.

It was a fairly straightforward build but did take a bit longer than other jobs as the front of the wooden deck was directly in line with where the bank below suddenly dropped off. So it was difficult to work at head height on a very steep slope. Ladders had to be tied off to the posts to climb them and so on.

Wooden decks Durban

Click to enlarge

For a free, no obligation quote, on your wooden deck, pergola, walkways, stairs and other outdoor and indoor timber construction please call us on 082 496 5444 or use the contact us form below.

← Back

Thank you for your response. ✨

Wooden Decks Durban – Westville

Wooden decks Durban

Click to enlarge

This wooden deck built in Westville Durban was built in record time. We have been experimenting with new techniques of building to make the task quicker yet still remain accurate, neat and structurally sound.

It was a 35m² wooden deck with a balustrade on 3 sides and a gate. It was flush with the floor inside the house so we had to be careful to make sure that the door could still open without jamming on the surface of the deck. The first metre or so was built on top of existing paving after which the bank dropped about 1.8m.

We built the frame to take the deck boards first, attached it to the wall of the house using sleeve anchors and then installed temporary posts to get the whole structure level and flat. Once the frame was built, level and flat, we slotted our 50 x 228 main-beam underneath the joists and attached them. So we now had our joists and beam installed being suspended by temporary posts. The beams were in fact now just hanging from the joists with a few screws. We could then see very accurately and quickly were out holes, for our posts, needed to be dug in order to secure our main beam. Holes were dug, posts cut to length, notched, secured to beam and concreted in. Now it is possible to use a wet mix of concrete as there is no danger of the posts moving while working with them. In the past we have done it the other way

Wooden decks Durban

Click to enlarge

around. We have worked out where our posts must go, concreted them in, then cut our posts to length, installed the beam and then the joists. The latter is far more time consuming. By having your frame built one can very quickly see where everything must go. A lot of the cutting is then done on the floor instead of in situ. Using the former method one also needs to make a dry mix of concrete and stamp it in so that you can work with the posts immediately. Pouring wet concrete is much easier and

Wooden decks Durban

Click to enlarge

quicker than working with a dry mix. This part of the job, the complete sub structure, took us one day (35m²).

Day two was spent screwing down deck boards. Again we used a new method of securing each end of the deck boards with our 5mm gap and then coming back to screw the deck boards down in between the ends. See this video for how we did it. 35m² of deck boards went down in one day. The last part of building was the balustrade. It rained that day so we only got a half day in, but the total time to install balustrade was one day. Hence a total of 3 days to build the entire structure, deck it and install balustrade. We still used the old method of installing the balustrade by attaching our rails to posts and then installing pickets. Our new method is to build the rails and pickets on the floor, pick it up and attach it to the posts. This new method will be a lot quicker as everything can be pre-cut to length.

In busy times, as we are experiencing now, techniques that allow us to build quickly and accurately are invaluable and allow us to keep our prices down. Well done to the crew, this wooden deck in Durban was built in record time.

Wooden decks Durban

Click to enlarge

For a free no obligation quote, please call us on 082 496 5444 or use the contact us form below. Please also visit the gallery page on this blog to see other pics of work we have done recently.

← Back

Thank you for your response. ✨

Screwing Deck Boards Down on a Wooden Deck in Durban

Here’s few videos of us screwing deck boards down on a wooden deck in Durban.  This wooden deck is 35 square metres in size.  It took us one day to get the complete substructure down and ready, and a 2nd day to screw down all deck boards.  Monday morning we will build the balustrade and gate.  It’s officially a record and I think it will be hard for us to beat that one.  Well done guys.

Wooden decks in Durban

Click to enlarge

For a free, no obligation quote, please contact us on 082 496 5444 or use the contact form below

← Back

Thank you for your response. ✨

High Level Wooden Deck Installed Durban

Wooden decks Durban

Click to enlarge

Now here’s a challenge. We’ve been commissioned to build a deck 5.5m high on the lowest point. The highest point is about 7m off the ground. An engineer and architect have drawn plans and there is a strict spec we need to follow. Our H4 CCA treated gum poles are 9m in length. That’s too long to fit on the top of our vehicles so we have to have them delivered. There are to be 3 of these poles in the front length of the deck measuring 6m long and another 2 mid way across the width of the deck. Each pole is to be buried in the ground in a hole measuring 1m deep to the lowest point and 600mm x 600mm wide.

The two end holes were dug with ease but the middle hole was slap bang in the middle of a rock. So we hired breakers, pulled the generator out and started digging. We dug straight through the middle of the rock. It was only sand stone so went relatively easily, but let me assure you even sand stone is hard enough to test the best of one’s fitness when holding a breaker whilst standing in the hole and still having to remove what you have just broken out the hole.

We will finish on nearly two cubic metres of sand and 2 cubic metres of stone and 14 bags of cement. We’re mixing a wet mix as opposed to our normal dry mix. Each pole is being placed in the hole and secured using 38 x 114 (our joist material) in 6m lengths attached to the post and secured to the ground by digging them in and placing bricks around them. We’ve managed to find a few trees nearby so have used the rope that was used to pull the pole up to tie it off to a tree to secure it while the concrete sets.

Wooden decks Durban

Click to enlarge

We had a little set back in that the deck was to be originally 6m x 2m. However our main beam, and therefore posts below would have ended up on the ridge of the retaining wall you see in the pics. We therefore had to extend the front edge of the deck by 1m. As a result the original poles we bought are too short by about 300mm. We originally bought 7.2m poles but have now had to go up to 9m poles.

Wooden decks Durban

Click to enlarge

Once we’re up with the poles we will need to build a platform of sorts so that we can work at waist height to build our substructure. Or we may opt for scaffolding. Once that is up we can then lay our deck boards and build our balustrade with ease and safely. I’ll post some more pics here of the completed job and work in progress. It’s a daunting task because of the height and we need to ensure that we are working safely and that the budget doesn’t run away from us. It is easy to lose money on a job of this nature due to extra costs.

Already we have had breaker hire for 3 days, one of which I managed to re-coup from the contractor breaking the hole in the wall to install the door. He didn’t realise that the balcony wall was solid concrete. He was probably expecting brick and sent his crew with a four pound hammer. Poles have grown in length and of course cost more. Holes have ended up bigger than planned so more money has been spent on sand and stone and cement.

Wooden decks Durban

Click to enlarge

For a free no obligation quote on your outdoor wooden decks, pergolas, balustrades, walkways etc. contact us on 082 496 5444 or use the form below.

← Back

Thank you for your response. ✨

Wooden Deck Installed in Queensburgh, Durban

Wooden deck installer Durban

Click to enlarge

This wooden deck we are installing is almost complete. The pics alongside are work in progress pics. I’ll update it with some others once we are done and you can then get the full feel of the deck. It has been an interesting installation as there are effectively three sections to it and the whole job incorporates three different methods of installing a wooden deck.

The first section is a deck around the pool measuring 1.2m off the side of the pool. The slasto that was there had quite a steep fall from the edge of the pool to the soil to allow water to run away from the pool instead of in to it. We used 38 x 114 joists but had to cut them in a wedge shape to allow them to be level on top but still remain in contact with the slasto as much as possible. There is an easier way of doing this by using 38 x 38 batons with a foot on the side, farthest from the pool, so that the baton remains level on top. This would of course result in a large gap beneath the baton. Being only 38mm in thickness the baton would break as a load is placed on top of it. So one would need to pack the underside of this baton with a suitable material. In the past we have used structural grout simply because of its strength and usability. It is fairly easy to use as it is cementious based. You simply mix it with water and pack the gap. It dries extremely hard, harder than cement, and contains small fibres in it which give it its strength. Both ways are structurally sound, but cutting wedge-shaped joists takes time and they inevitably need to be shimmed to get to a perfect level across all joists. Packing them is easier and just as strong. So next time I will revert to the old tried and tested method of packing them to save time.

We ran our deck boards parallel to the pool on all fours sides, rather than running them all in the same direction. The method we used in this deck is of course the better method. It looks neater and also keeps more water from the pool away from the end grain of the deck boards. Water is absorbed by wood largely through the end grain so this method will result in less rot than running them all the same way where two sides will have end grain facing the pool. However, and a big however, this method is tricky in that if the pool is not perfectly square, the corners of the deck will not run out from the pool at 45°. If a deck board is cut at say 40°, the other deck board that will meet it on that corner will need to be cut at an angle other than 40° if the deck is not square as a result of the pool not being square. And herein lies the problem. The cut ends of each deck board will not be the same

Wooden deck installer Durban

Click to enalrge

length and will not meet up nicely resulting in a stepped joint. Hence the deck MUST be built square regardless of how square the pool is. This brings with it another problem in that it will mean that two ends will overhang the pool and two ends will be flush with the edge of the pool. If the pool is only slightly out of square, then it is not a problem because it won’t be seen. However if the pool is far out of square, then the overhang on the two sides becomes too big. If this is the case then opt for deck boards running all the same way or a gap filler must be placed between the join, so that the eye cannot pick up the difference in lengths of cut ends.

There was small walkway of 1.3m wide by about 4.5m long joining this pool deck to the other deck pictured alongside. There was a small step up to this deck which was enclosed with a balustrade.

So three different style decking systems were used which made it very interesting. One was a baton system on a slasto substrate, the other was a frame system as the walkway and the third was a joist and beam system which was suspended about 2m up.

Tomorrow we will continue sanding and then seal.

For a free no obligation quote, please call us on 082 496 5444, or use the form below. If you call please let me know you found my blog so I can track my marketing.

← Back

Thank you for your response. ✨

Wooden Pool Deck Built in Westville, Durban

This slideshow requires JavaScript.

This wooden deck was built in Westville, Durban in September 2013. There are two sections to the wooden deck, one being the deck around the pool and the other being the deck above the pool where the water flows back into the pool and the pot plants are housed.

One way of decking around a pool is to lay all the deck boards the same way. What this results in is two sides of the deck having end grain facing the water and the other two having face grain facing the water. Seeing as water likes to be absorbed through the end grain of wood, it makes sense to try to keep as much end grain away from the water as possible. This will slow down the rotting process to a large degree and you will get many more years use out of your deck. Besides, in my opinion, it looks better this way.

It is more time-consuming however because when you are laying the deck boards you need to run them to the corner at 45º. You also need to make sure that your joists or batons you have laid prior to laying your deck boards are exactly 45º because if this is out then the point in the deck surface where the boards meet will also not be 45º and will result in one side of the deck being wider than the other. So lay your joists very carefully to ensure this problem does not occur because having to re-do work a second time takes a lot longer than planning it correctly the first time. If the substructure is perfect, or near perfect,

then cutting the deck boards for the join will be easy as you can set the saw to 45º and cut. But check as you are going that it is not running out because a slight deviation in the joist will result in the cut needing to be a few degrees bigger or smaller than 45º. If need be shim the side of the joist to keep your join 45º.

The pot plants that you see on the raised deck are actually part of a water feature below the deck and we have decked around them. They do not sit on top and the water flows down the pots back under the deck and into the pool. There is also a rim feature below the front face of the raised deck so that water flows into the pool from under the deck. Trap doors are a necessity in pool decks, as one often needs to gain access to pipes and filters below the deck surface.

There is a rim or fascia board attached to the inside of the joists or deck boards to complete it by covering the gaps below the deck itself. This should always be set as high as possible to avoid as much contact with water as possible, but yet still cover and substructure below the deck boards.

This deck was finished using our normal Timberlife Satin Wood Base 28 with a Mahogany tint, but because the deck boards were a bit lighter in colour to other decks we have done it resulted in a more reddish / orange colouration.

This deck totalled about 50m². It is always deceiving to try to estimate a pool deck size as it always looks a bit smaller than it actually is. It is always a good idea to measure it accurately before starting to avoid a budget over run.

For a free no obligation quote please contact us on 082 496 5444 or use the contact form below.

← Back

Thank you for your response. ✨


Wooden Deck Built with Guarantee in Durban

Wooden deck guarantee

Click to enlarge

As mentioned in some of my other articles we started offering supplier guarantees on our H3 CCA Treated pine substructures. These guarantees can run for up to 50 years from the date of installation. They are guaranteed by the manufacturer of the chemicals used in the treatment process and are underwritten by one of the large insurance companies. Provided certain building techniques are adhered to and the company treating the timber has treated it correctly, the manufacturer of the chemicals is willing to guarantee the timber against various forms of rot and various types of insect infestation for up to 50 years.

One of the conditions is that the end-user, being you the client, needs to register the build with the manufacturer within 60 days of completion of the build. The registering of the build needs to be done in a certain format and details such as when the timber was purchased, where it was purchased from, ERF number etc. needs to be submitted to them together with proof, in the form of photographs, of the building methods we used whilst building the wooden deck.

We need to treat the cut ends of the timber with an approved end sealer, we need to ensure that we are using H3 for timber above ground and H4 for timber in ground or in constant contact with wet soil and we have to show that we have planted our posts according to the recommended method.

Wooden deck guarantee

Click to enlarge

We at The Wood Joint offer to facilitate this process for you, for a small admin fee, so that you may activate the guarantee with them. We take pictures of what we are doing to prove that we have used end sealer and adhered to their criteria. Once the build is finished we compile the report that will be sent to them, by you, to register the build and activate you guarantee. We can also assist in submitting it on your behalf.

In the pictures alongside you can see the end sealer we are using which is a diluted version of the same chemical that is used in the treatment process. This applies to all cut ends and drilled holes. The greenish colour is due to the copper in the solution which prevents algae growing on the timber which can cause rot.

We also take pictures of us planting the posts or poles so that it is clear we have planted them correctly. When one plants a post, it should always be placed on top of soil and then concrete placed around the post. If you wish to place it on top of concrete than that concrete should be allowed to set completely before placing the post and setting it in concrete. This is to allow any water that does get into the post to escape through the bottom of the post. If a post is set on top of wet concrete it will slow the escape of water through the pole and this will speed up the rotting process from within the posts. I’m sure you’ve seen some gum poles that have rotted from the inside out. This is because they have probably been set on top of wet concrete.

Wooden deck guarantee

Click to enlarge

We also take pictures of the red SABS / SANS stamps on the timber so that it can be proved that the correct Hazard Level was used for the correct application, H3 for above ground and H4 for in the ground.

Both SABS and the company manufacturing the chemicals regularly, and unannounced, check on them and run test to ensure that their timber is being treated correctly. Pine cannot be treated in the same chamber as saligna (poles) for instance as the absorption rates of each timber are different. The timber needs to be treated at a certain pressure and the solution needs to be of a certain strength to arrive at the different H levels. This is tested by coring a section of the timber out, after treatment, and measuring the amount of timber the chemical has penetrated. They also use a dye to determine if the solution was of the correct strength. So it is important that this CCA treated timber is purchased from a reputable supplier.

Over and above this info we need to report on where the timber was purchased, when it was purchased, who treated it and so on. With all this information on hand, you the client, can register your build with the manufacturer and be rest assured that you substructure is safe for 50 years.

For a free no obligation quote on your wooden decking needs, please contact us on 082 496 5444 or use Wooden deck guarantee

Click to enlargethe contact form below.

← Back

Thank you for your response. ✨


Removing Carpet Glue from Solid Wooden Floors

Removing floor adhesive

Clik to enlarge

A major problem that one encounters when refurbishing old wooden floors is that of carpet glue. When these floors were first covered by carpets, back in the day when thick pile carpets were popular, they used carpet glue to stick the carpets down. The good news is that it can be removed successfully. The majority of it needs to come off before sanding the floor otherwise the sand paper will get clogged which will result in a higher cost of consumables as well as time in changing the paper more often. With a bit of time and the right tools and substances the job can be done quite quickly.

The glue that will have been used will either be a tar based substance or a general carpet adhesive. Most older houses will have used a tar based substance and newer houses a general purpose carpet glue. Tar based glues will have a tan to dark brown appearance whilst general purpose glues will be yellowish in colour. The process is very similar but the materials used will differ and it is important to choose the correct one so as not to waste time and money.

Tar based glue is best removed or loosened using mineral spirits which is readily available at any hardware store and is inexpensive. General purpose glue is best removed using a modern-day adhesive remover also available at your local hardware store. If you are a contractor, I would suggest sourcing the supplier, as this will reduce your cost significantly. Follow the instructions carefully as they will be pretty thorough and will explain how each product works best. Both products will be applied using either a sponge or roller and enough time needs to be given to allow it to do its magic. It is a very similar process to removing paint using paint stripper.

Removing floor adhesive

Click to enlarge

Once it has done its magic, use a plastic putty knife or similar to scrape and loosen the glue. Don’t use a steel knife as this can leave deep marks and gouges in the wood, making your sanding job a lot harder.

Once the bulk of the glue has been removed soak a rag in the mineral spirits or adhesive remover and rub the floor to remove the last bit. If you find that you have stubborn areas you can use a steel knife but be careful not to damage the floor or yourself.

The floor should now be left to dry completely. Leave the widows open too to get good ventilation and speed up the drying process. Check on the instructions if you can use water to clean it or not, although this will probably not be necessary as you are still going to sand it.

Your floor is now ready to be sanded smooth before re-sealing. Always take precautions and work in well-ventilated areas when using an adhesive remover as these substances can be very harmful. Always read the manufacturer’s instructions and take heed of their precautions. They know their product better than anyone.

Removing floor adhesive

Click to enlarge

You can search this blog for tips on sanding and sealing your floor by using the search bar on the top right.

For a free no obligation quote on your entire flooring or decking needs please feel free to call us on 082 496 5444 or use the contact form below. You’ll be surprised on how much you can save by getting a professional in to do the job.

← Back

Thank you for your response. ✨