Wooden Decks Durban – Verulam

Wooden decks Durban

Click to enlarge

We recently had a good run of building wooden decks in Durban. With the arrival of summer and Christmas, wooden decks in Durban become a very popular item for consumers to spend their hard-earned cash. Despite trying to get jobs confirmed earlier on in the year, most of our work was confirmed in November and hence we have been running 2 to 3 sites simultaneously. It’s no easy task with the size of our current crew, but we were lucky enough to have most of them take place north of Durban in Durban North, Umhlanga and this one in Verulam. We rented an old beach cottage near Ballito and stayed there with our full crew for 3 weeks so that we didn’t need to fight traffic in the mornings or afternoons and drop and pick up staff in various different areas. However the traffic in Umhlanga and that whole north of Durban area is beyond ridiculous so it still took us hours to get “home” each day. This coupled with the fact that we had a lot of work to get through, made for very early starts and very late finishes.

Wooden decks Durban

Click to enlarge

Wooden decks Durban

Click to enlarge

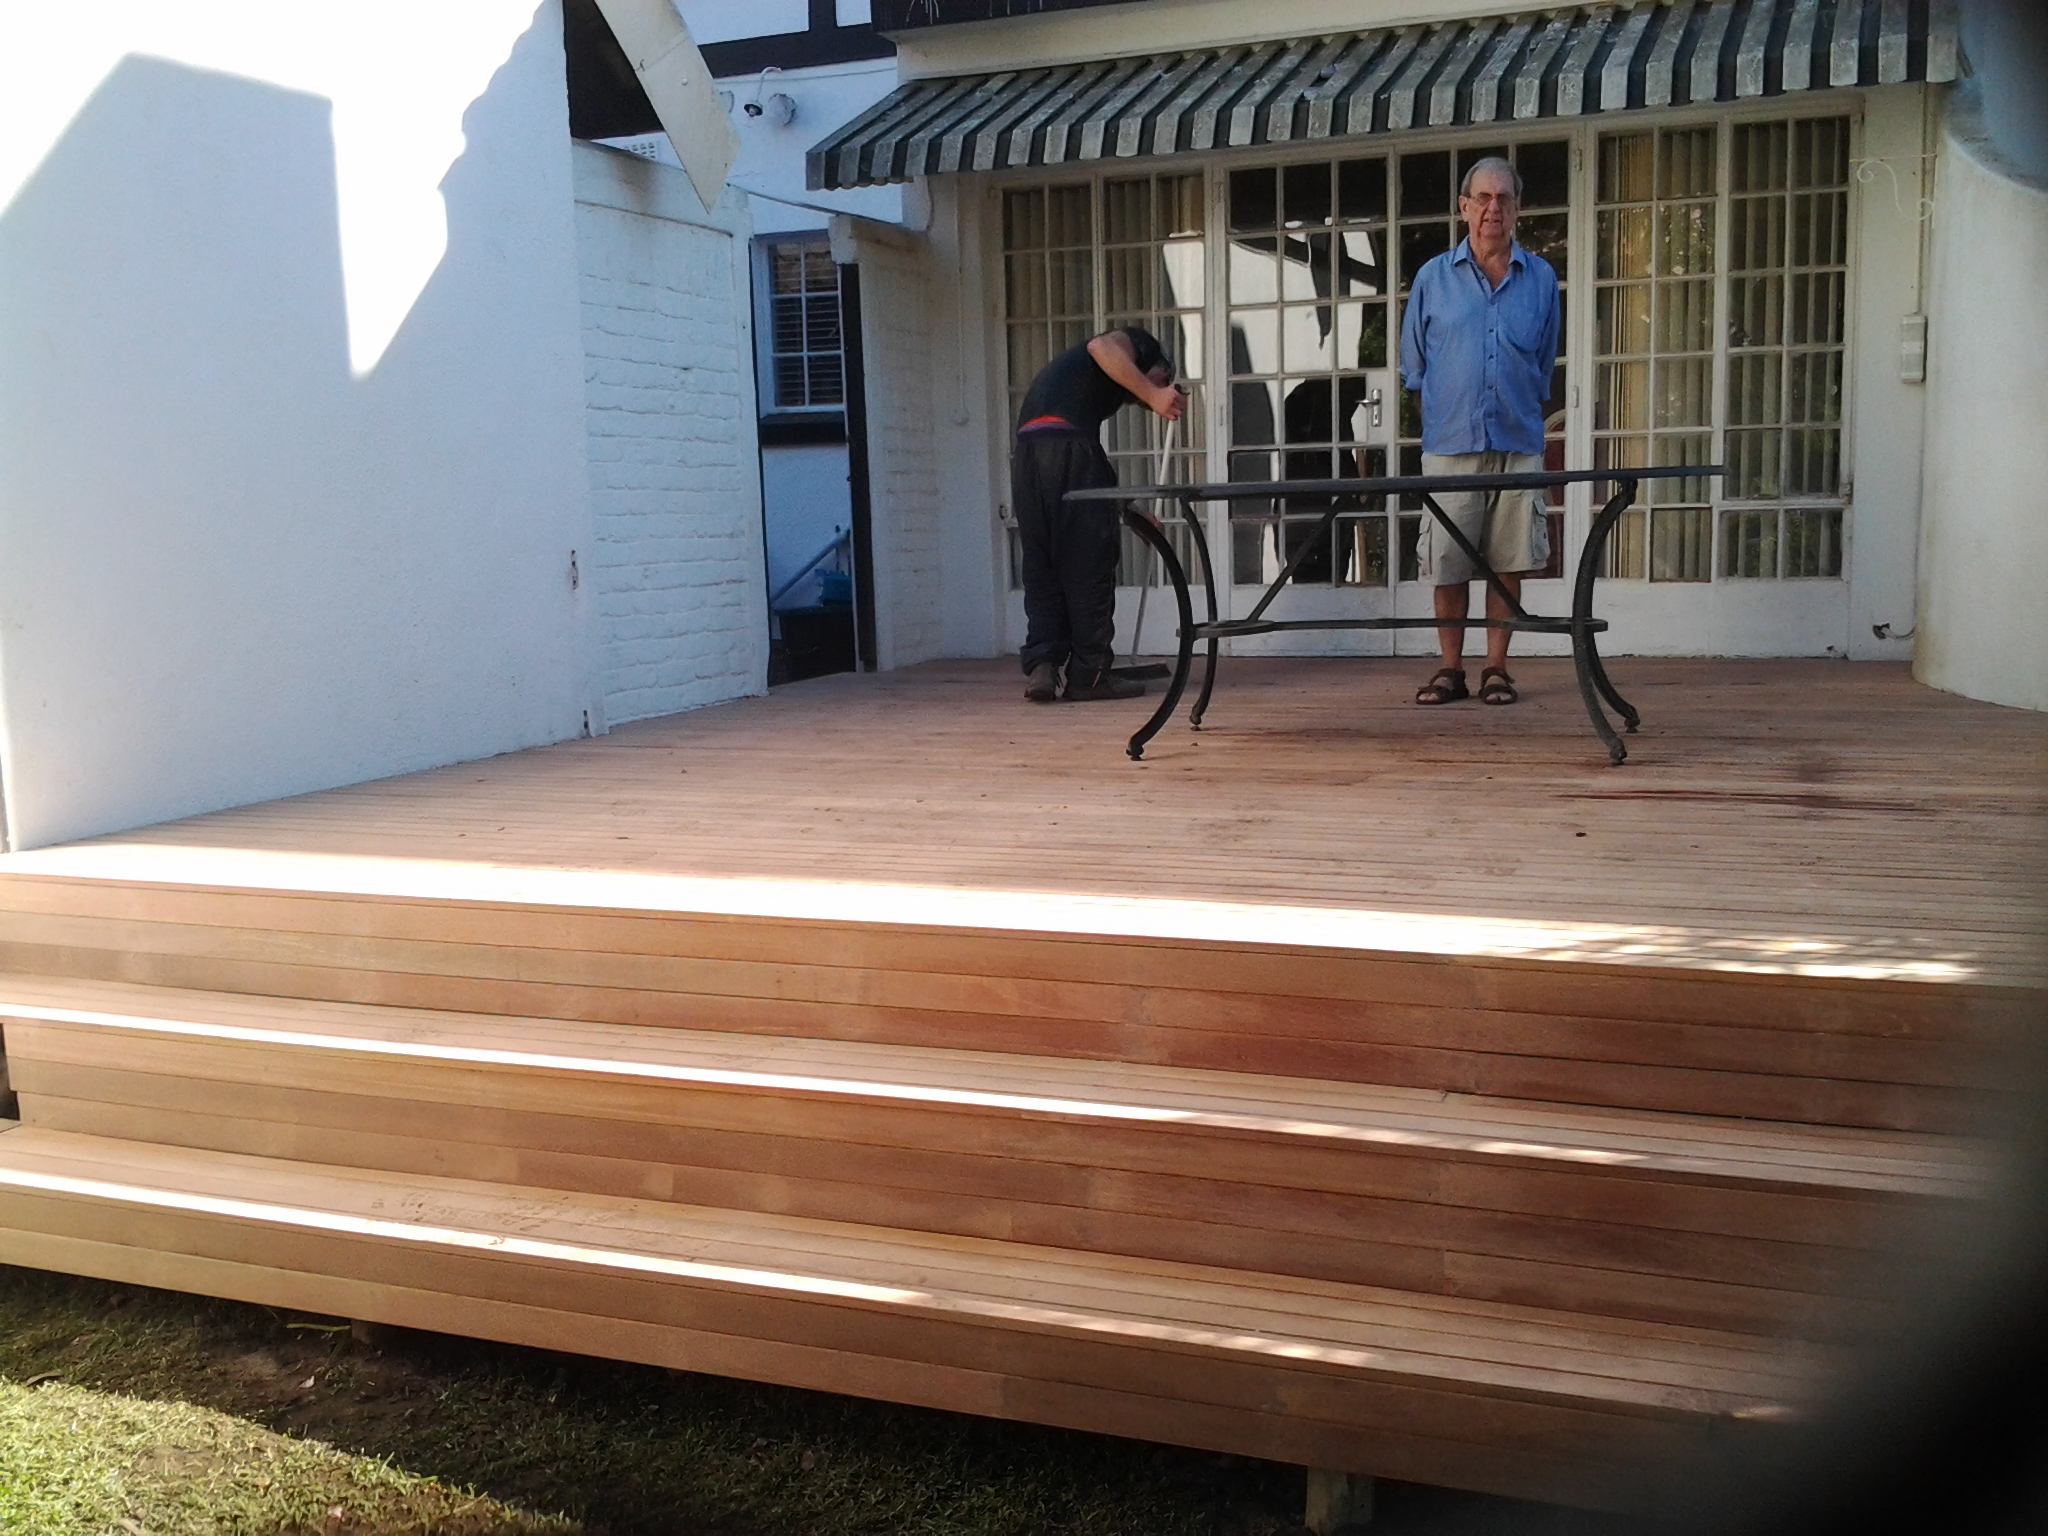
The pics alongside are work in progress pic and I will update then once we have sanded and sealed the deck.

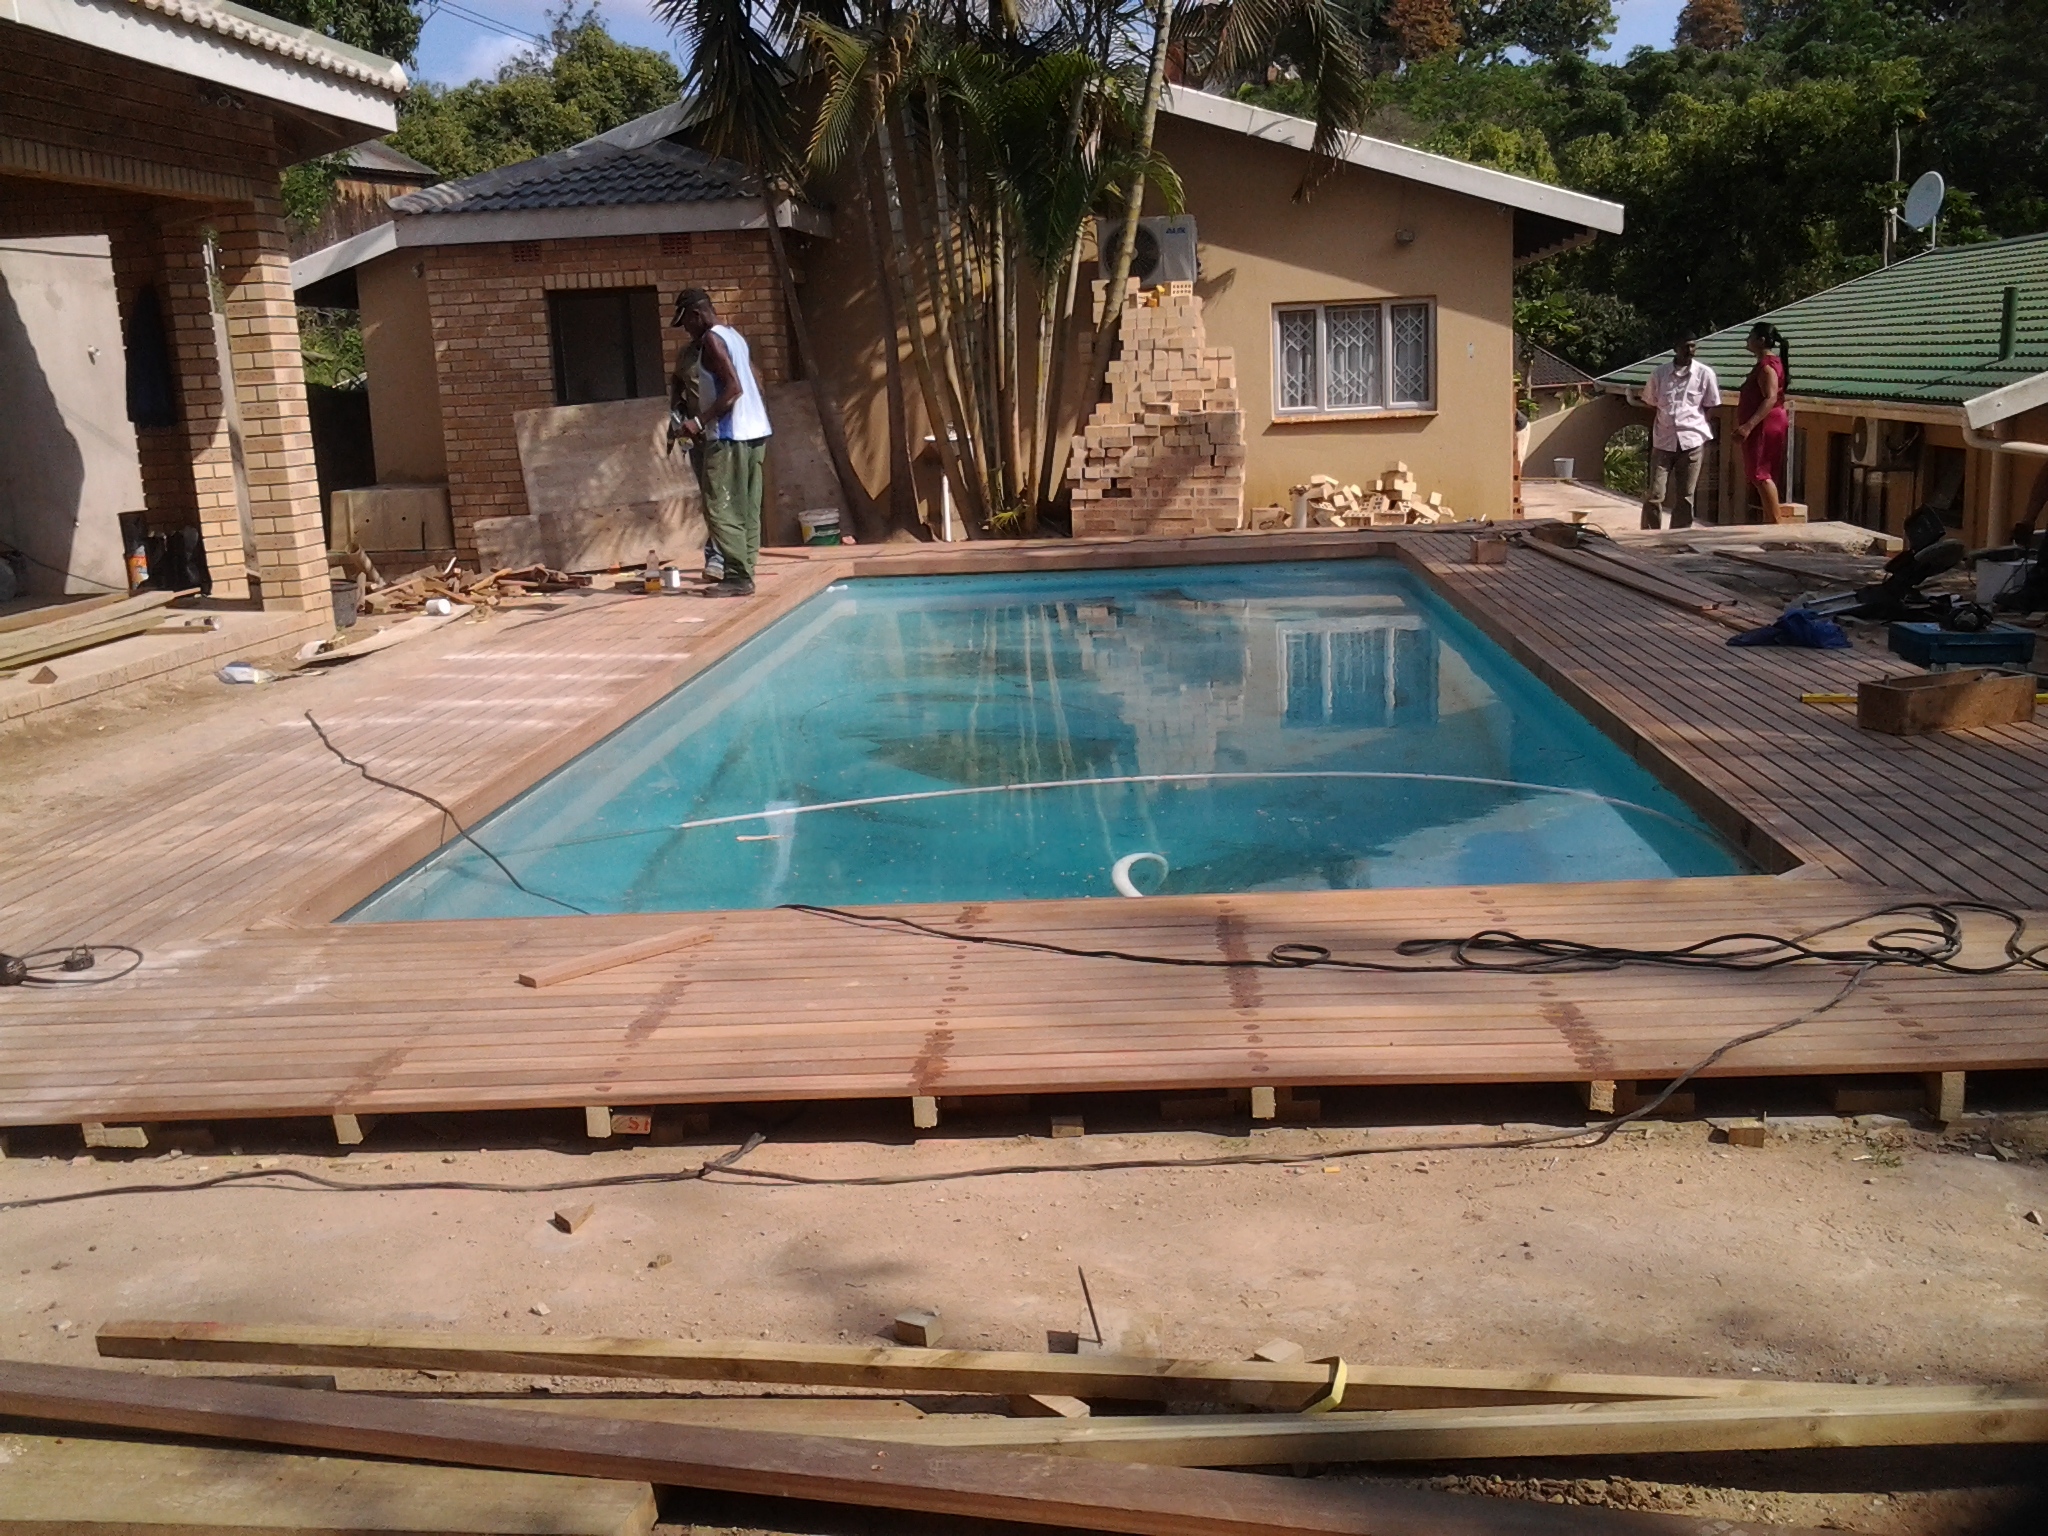
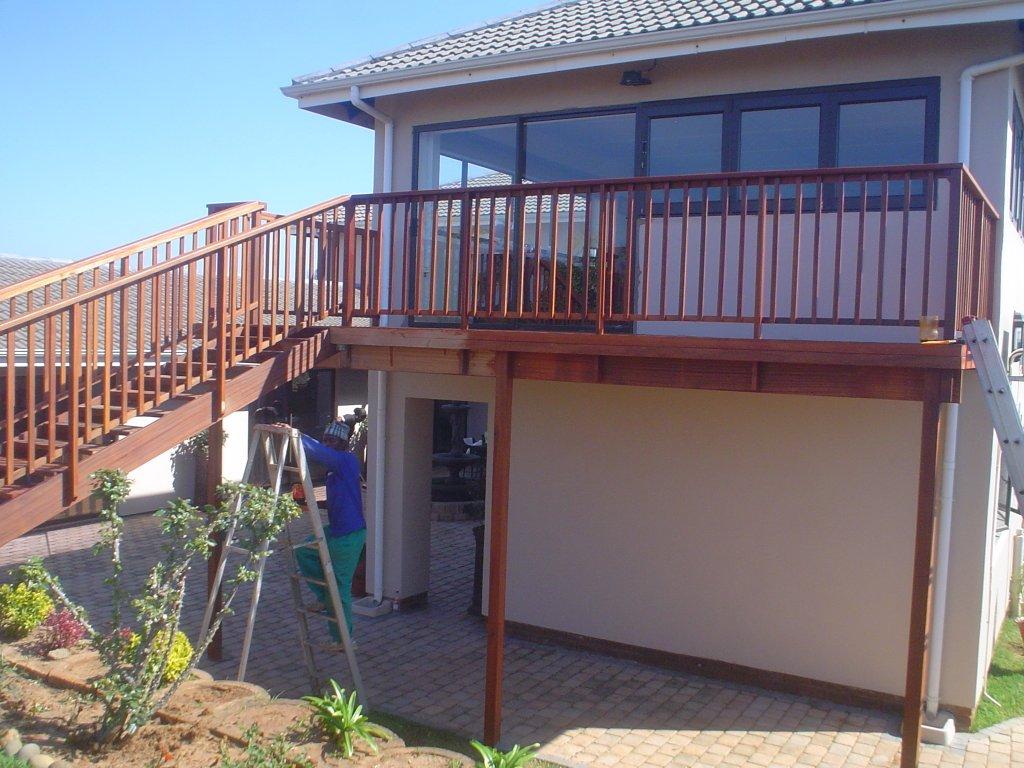
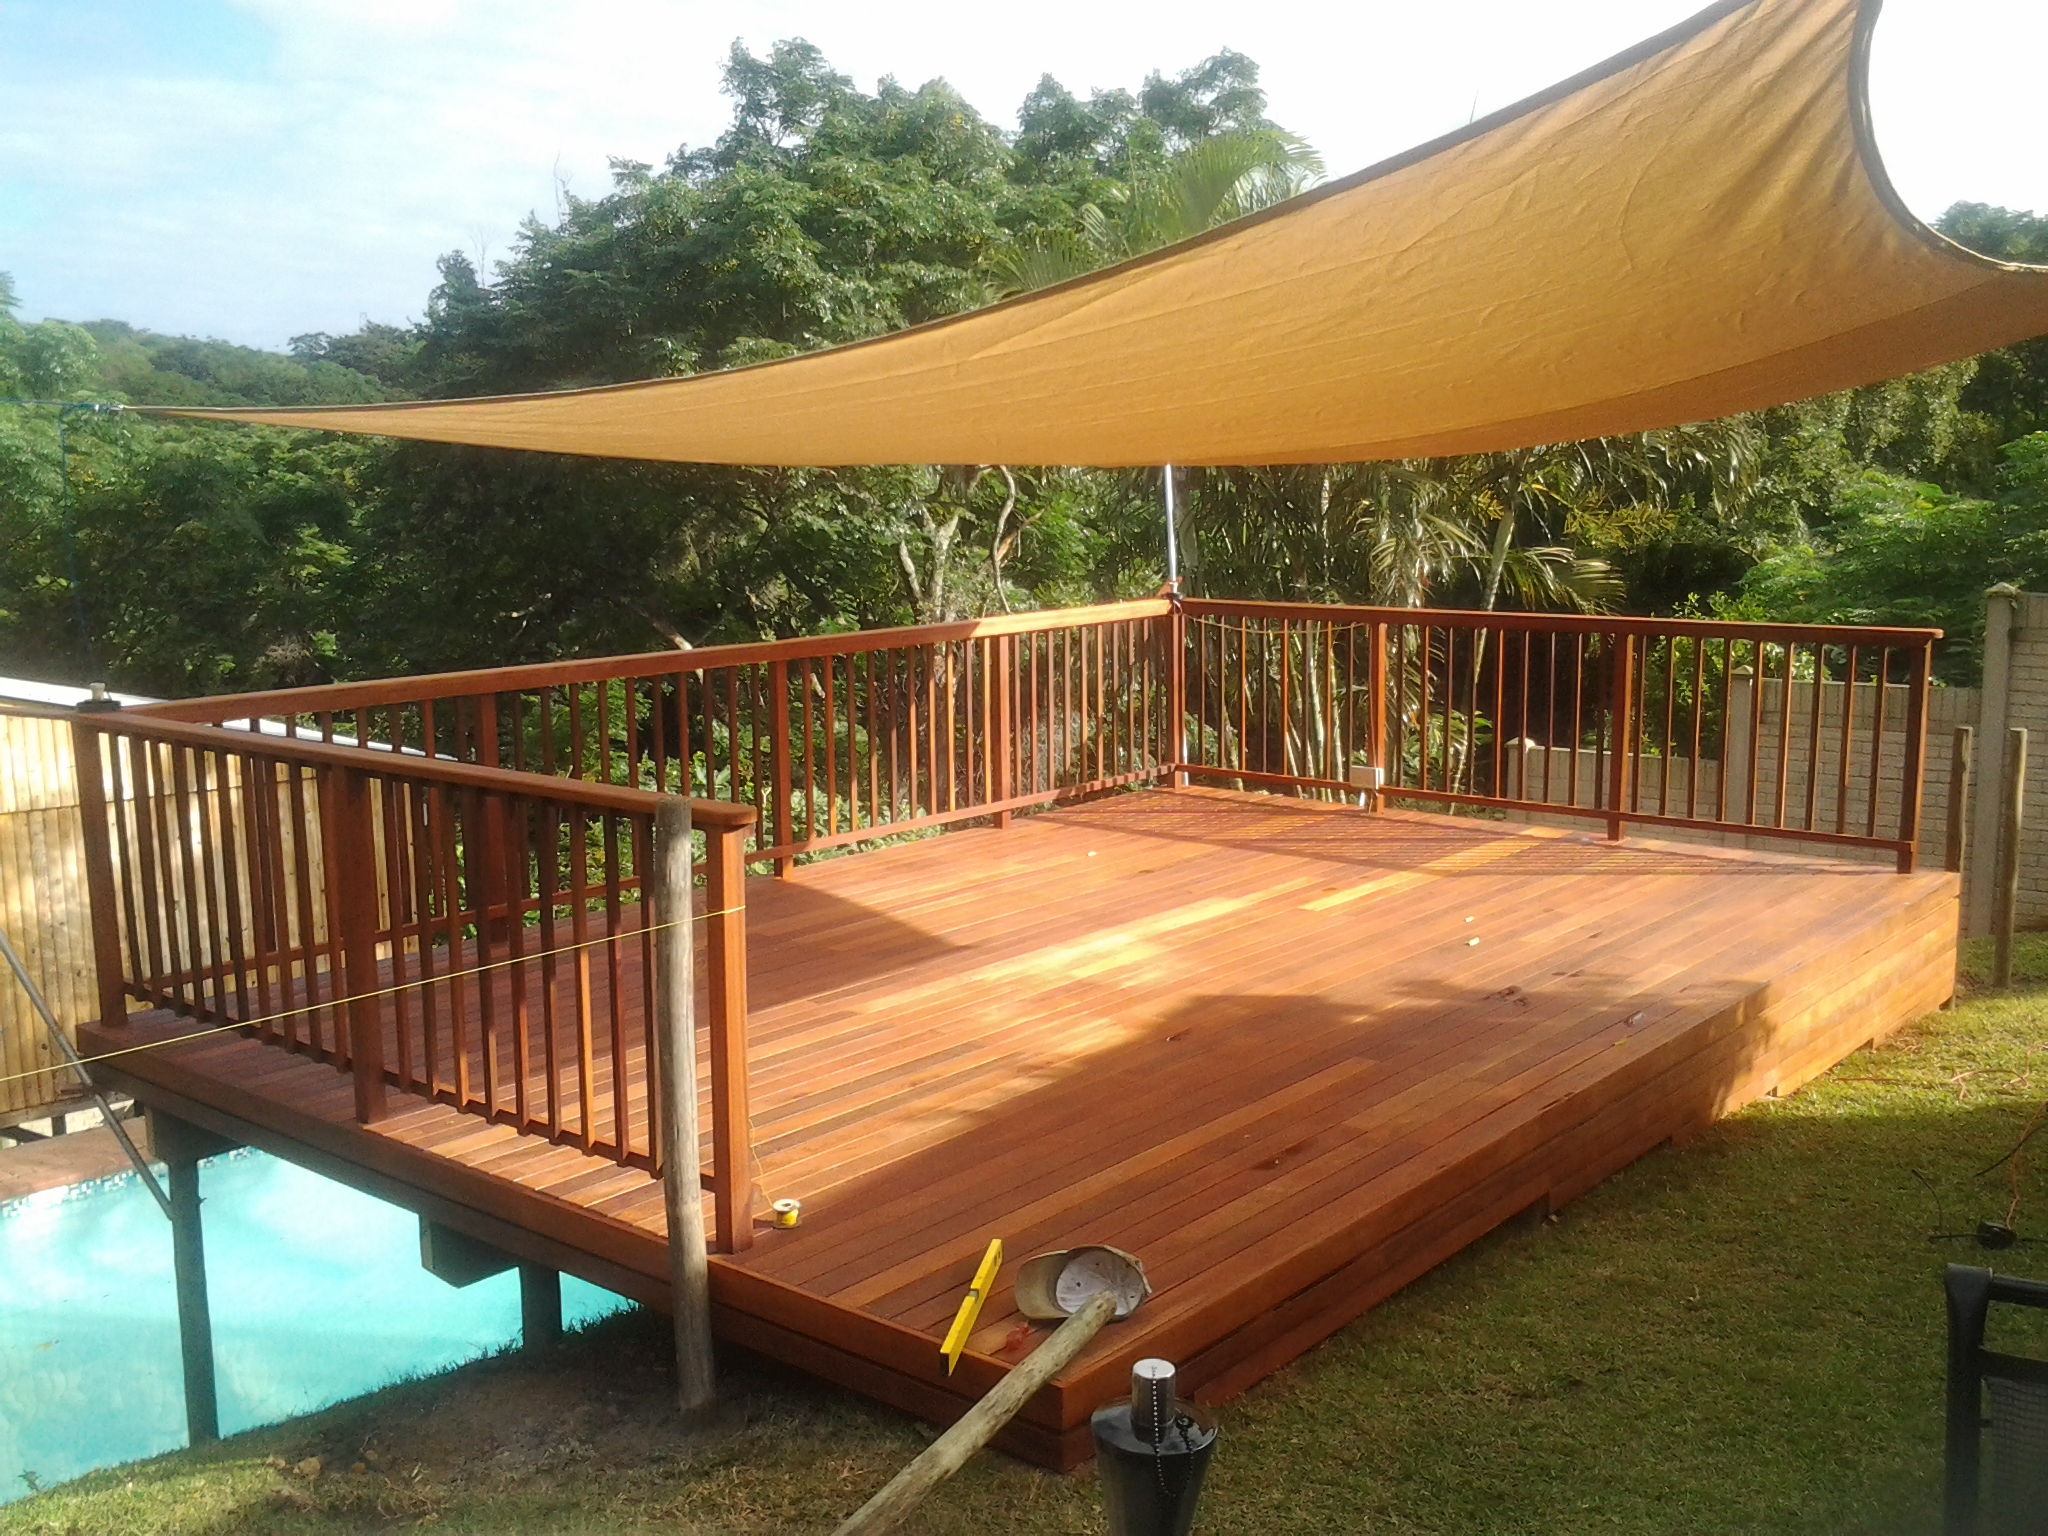
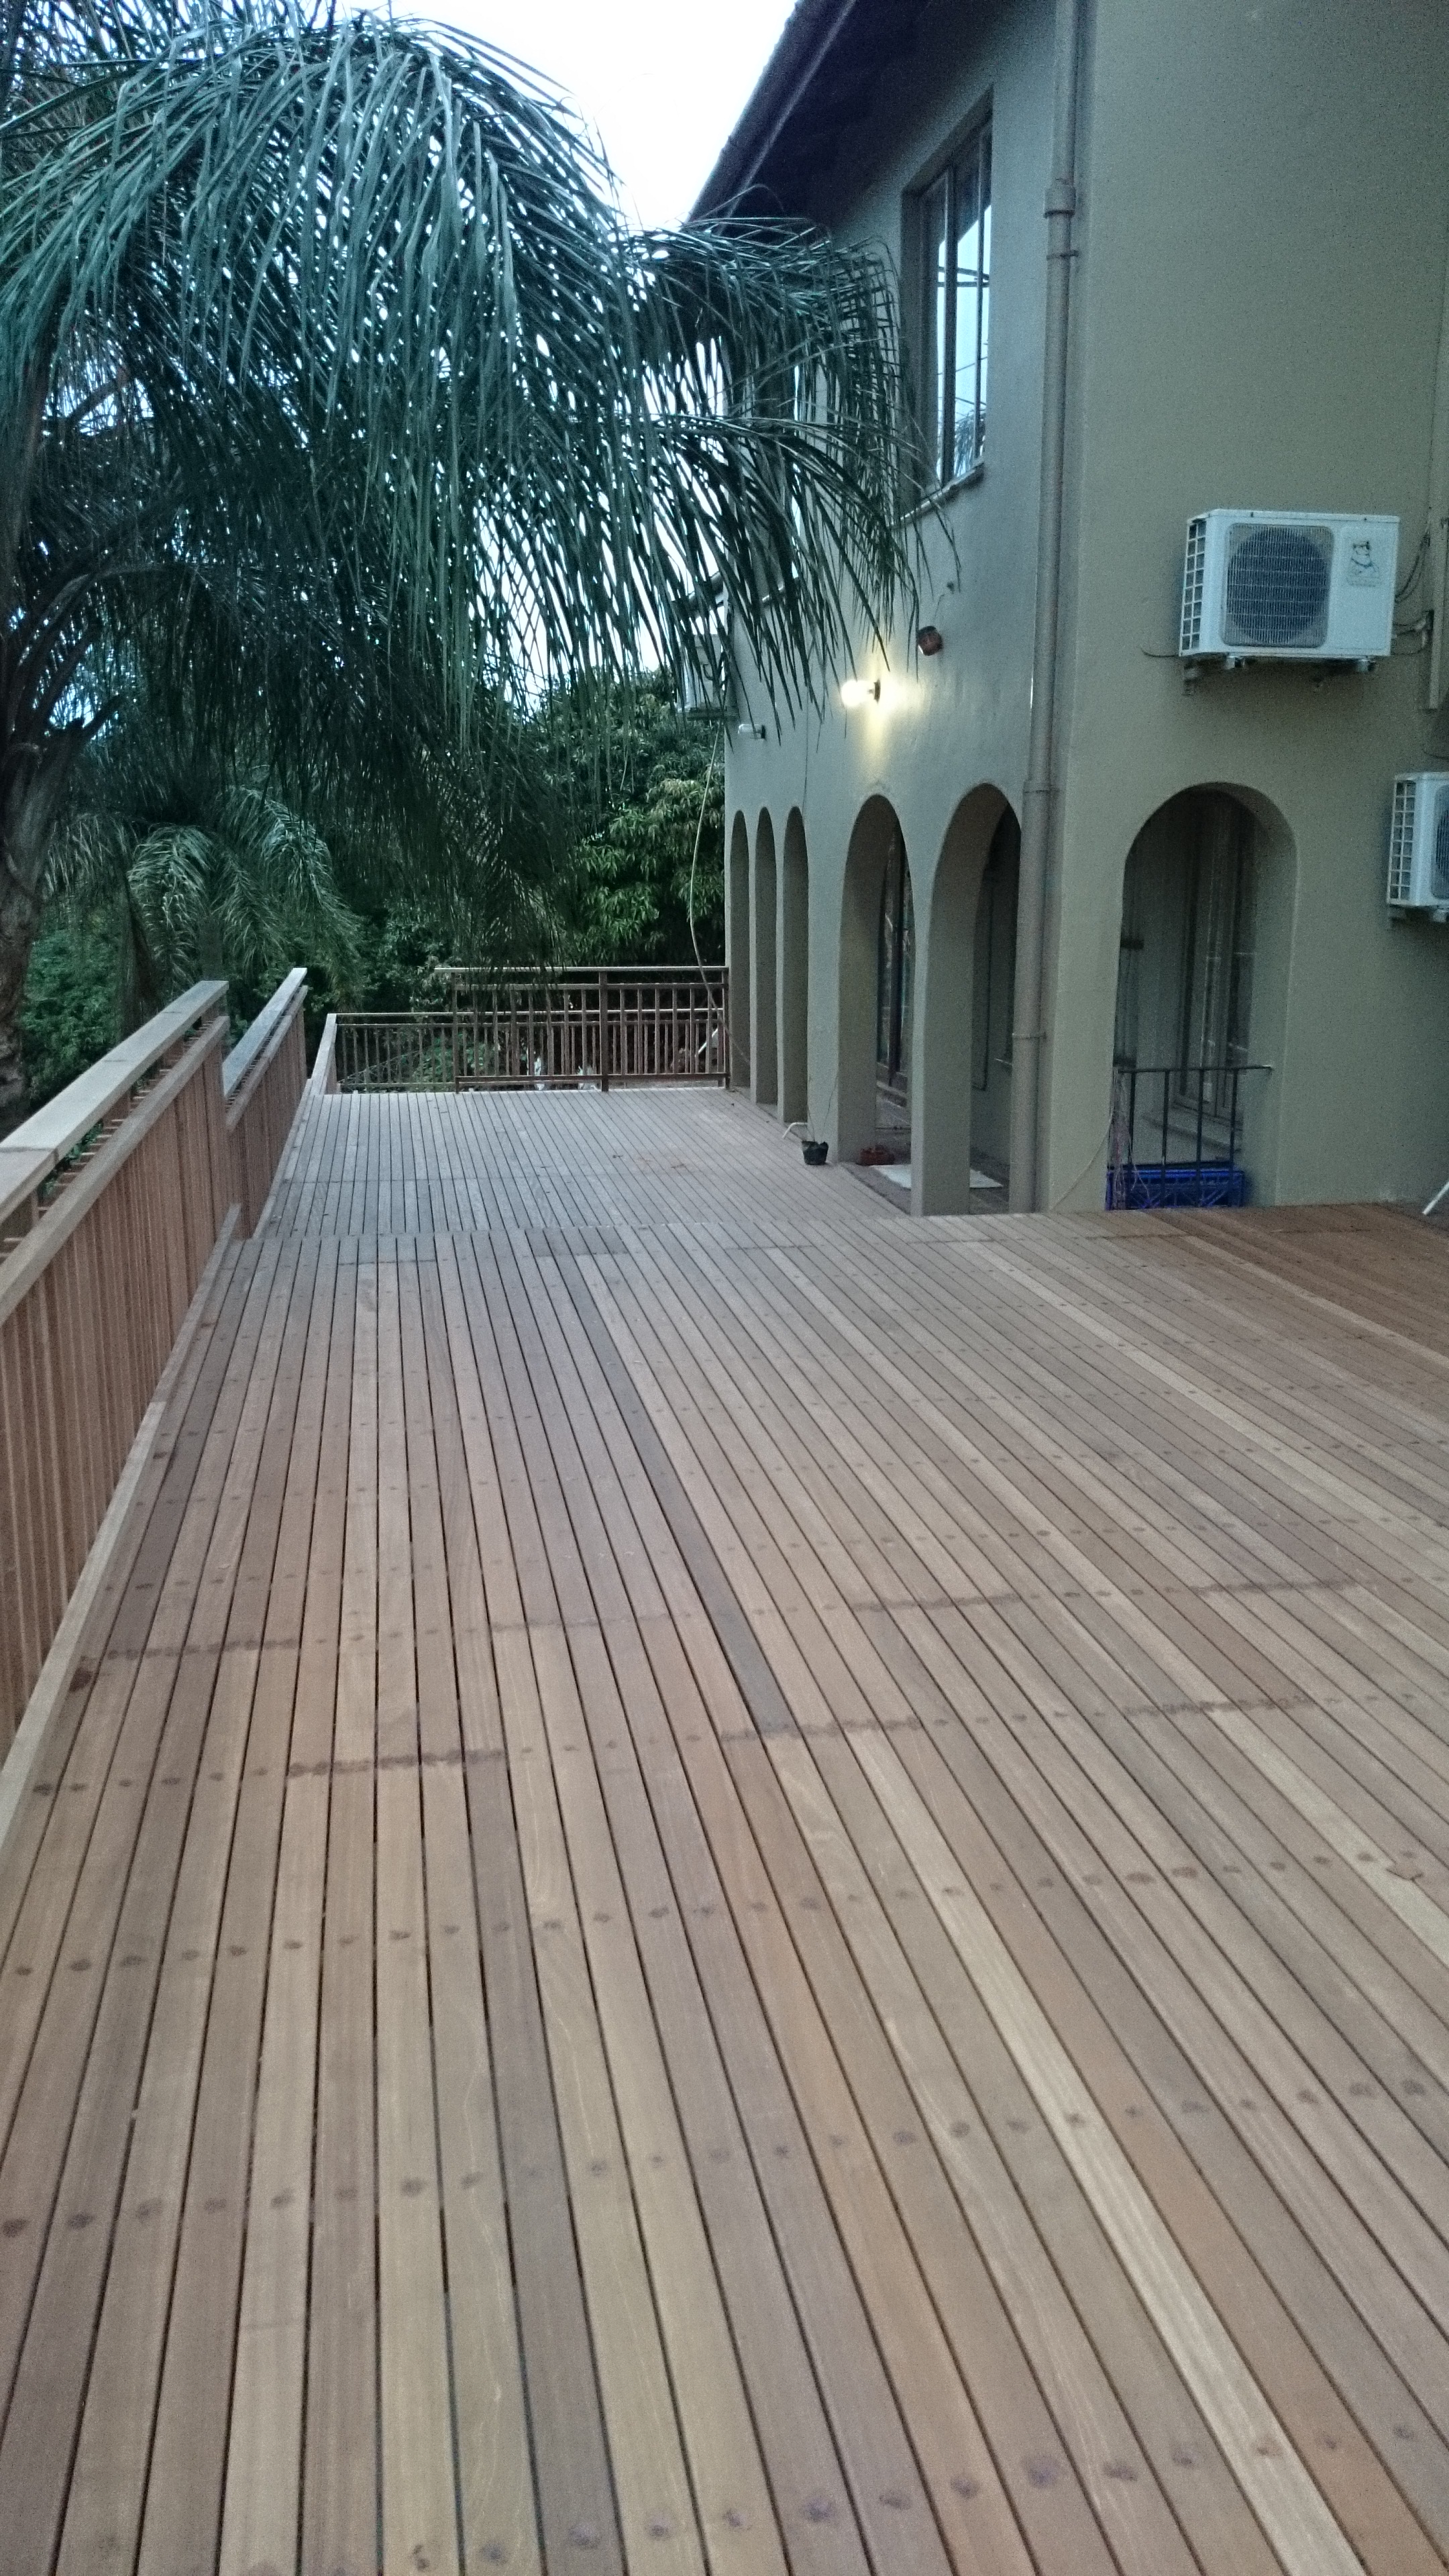
This job in Verulam was at a complex and this part of the complex consisted of 6 units. We built 3 wooden deck sections, each of about 45m². There was a wooden balustrade on the front of it and on the two ends or sides. The drop down from the first section of wooden deck was about 450mm so we created a step along the entire width of the deck with closed risers. For these closed riser steps we use a mini substructure and then deck it using the standard 19 x 68 balau deck boards. It then becomes a sort of bench as well as a step down.

Wooden decks Durban

Click to enlarge

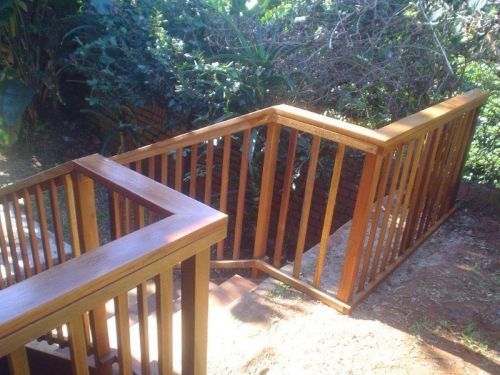
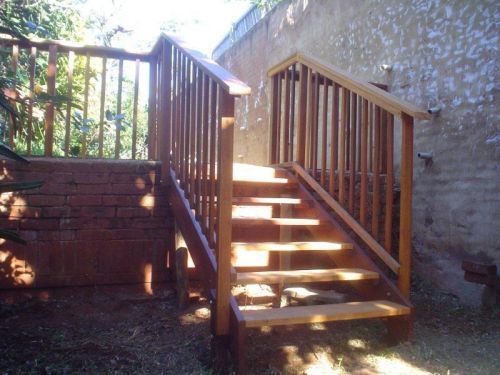
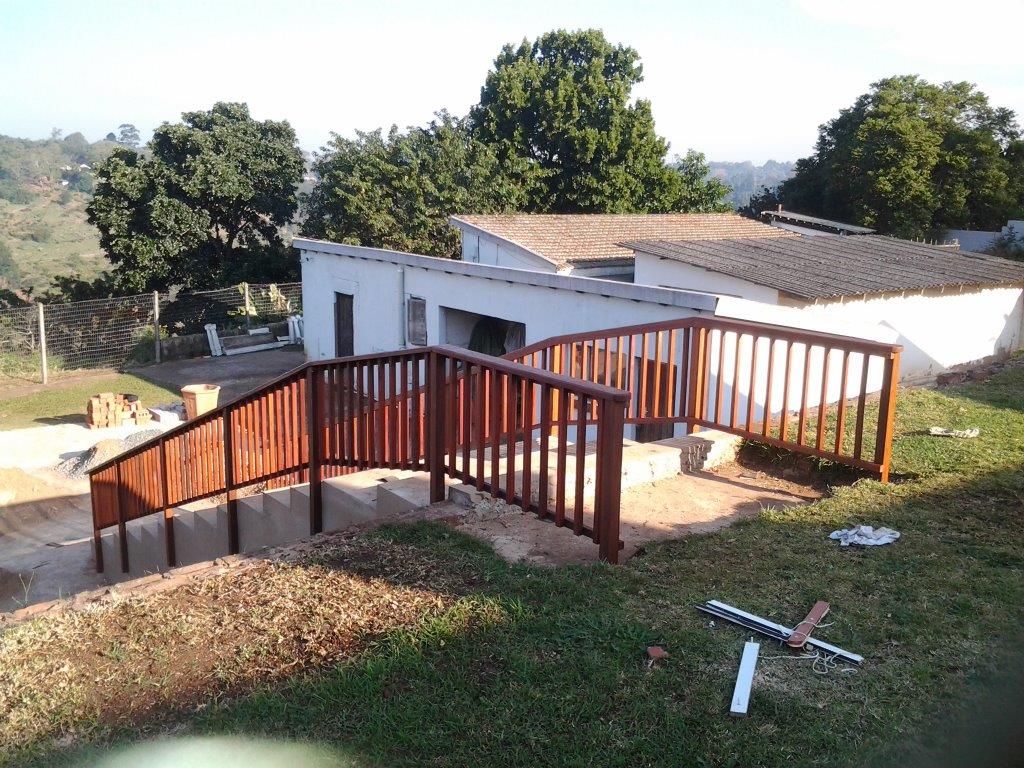
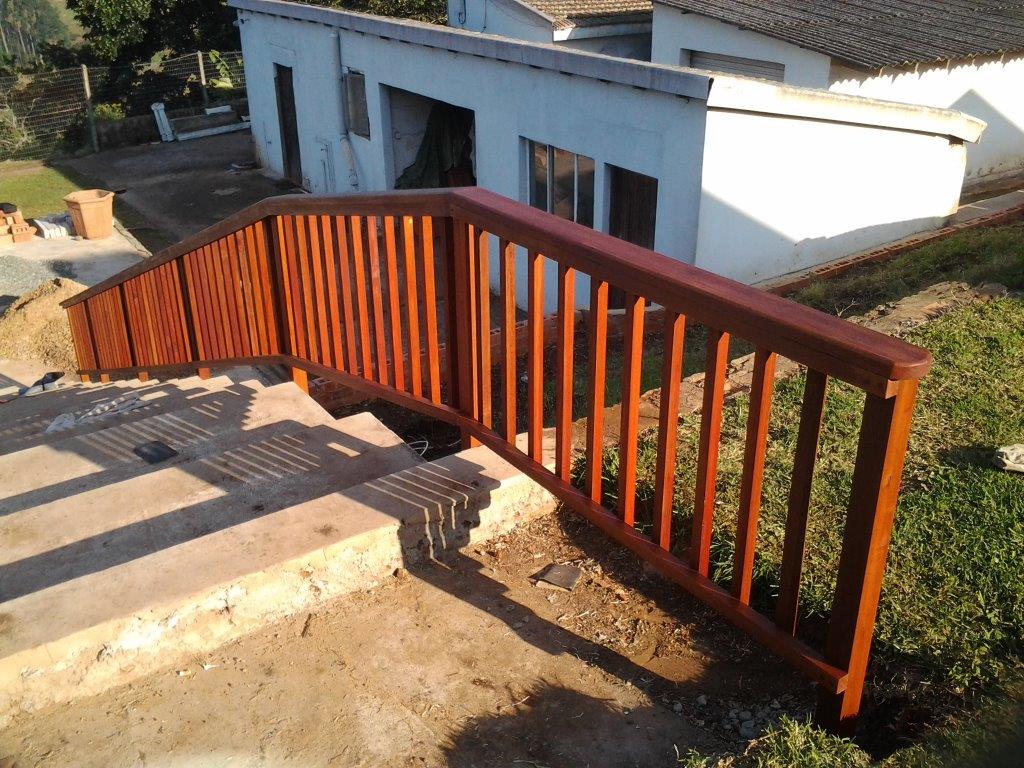
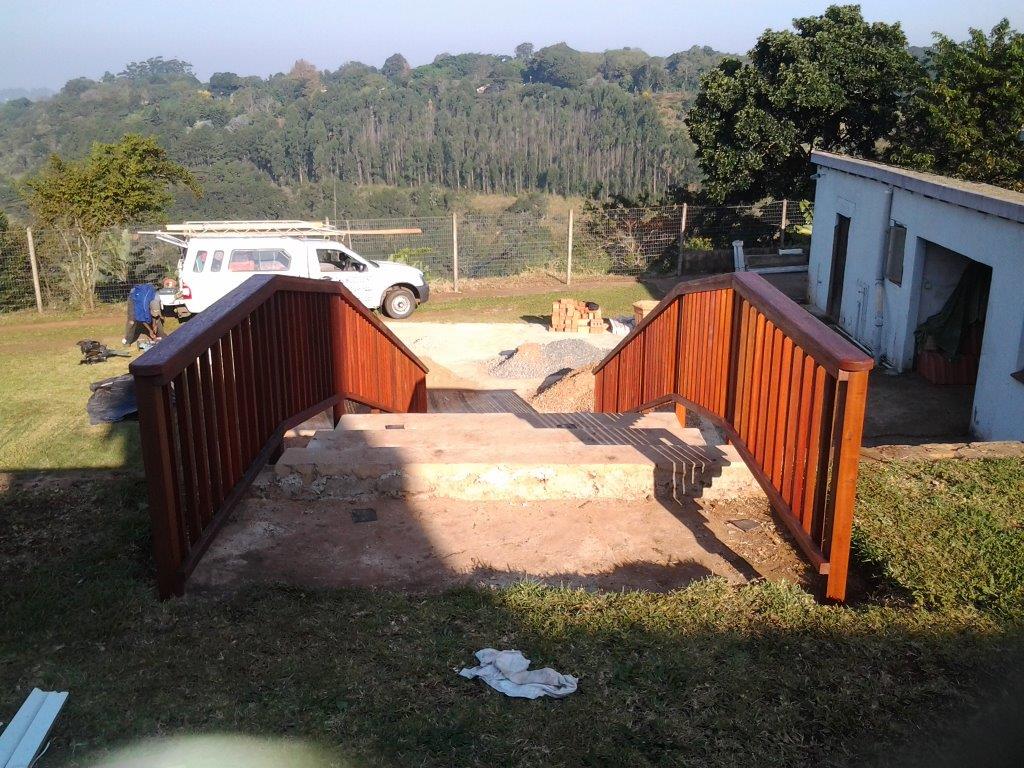
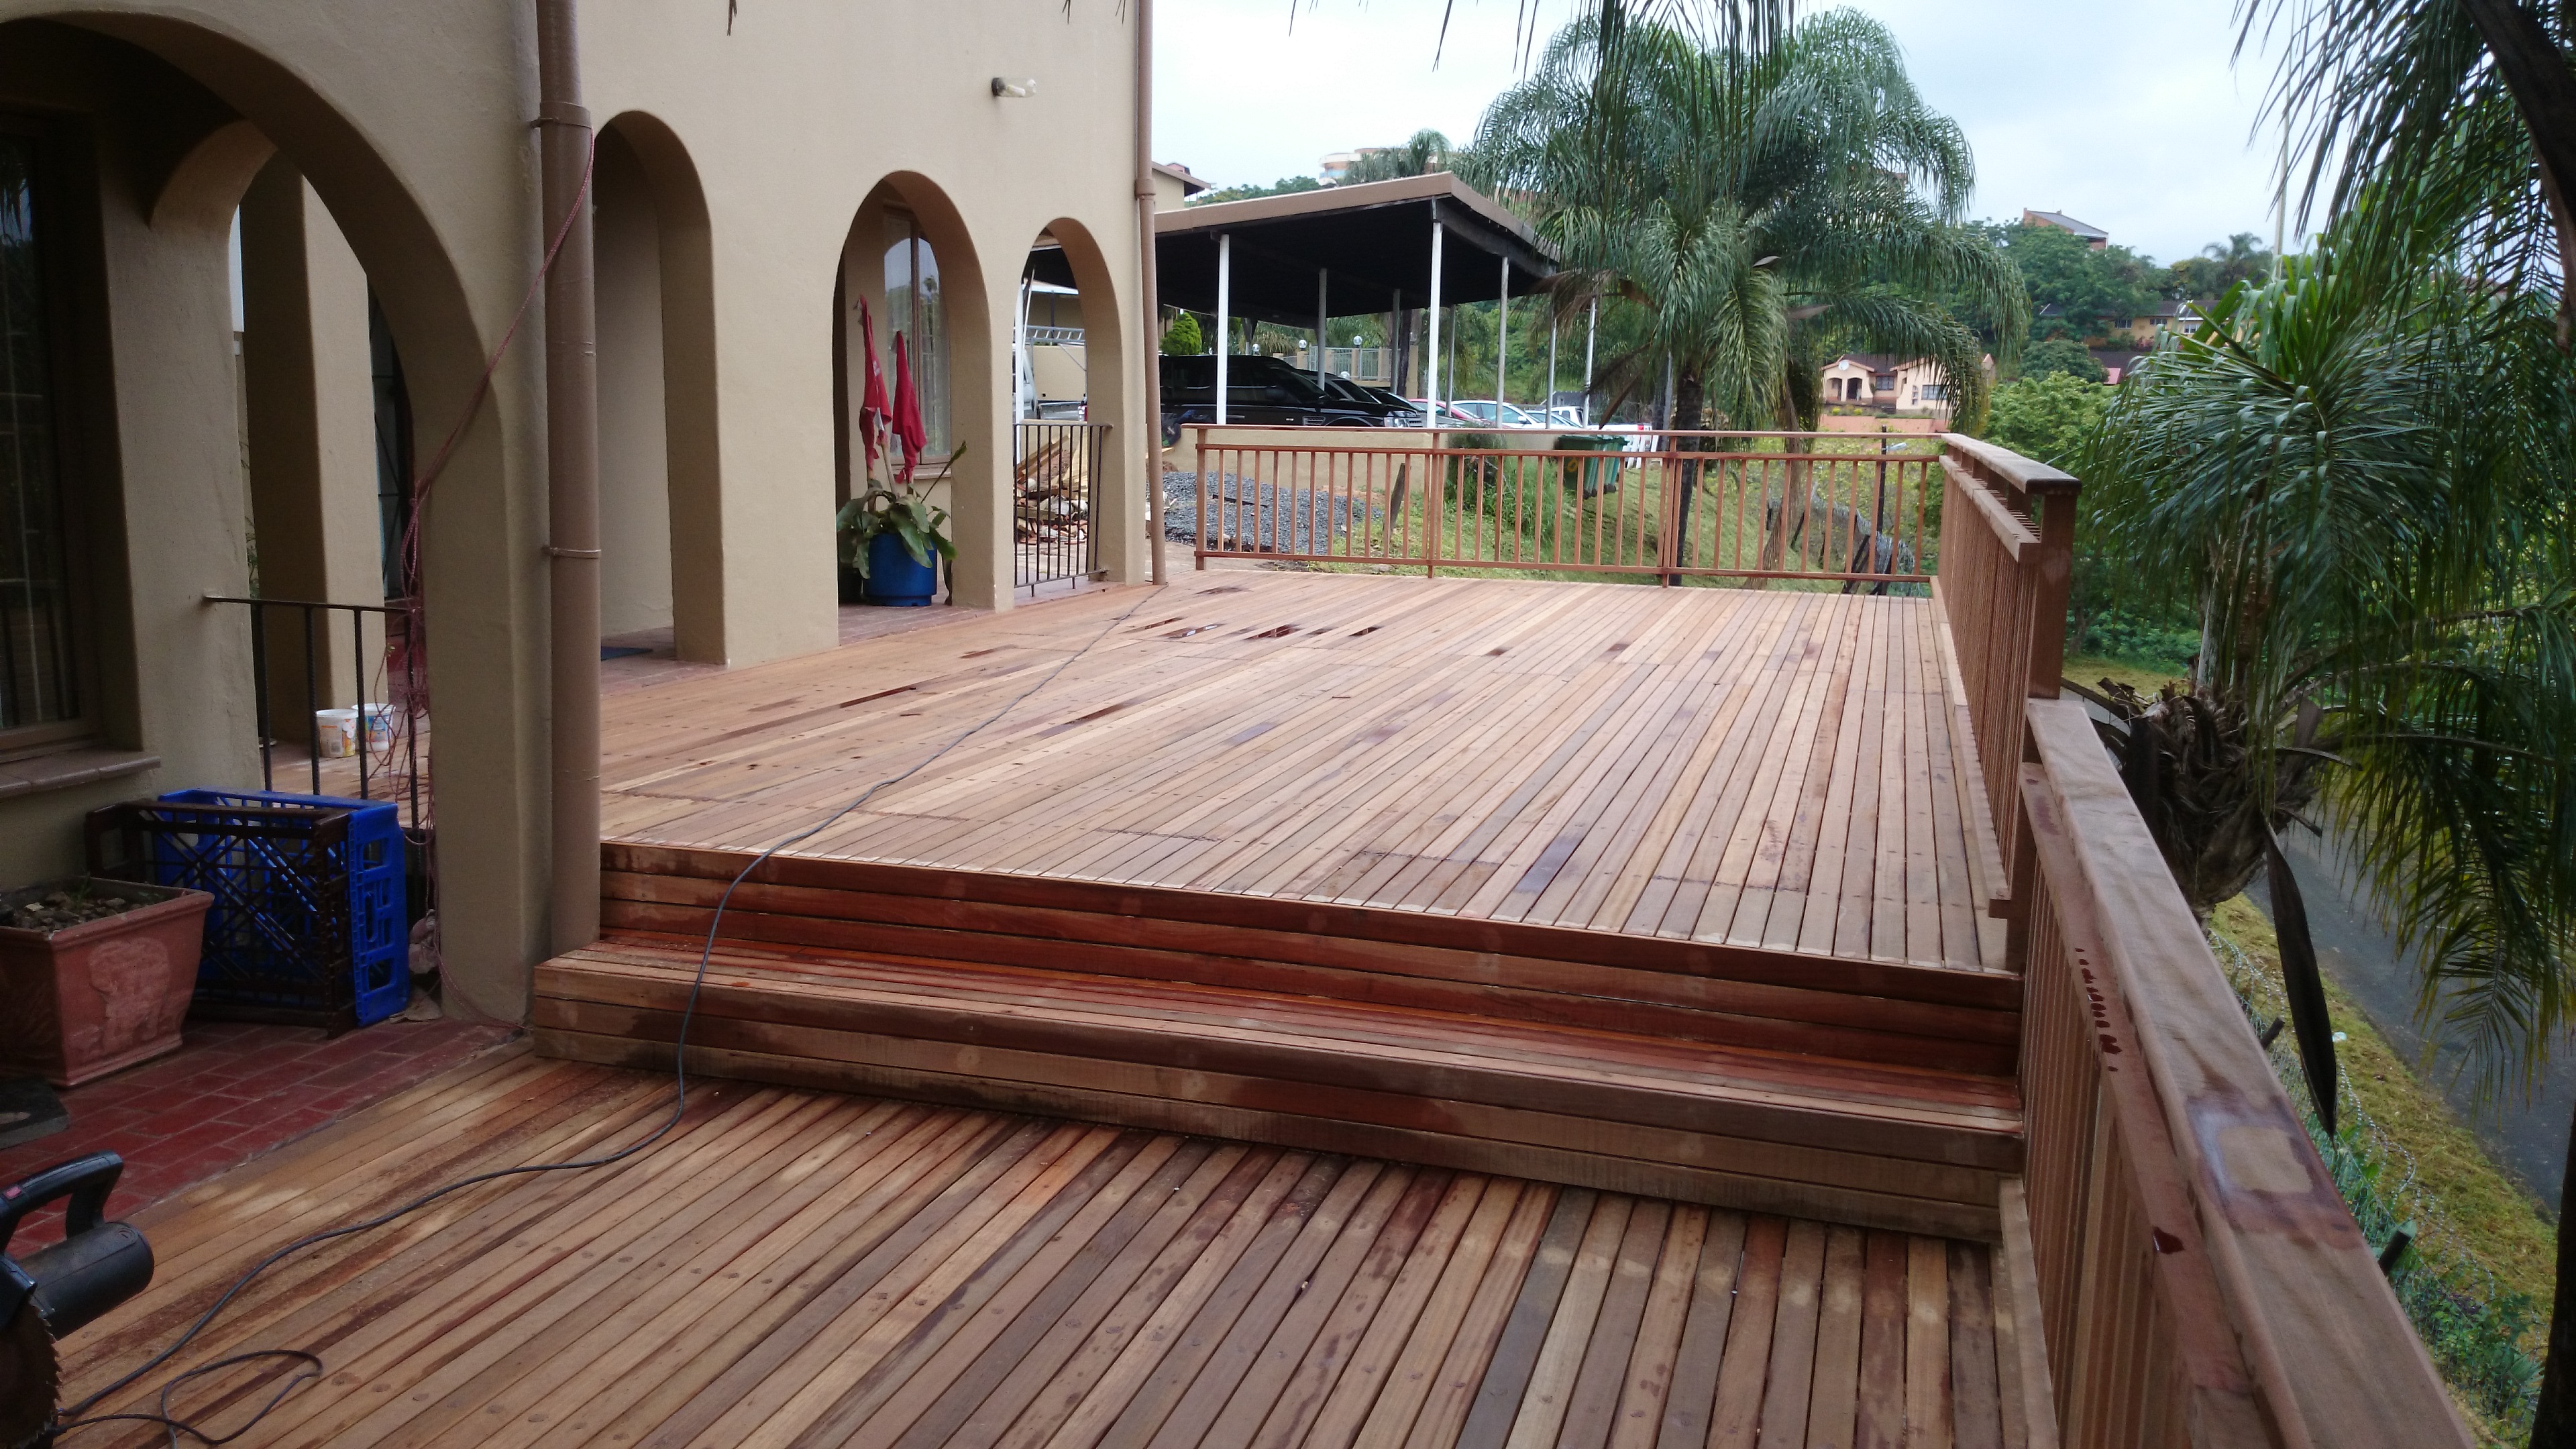
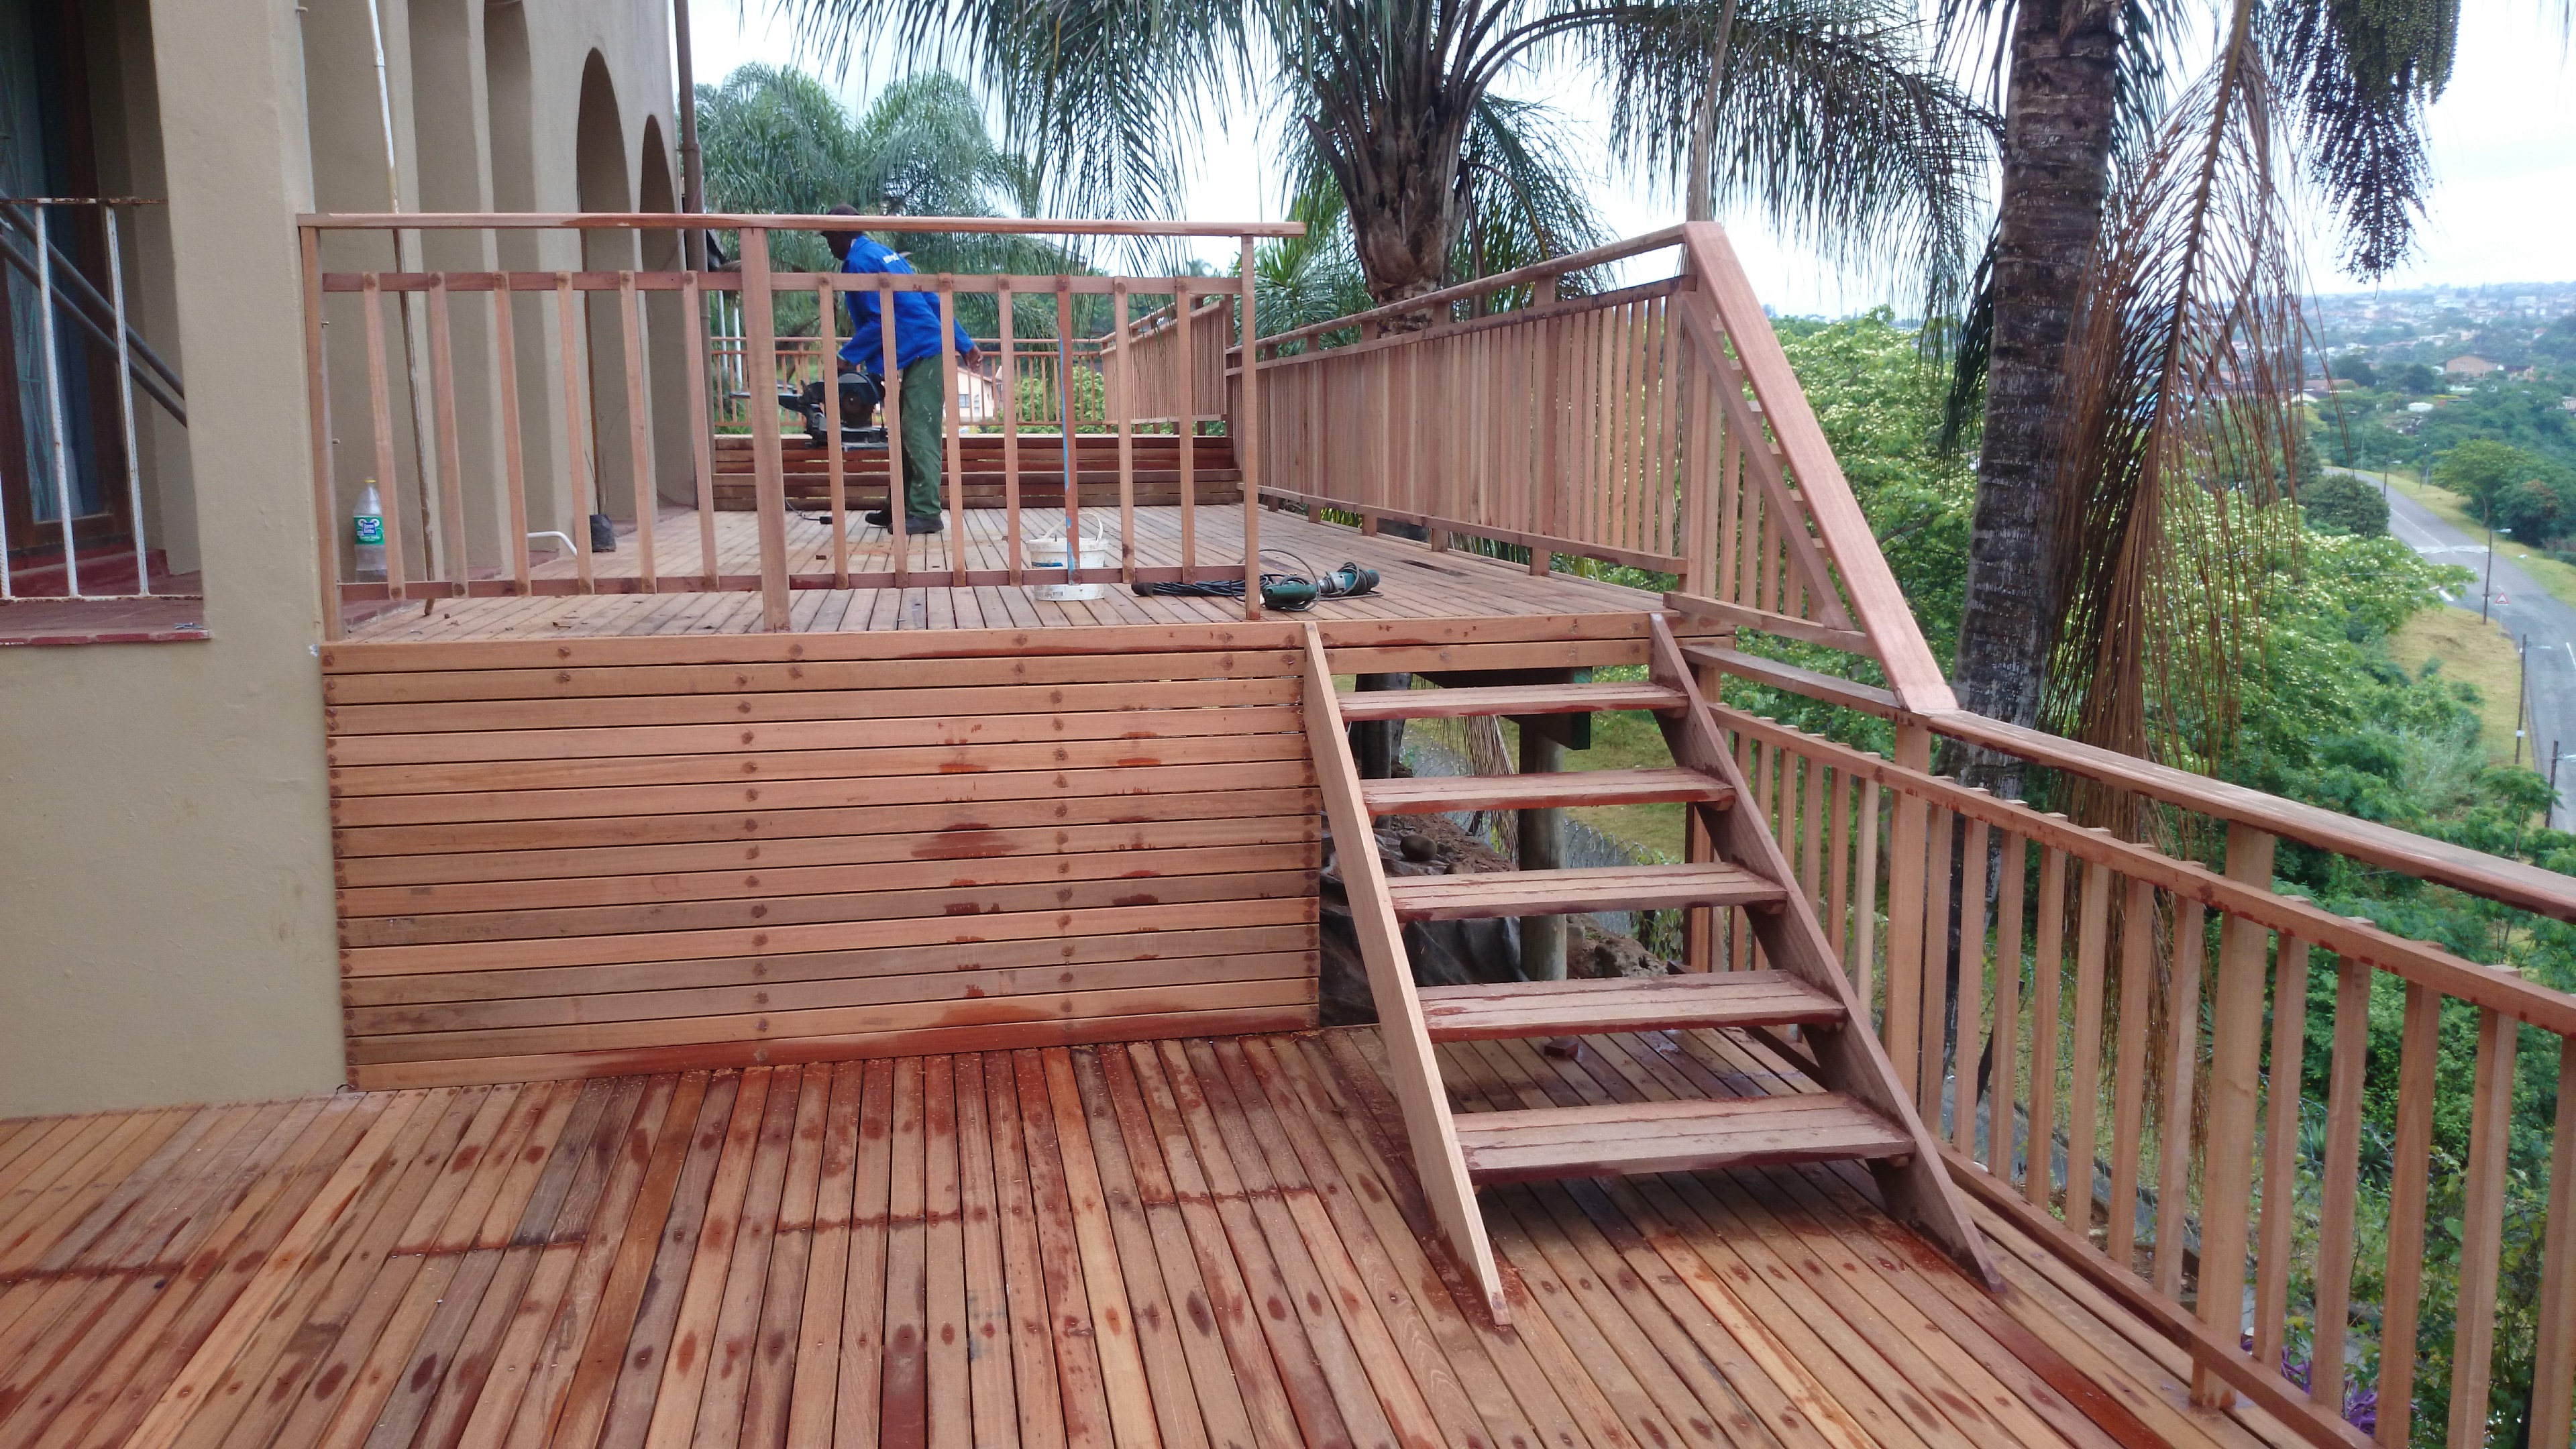
The step down from the second wooden deck section to the third was about 1, 100mm so we had to build some wooden stairs with open risers of standard width of 1m and clad the section were there were no stairs. We also clad behind the stairs in order to block of the underneath of the deck completely. These wooden stairs were the straight forward design with stringers on either side, and treads placed inside of the stringers using cleats on each side. Hence the risers are open which is why we clad behind it to block off the underneath of the second section. We used 30mm x 102mm stock to build the stairs as there is no support beneath them over the 1m span. Using 30 x 102 stock with no gaps, as opposed to 30 x 140 stock, results in a tread of 306mm compared to 285 (140 + 140 + 5mm gap). So they are slightly wider (by 21mm) but still very comfortable. Also we get to use our 1m off cuts from the capping on the balustrade thereby reducing our cost which we can pass on to our clients through our reduced selling price.

It was a fairly straightforward build but did take a bit longer than other jobs as the front of the wooden deck was directly in line with where the bank below suddenly dropped off. So it was difficult to work at head height on a very steep slope. Ladders had to be tied off to the posts to climb them and so on.

Wooden decks Durban

Click to enlarge

For a free, no obligation quote, on your wooden deck, pergola, walkways, stairs and other outdoor and indoor timber construction please call us on 082 496 5444 or use the contact us form below.

Go back

Your message has been sent

Warning
Warning
Warning
Warning
Warning

Warning.

Wooden Deck Installed in Queensburgh, Durban

Wooden deck installer Durban

Click to enlarge

This wooden deck we are installing is almost complete. The pics alongside are work in progress pics. I’ll update it with some others once we are done and you can then get the full feel of the deck. It has been an interesting installation as there are effectively three sections to it and the whole job incorporates three different methods of installing a wooden deck.

The first section is a deck around the pool measuring 1.2m off the side of the pool. The slasto that was there had quite a steep fall from the edge of the pool to the soil to allow water to run away from the pool instead of in to it. We used 38 x 114 joists but had to cut them in a wedge shape to allow them to be level on top but still remain in contact with the slasto as much as possible. There is an easier way of doing this by using 38 x 38 batons with a foot on the side, farthest from the pool, so that the baton remains level on top. This would of course result in a large gap beneath the baton. Being only 38mm in thickness the baton would break as a load is placed on top of it. So one would need to pack the underside of this baton with a suitable material. In the past we have used structural grout simply because of its strength and usability. It is fairly easy to use as it is cementious based. You simply mix it with water and pack the gap. It dries extremely hard, harder than cement, and contains small fibres in it which give it its strength. Both ways are structurally sound, but cutting wedge-shaped joists takes time and they inevitably need to be shimmed to get to a perfect level across all joists. Packing them is easier and just as strong. So next time I will revert to the old tried and tested method of packing them to save time.

We ran our deck boards parallel to the pool on all fours sides, rather than running them all in the same direction. The method we used in this deck is of course the better method. It looks neater and also keeps more water from the pool away from the end grain of the deck boards. Water is absorbed by wood largely through the end grain so this method will result in less rot than running them all the same way where two sides will have end grain facing the pool. However, and a big however, this method is tricky in that if the pool is not perfectly square, the corners of the deck will not run out from the pool at 45°. If a deck board is cut at say 40°, the other deck board that will meet it on that corner will need to be cut at an angle other than 40° if the deck is not square as a result of the pool not being square. And herein lies the problem. The cut ends of each deck board will not be the same

Wooden deck installer Durban

Click to enalrge

length and will not meet up nicely resulting in a stepped joint. Hence the deck MUST be built square regardless of how square the pool is. This brings with it another problem in that it will mean that two ends will overhang the pool and two ends will be flush with the edge of the pool. If the pool is only slightly out of square, then it is not a problem because it won’t be seen. However if the pool is far out of square, then the overhang on the two sides becomes too big. If this is the case then opt for deck boards running all the same way or a gap filler must be placed between the join, so that the eye cannot pick up the difference in lengths of cut ends.

There was small walkway of 1.3m wide by about 4.5m long joining this pool deck to the other deck pictured alongside. There was a small step up to this deck which was enclosed with a balustrade.

So three different style decking systems were used which made it very interesting. One was a baton system on a slasto substrate, the other was a frame system as the walkway and the third was a joist and beam system which was suspended about 2m up.

Tomorrow we will continue sanding and then seal.

For a free no obligation quote, please call us on 082 496 5444, or use the form below. If you call please let me know you found my blog so I can track my marketing.

Go back

Your message has been sent

Warning
Warning
Warning
Warning

Warning.

Stairs and Balustrade – Durban North – July 2011

Wooden stairs

Click to enlarge

This wooden stair job started off as just a few stairs to gain access to the granny flat from the other side of the garden and then progressed into a small balustrade on either side too. The client originally had a fence there of CCA pine slats which we had to remove and then build our stairs. She wanted to then put some sort of fence on either side to keep dogs out and originally we were going to re-use some of the CCA pine slats. After speaking to her we agreed that a balau balustrade at the same height as the stairs would finish it off more neatly and add more value to her property.

The stairs were fairly simple and we used two stringers on each side of 30 x 228 balau. We then attached cleats at the required height for each tread. For the cleats we used 30 x 40 balau and for the treads we used 30 x 140 and doubled them up to get a tread of 285 wide with a 5mm gap in between each board. This type of stairs can only really be about 1m wide before you need to increase the thickness of your timber to 40mm. If the timber is too thin and the steps are too wide then the tread will bend each time someone walks on it. If you want to make your stairs wider than 1m then you must use a 40mm thick piece of balau. If you are using pine then this thickness needs to be increased even more because pine is so much softer than balau.

I prefer to use a different system when building wide stairs. One can add an extra stringer in the middle to give it support. However the stringers on the end have the cleats attached to the inside of them. The stringer in the middle cannot have the cleat attached to the inside as the stringer itself will protrude above the level of the tread. So you will need to cut recesses out of the middle stringer so that the tread can sit on a flat surface.

Wooden stairs

Click to enlarge

The other alternative to this is to build a structure underneath each tread on which deck boards are attached. This method is common in building stairs with closed risers. The above method and the one we used on this build is common for stairs with open risers.

We had a challenge on this job in that the wall that we were going to attach to wasn’t straight and looked as if it had been moving over the years. So instead of attaching to the wall we sunk some posts in the ground and concreted them in. This way the wall can continue to move without pushing or pulling our stairs over.

We filled our holes with epoxy and saw dust mixture to get a colour match and sealed it this time using Timberlife Ultra Care Gold. The Ultra Care Gold has a higher wax content and is suitable for vertical pieces of timber where the sun’s rays are not as direct as the horizontal pieces.

I went back to this client’s house to repair a broken fence and our stairs and balustrade are still as good as they were when we built them. They need to be re-sealed again but otherwise the balau has held up well.

For a free no obligation quote on your outdoor timber construction please call us on 082 496 5444 or use the form below to submit your enquiry.  If it’s just advice you are after, leave a comment in the comments section and I will try to assist you.

Go back

Your message has been sent

Warning
Warning
Warning
Warning

Warning.


Wooden Deck Built in Toti at a Guest House

Wooden deck builder Durban

Click to enlarge

This was one of my first wooden decks in Durban that I undertook. The Guest House we built it for had just opened up the side of the dining room on the first floor with sliding doors and now wanted to extend the area by adding a deck of about 14m². It is always important to first break through the wall and install the sliding doors and then build the wooden deck. This way the deck builder can get the surface of the deck flush with the entrance to the room. I have built one deck before where the client insisted that I build the deck first and then they were going to break through. Although we did our best to measure where the inside floor was, there may still have been a small step up or down once they had broken through. On this build though it was done the right way around and the deck was flush with the floor inside the dining room.

The deck was a normal cleat, beam and joist system where we secured a cleat to the wall with sleeve anchors, installed vertical posts and attached a beam to that and then ran joists between the cleat and beam with a small canter lever. We had to try to set our posts as far out as possible so as to create enough space under the deck that could be used.

Wooden deck builder Durban

Click to enlarge

The balustrade was a normal picket style one. These are the safest and really the only one that is completely compliant with building regulations. Building regulations state that there should be no opening that is larger than 100mm. With all other balustrades there are some spaces that become greater than 100mm. Besides being non-compliant they are not that safe especially for small children. With the pickets running in a vertical direction it is more difficult for children, or adults, to climb up on the balustrade and fall over. The other designs offer more horizontal pieces that people can use to climb up on.

The stairs we built here joined the deck to the pool area which was about half a floor up from ground level. There were separate concrete stairs running from ground level to the pool area but the new wooden stairs we built could now be used to access the pool area, and the rest of the outside area, from the dining room. Because there was no way of supporting the stringer mid-way we had to ensure that we had the correct width of stringer so that it would not break over time. Most of the strength in a piece of wood is in the width and not the thickness as the downward force is exerted on the width.

Wooden deck builder Durban

Click to enlarge

We finished up by filling our holes with epoxy and sawdust and sealing with a Timberlife Satin Wood Base 28 Mahogany tint. In our decks we counter sink the screws which leave a small screw hole that water can get into. It is important to fill these so that no water can get in. If water does get in it can travel down the end grain and will cause the wood to rot much quicker at the point of the screw hole. Water travels through wood along the end grain rather than being absorbed from the face or side grain. Wood filler is also not suitable as it will pop over time due to the weather. Clear epoxy works well mixed with a little saw dust to match the colour. Once it’s dry, use a grinder with a sanding pad to flat it and then sand the grind marks off before finishing.

For a free no obligation quote on your deck or for some advice, please contact us on 082 496 5444 or complete the form below.

Go back

Your message has been sent

Warning
Warning
Warning
Warning
Warning

Warning.

Wooden Balustrade Built in Everton – May 2013

Wooden balustrade

Click to enlarge

This wooden balustrade we built in Everton Kloof, Durban was for an established client of ours that we have done various amounts of work for in the past. She had had some stairs built in brick and concrete down the bank to access the lower level of her property. We had to wait a few weeks in order for the concrete to cure properly before we drilled into the side of it. It is always a pleasure installing a wooden balustrade onto a concrete substrate as opposed to a brick or block substrate. With concrete your holes can be drilled easily and the sleeve anchors used to secure the posts to the side of the stairs take nicely and bind properly. When drilling into bricks, or even worse blocks, the cavity that exists in the brick or block almost always creates a problem in that the sleeve anchor has nothing to set itself against and ends up turning on itself and not binding properly. It is most frustrating and sometimes results in drilling new holes to find a solid substrate or even going the chemical anchor route. If one is drilling into blocks with large cavities, it is sometimes better to go the chemical anchor route from the beginning.

Wooden balustrade

Click to enlarge

Chemical anchors come with sleeves that are inserted into the holes first and then the two-part chemical is squeezed into that and then a thread bar is inserted. The chemicals dry very quickly, in a few minutes or less, and the thread bar is then fixed securely in the wall. A post can now be pre drilled and inserted over the thread bar and washers and nuts fastened onto that. It is a much stronger bond than sleeve anchors, albeit more expensive. Currently chemical anchors can cost about R300-00 per tube, the size of a tube of silicone, and the sleeves are about R15-00 each.

This wooden balustrade needed to have a bend in it that can be seen from the pictures alongside as the top tread was deeper than the rest of the treads. There was a small landing at the top where the balustrade needed to be level with ground. This was the normal vertical picket style balustrade and we sealed it using our favourite Timberlife Satin Wood Base 28 in a mahogany tint. Using this product will result in lower maintenance costs going forward as no sanding will be required when re-sealing. You simply clean and re-seal.

Wooden balustrade

Click to enlarge

Balustrades are not the easiest thing to install. One needs to be very careful that both rails are parallel to each other and that they are parallel to the tips of the risers. Of course the tips of each riser will not necessarily be in a straight line. What we do is run a straight edge or fish line across all the risers to get an average line that we work from. The lower rail is then set parallel to this line and the top rail and hence the capping is set to this, again parallel. One also needs to be careful when taking corners. Often the distance between the capping and the steps can vary, especially if there is a landing involved. Where a balustrade arrives at a landing one needs to step the balustrade so that the capping will remain at the 1m mark above ground.

For a free no obligation quote on your wooden balustrades or other timber construction, please complete the form below and I will contact you or you can contact us on 082 496 5444.

Go back

Your message has been sent

Warning
Warning
Warning
Warning
Warning

Warning.


Timber Sundecks in Durban

Wooden decks Durban

Click to enlarge

“Summertime ….. And The Livin’ is Easy “… Or it CAN be !! …Yes, with the South African summer right on the doorstep now, what’s the best Christmas present you could give to your family (and yourself)? (This one won’t fit into a Christmas stocking however …)

Ponder and Dream of how ‘lekker’ it would be to have a good quality sundeck in our sunny climate, leading off your lounge, and onto your pool or into your garden… and yes, in South Africa a sundeck is as important as your lounge, or more so because of our outdoor lifestyle.

Who to get to build it?
The benefits of having it professionally installed versus a ‘fly by night builder’, or tackling this mammoth task yourself; the importance of the maintenance of your valued product and the importance of what wood type to use in its construction are all considerations to take into account when planning to invest in this forever “best thing I ever did” choice. Make it your Christmas gift to the whole family, all in one!

Wooden decks Durban

Click to enlarge

Materials used in the construction include the following. All are good quality materials, able to weather the weather (pun intended) if properly maintained. An example:

• Balau (an imported hardwood from Indonesia, extremely dense, contains toxins that prevent termite damage and resins which repel water to prevent rot).
• Kalgard screws (similar to epoxy coating where the coating on the screw is baked on
• Stainless Steel Screws
• Epoxy to fill screw holes where the screw has been counter sunk to prevent water getting in the little hole which slows down rot
• Timber preservative rather than varnish (varnish sits on top and cracks and flakes from the UV in the sun’s rays, whereas timber preservative soaks into the wood nourishing it thereby preventing flaking and peeling of varnish.)
The Wood Joint pays special attention to detail in all products and places great importance on durability and longevity in their products by applying sound techniques and slightly over engineering most products.

Wooden decks Durban

Click to enlarge

They pride themselves in their quality workmanship and use only top quality timber sourced from reputable suppliers.

A sundeck is a valuable addition to any home and will not only provide many years of enjoyment, but will also enhance the value of your property.

With the correct care, maintenance costs can be kept to a minimum and the life span of your deck increased.

The Wood Joint will assist you in a design that will be cost effective and will best suit your needs taking into account the existing structure that is in place.

With years of experience in the deck building industry, The Wood Joint can advise, design, maintain and erect your deck in the most cost effective and structurally best methods.

Other Products, Other Timbers …
“We have listed the three most commonly used timbers to construct decks which have been selected due to their structural strength, longevity and cost effectiveness. There are however other timbers that can be used and these can be discussed individually.”
The Wood Joint (www.thewoodjoint.co.za) from my experience and that of many is dependable, reliable, knowledgeable and professional … View their website to see the quality and standard of their Sundecks and a wider portfolio of other specialities their experience encompasses:

• Sundecks
• Balustrades
• Pergolas
• Walkways
• Garden Bridges
• Pool Decks
• Screens (vertically installed to provide privacy)
• Cladding (on walls mainly for aesthetic purposes)
Wood
Balau

The most commonly used, and most cost effective timber, is Balau which is sourced from south East Asia. It is a yellow – brown to dark brown timber with a fine texture and interlocked grain and is extremely durable under tropical conditions.

It is a fairly heavy timber weighing between 800 kgs and 1, 000 kgs per cubic metre when dry.

It can be sealed or left unsealed. Unsealed it weathers to a grey colour. It can also be stained easily using a variety of tints to change the colour.

Garapa

Garapa is also a popular decking material as it is hard, heavy, tough and strong and is naturally resistant to rot, decay and insect attack. Found most commonly in Argentina, Brazil, Venezuela and Eastern Peru.

It normally weighs between 800 kgs and 960 kgs per cubic metre when dry. A fine grained timber varying in colour from yellowish to yellow – brown / yellow – pink.

It is, to a degree, scratch resistant reducing sanding during scheduled maintenance.

Massaranduba

Sourced form the West Indies and Central and South America, this timber is suitable for decks due to its hardness.

It is extremely heavy weighing in at about 1, 050 kgs per cubic metre when dry.

The texture is fine and uniform. The grain is usually straight but sometimes interlocked.

The heartwood is light red to rose red.

Keruing

Keruing is naturally found in South East Asia.

The timbers vary in colour from pinkish-brown to dark brown and look rather characterless. Grain is straight or shallowly interlocked and the texture is moderately coarse and even. All of the species contain oleo-resins and many of them will exude it onto surfaces during drying or when exposed to heat or sunshine when in use.

The weight is variable too but is generally within the range 720 to 800 kg/m3 when dried.

It is moderately durable.

For free quotes and more information on The Wood Joint’s various wooden products contact us on 082 496 5444 or complete the form below.

Go back

Your message has been sent

Warning
Warning
Warning
Warning
Warning

Warning.


Wire Rope Balustrades

A turnbuckle

Wire rope balustrades are quite common nowadays especially if a modern and sophisticated look is required.

There are two types of wire rope balustrades available.  The first is a 5mm stainless steel cable or rope attached to the uprights of the balustrade which should be balau of about 60mm x 60mm.  This is attached using a turnbuckle as depicted in the image and can be tightened as time goes by and the wire rope stretches slightly.  The tension of this rope should be taught but not too tight.  This 5mm cable or rope can normally turn corners and hence less turnbuckles are required per length of wire rope.

The second method, and my preferred one, is a 4mm marine grade stainless steel wire rope with button heads on either end.  The 4mm wire rope is normally of a higher grade than the 5mm rope and tends to tarnish less over time.  I have found the 5mm rope to often contain one rogue strand which will tarnish and spoil the look of your balustrade.  This method requires button heads on either end but the 4mm rope normally cannot turn corners and more button heads are therefore required.  Each length of rope should run in one continuous straight run and a new length started once a corner is encountered.  A hole is simply drilled into the balau uprights, the button head inserted and the wire rope threaded through and crimped.  It too can then be tightened and again it should be taught rather than too tight.

Care should be taken to drill level holes that are equidistant as the slightest difference will be noticeable.  Particular care should also be taken when drilling holes on uprights that are on diagonal stairs.  A trick is to snap a chalk line the total length of the required wire rope and then drill the balau upright from both ends with the holes meeting in the middle.  One cannot see any kink in the wire rope inside the timber but it is more noticeable where it enters and exits the balau upright.

It is normally better to install the wire rope balustrade after the balau has been sealed or coated as this will eliminate the chance of accidentally coating or sealing the button heads or turnbuckles.

Both methods require a crimping tool to crimp the button heads or turnbuckles on either end.  This can be purchased often at a considerable price or one can be made using a large bolt cutter and adapting the head.  However, only attempt making one yourself if you have the skills and the correct tools, as the correct crimping is vital to ensure that the wire rope does not pull out of the button head or turnbuckle, resulting in a fresh length of wire rope having to be used.

The capping on top depends on choice but I have mostly used a 30 x 102 balau capping which is fastened using kalgard screws to the top of the uprights.  Again use as long a length as possible in any one straight run and if a join is necessary ensure that a 45° angle is cut to reduce lifting on the join.

Timber or Wooden Balustrades

Wooden Balustrades

A classic criss cross style balustrade

Timber balustrades are built in various designs and various different timbers can be used. The most affordable hardwood of course being balau with more expensive options being Massaranduba, keuring etc. The pieces required for balustrades are most commonly found in balau as they form part of the structural pieces stocked by most timber merchants. Massaranduba, keuring etc. are largely supplied in deckboards only and are used for the actual decking with balau being used as the substructure. All three of them are equally as durable and strong and only really differ in colour and grain.

In this article we will discuss the picket style balustrade.

PICKET STYLE

This type of balustrade is often the only one that completely adheres to standard building regulations as the gap between any two pieces is, or can be made, less than 100mm. It should be designed with a cross horizontal support at the top and bottom to give the pickets a support to be attached to. The bottom horizontal support is normally set about 100mm from the ground and secured to each vertical post in as long a length as possible. The top horizontal support can either be set at the top of the post and directly beneath the capping or set 100mm down from the capping to provide a gap between it and the capping. The former being my personally preferred method as it then gives the capping a more rigid support and will reduce bowing and cupping of the cap.

Each picket is then attached to these horizontal supports so that the gap between vertical pickets is equal. Care should be taken in setting the first and last one as the width of each picket needs to be taken into account when calculating the centre of each picket due to the first and last one being the vertical post itself. Pickets can be pre routed on the corners to give it a profile or left square. They can also be routed in situ resulting in the router not running all the way to the end of the picket.

A capping is then placed and secured on top of the horizontal support and posts, or just to the posts if the latter method was used. This capping can then be routed over the edges to break the sharp corner. This capping should also be secured in as long a length as possible to avoid joins wherever possible. If a join is necessary it should be joined with a 45° join directly above a vertical post. This will reduce lifting on the joint.