Wooden Sundecks – Durban North

Wooden sundecks Durban North

Click to enlarge

Wooden sundecks Durban North

Click to enlarge

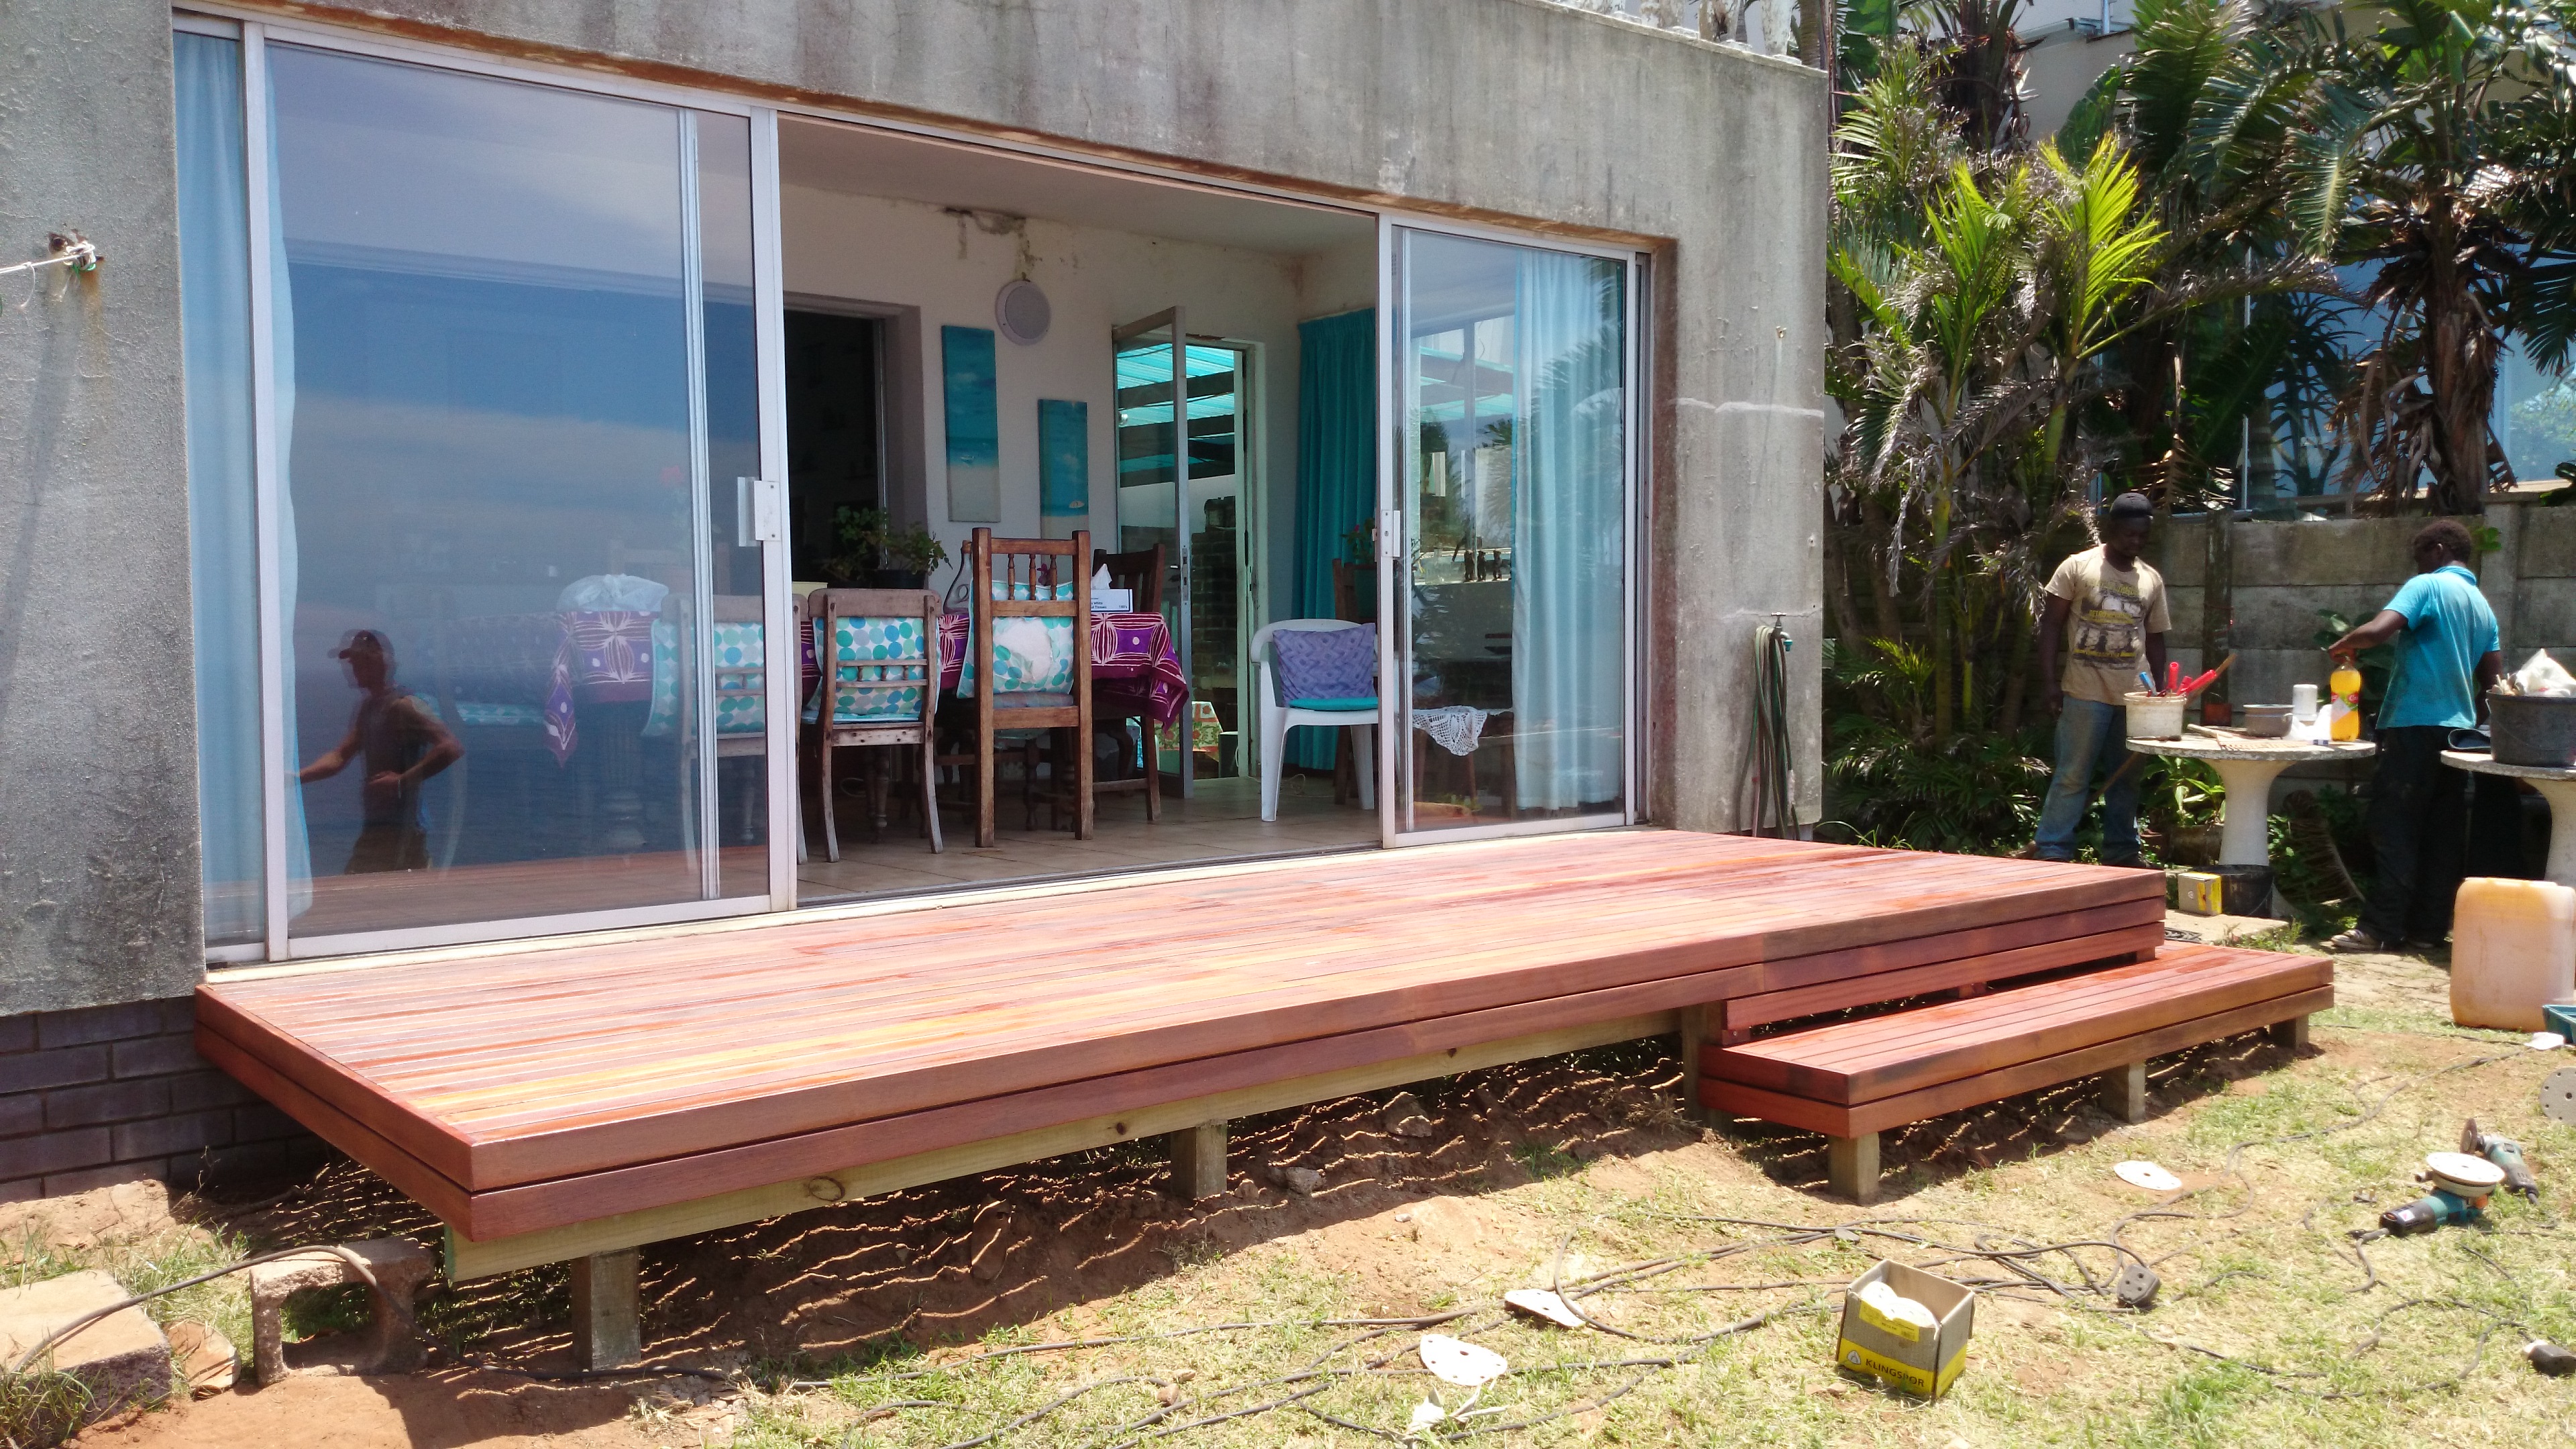
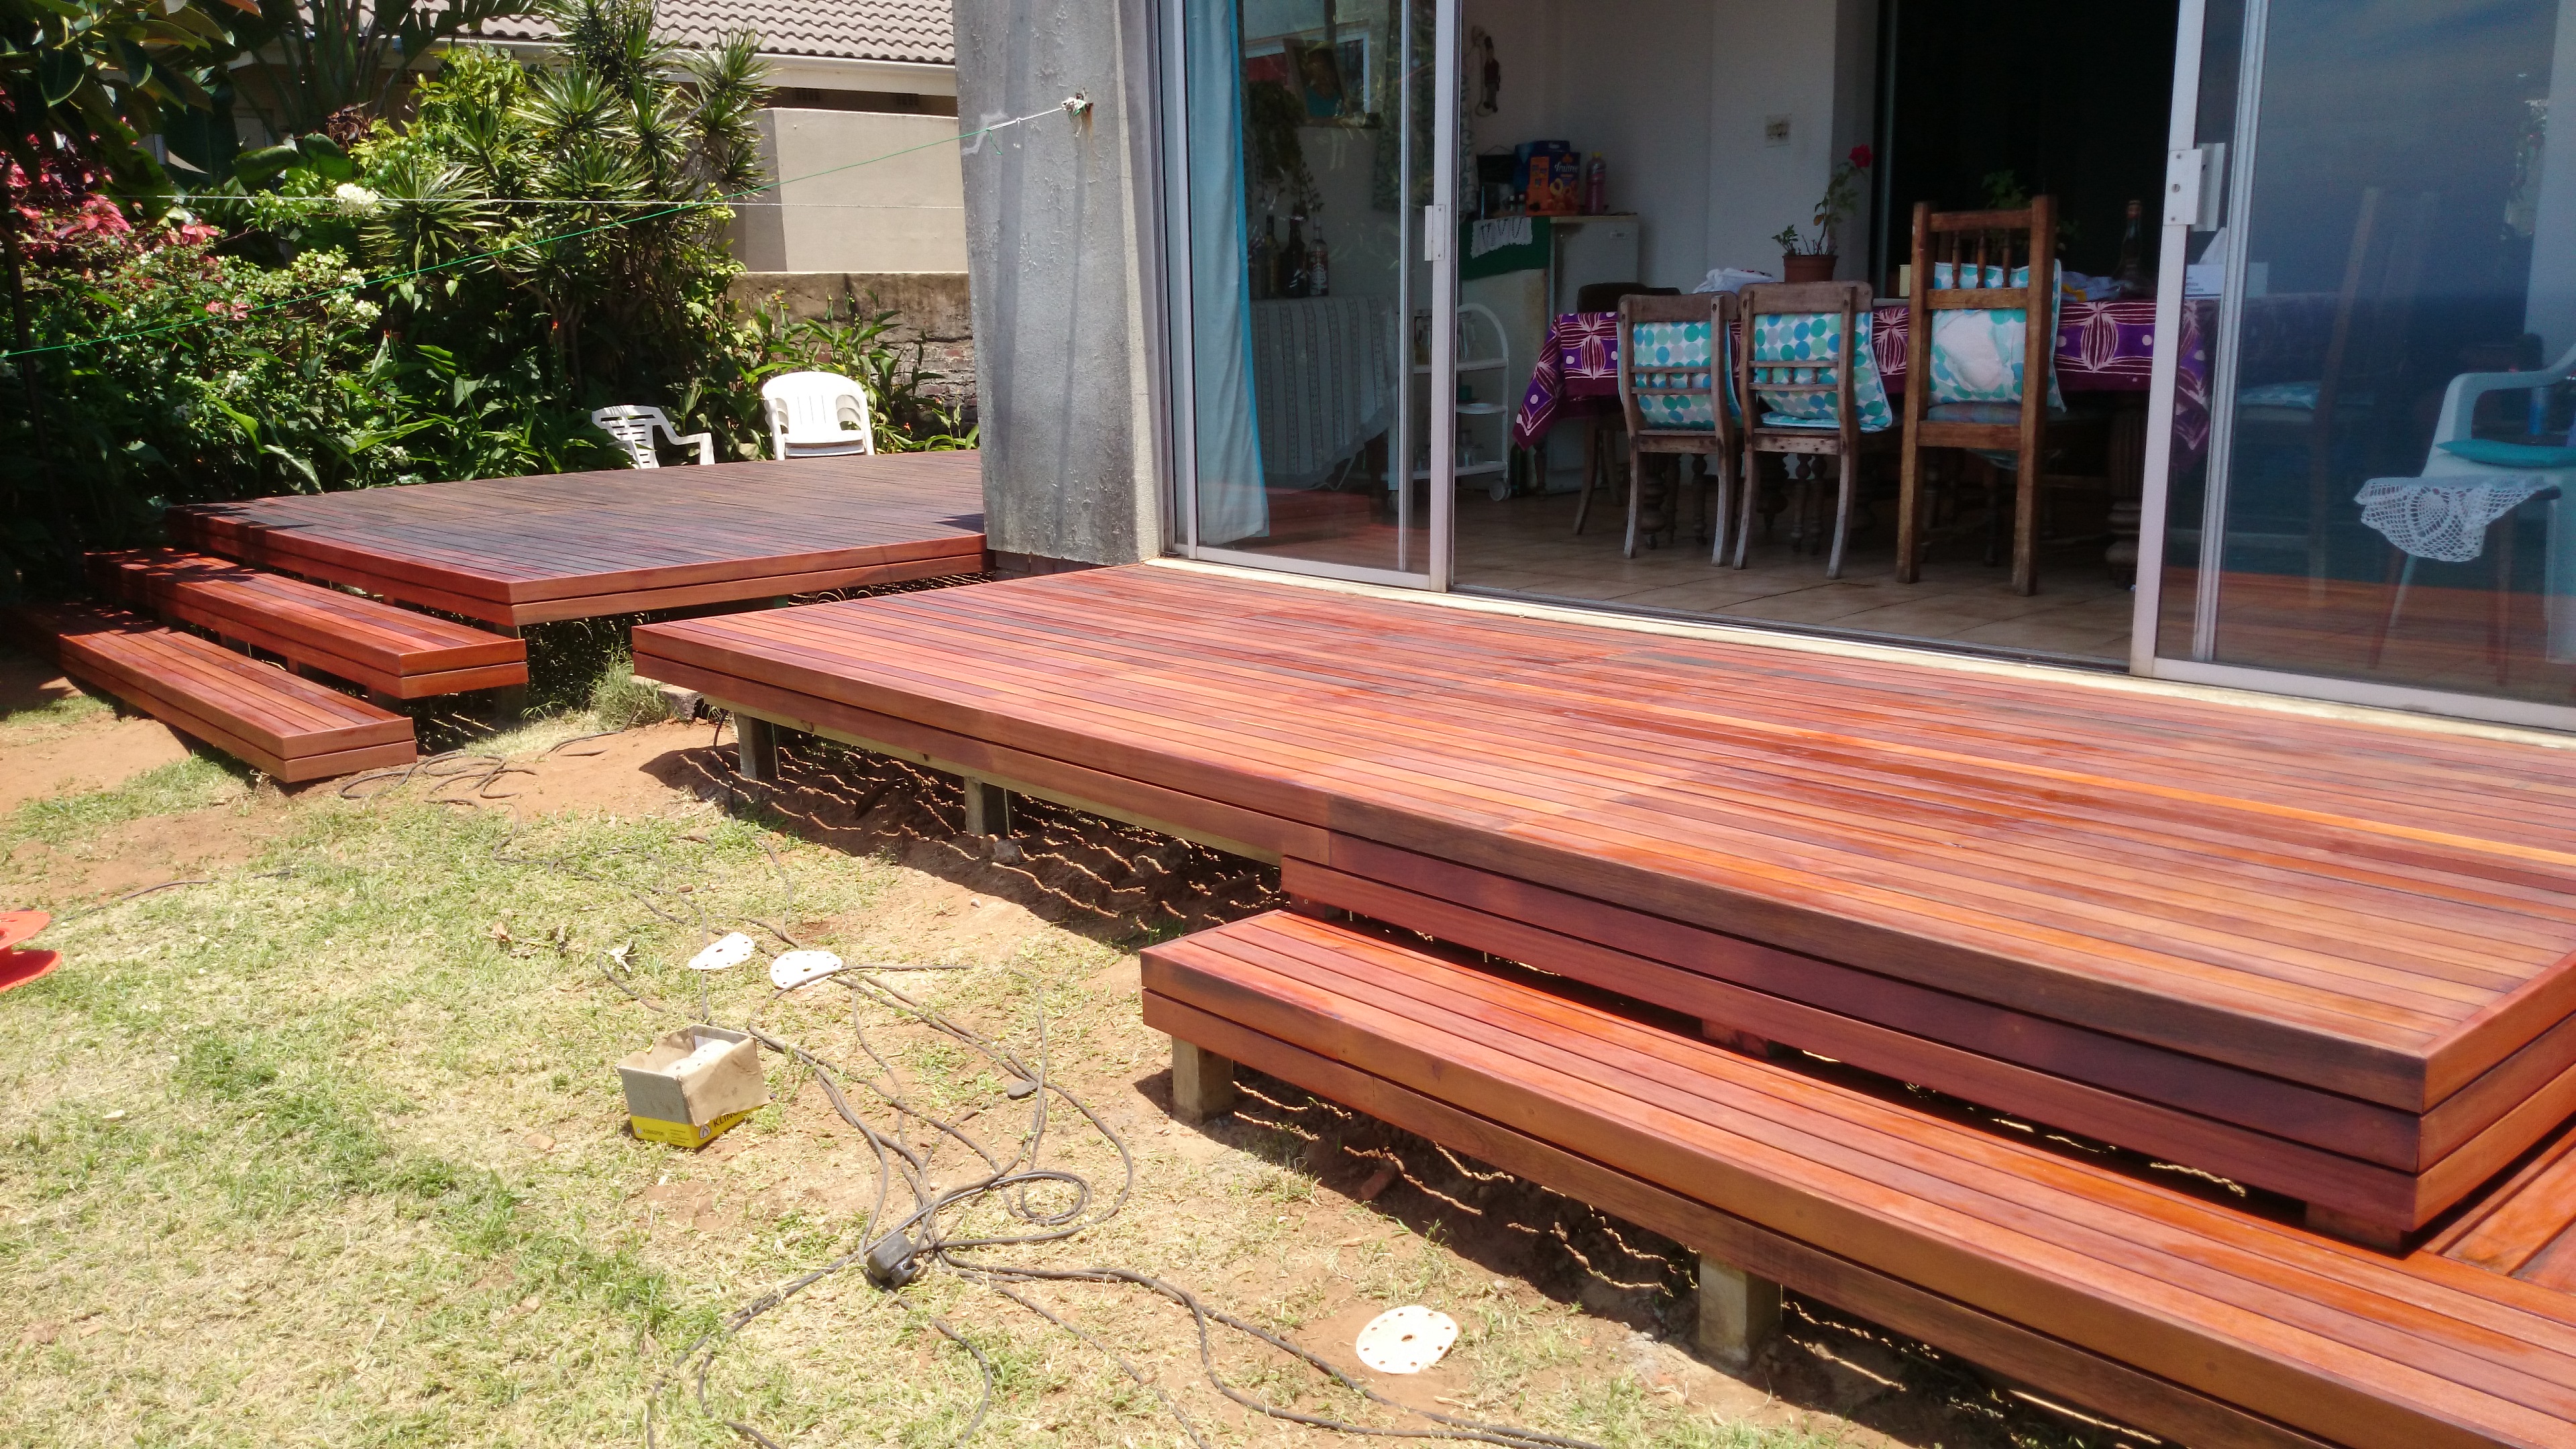
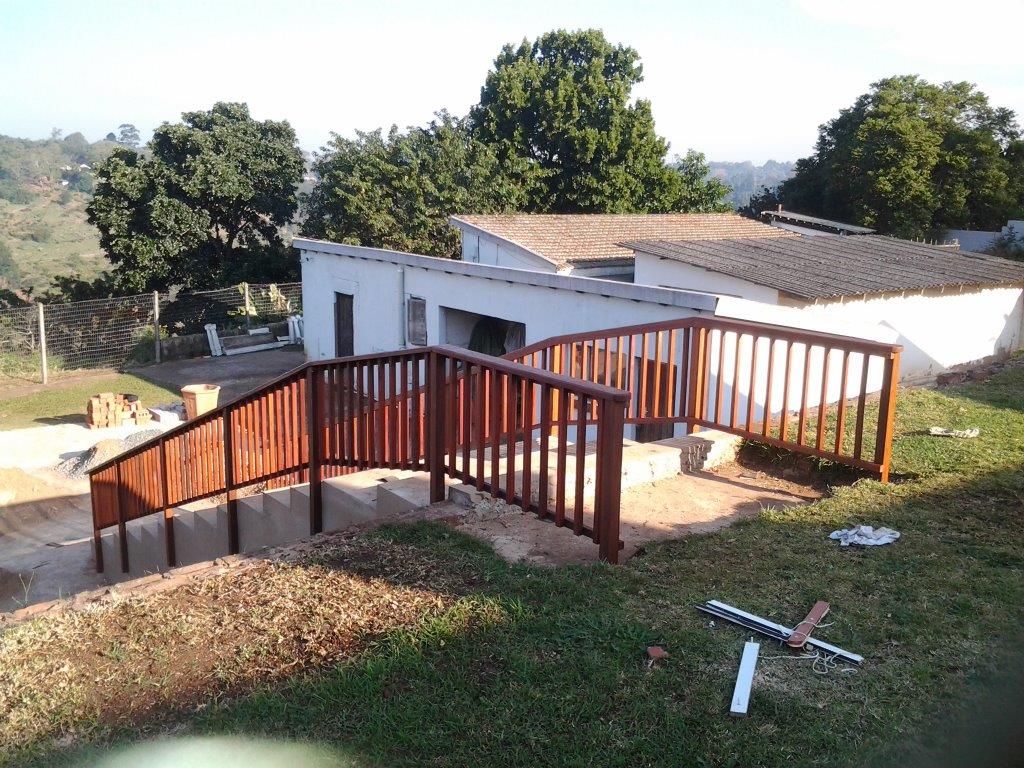
We completed these wooden sundeck jobs in Durban North last year during our busy decking season. There were two decks we built. They were both quite simple in that they were low-level wooden sundecks coming off the granny flat, which had just been refurbished measuring 5m x 2.2m.

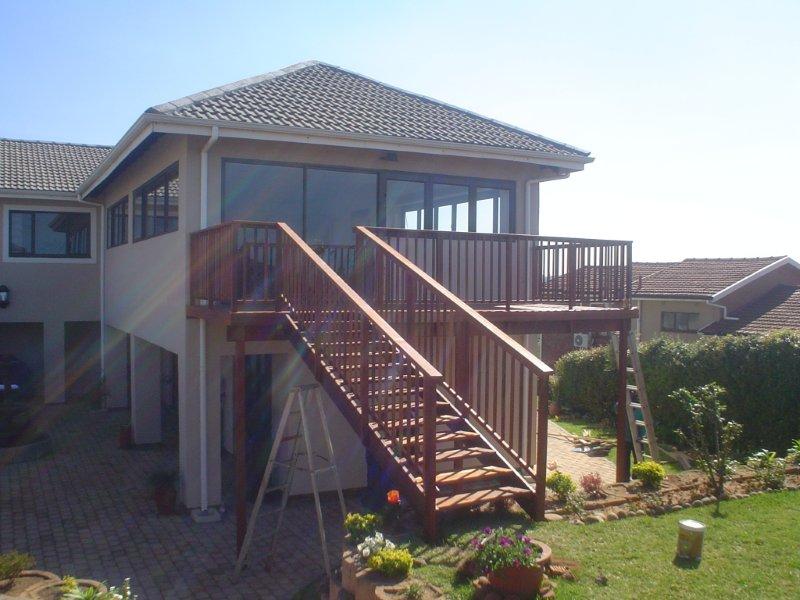
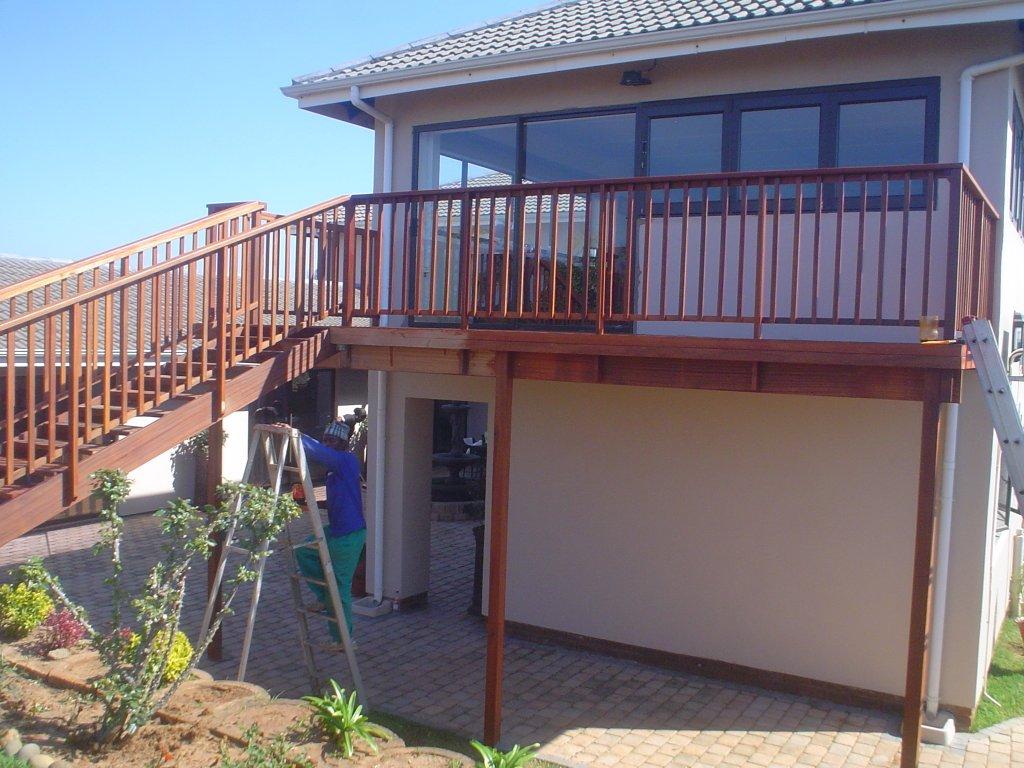
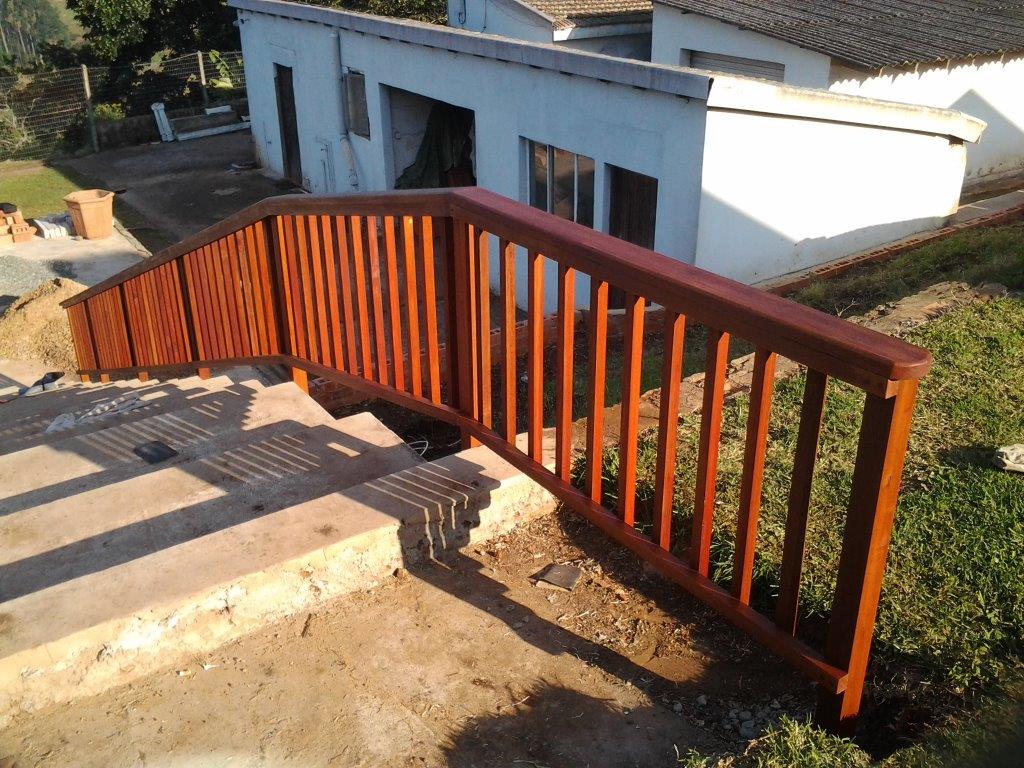
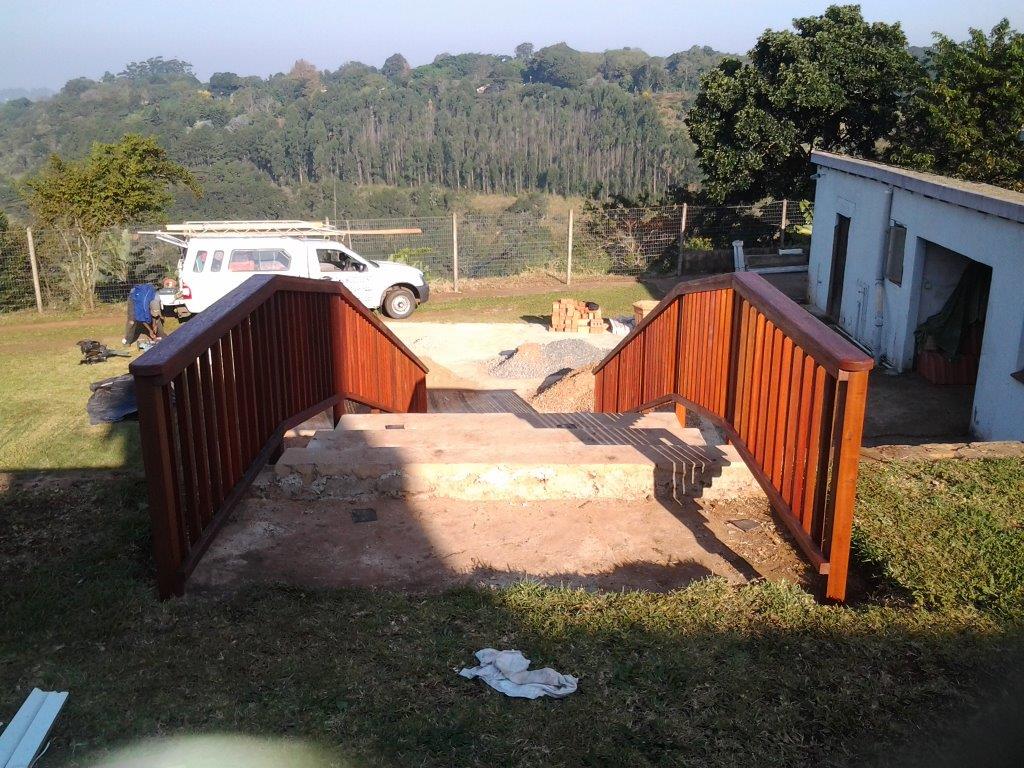
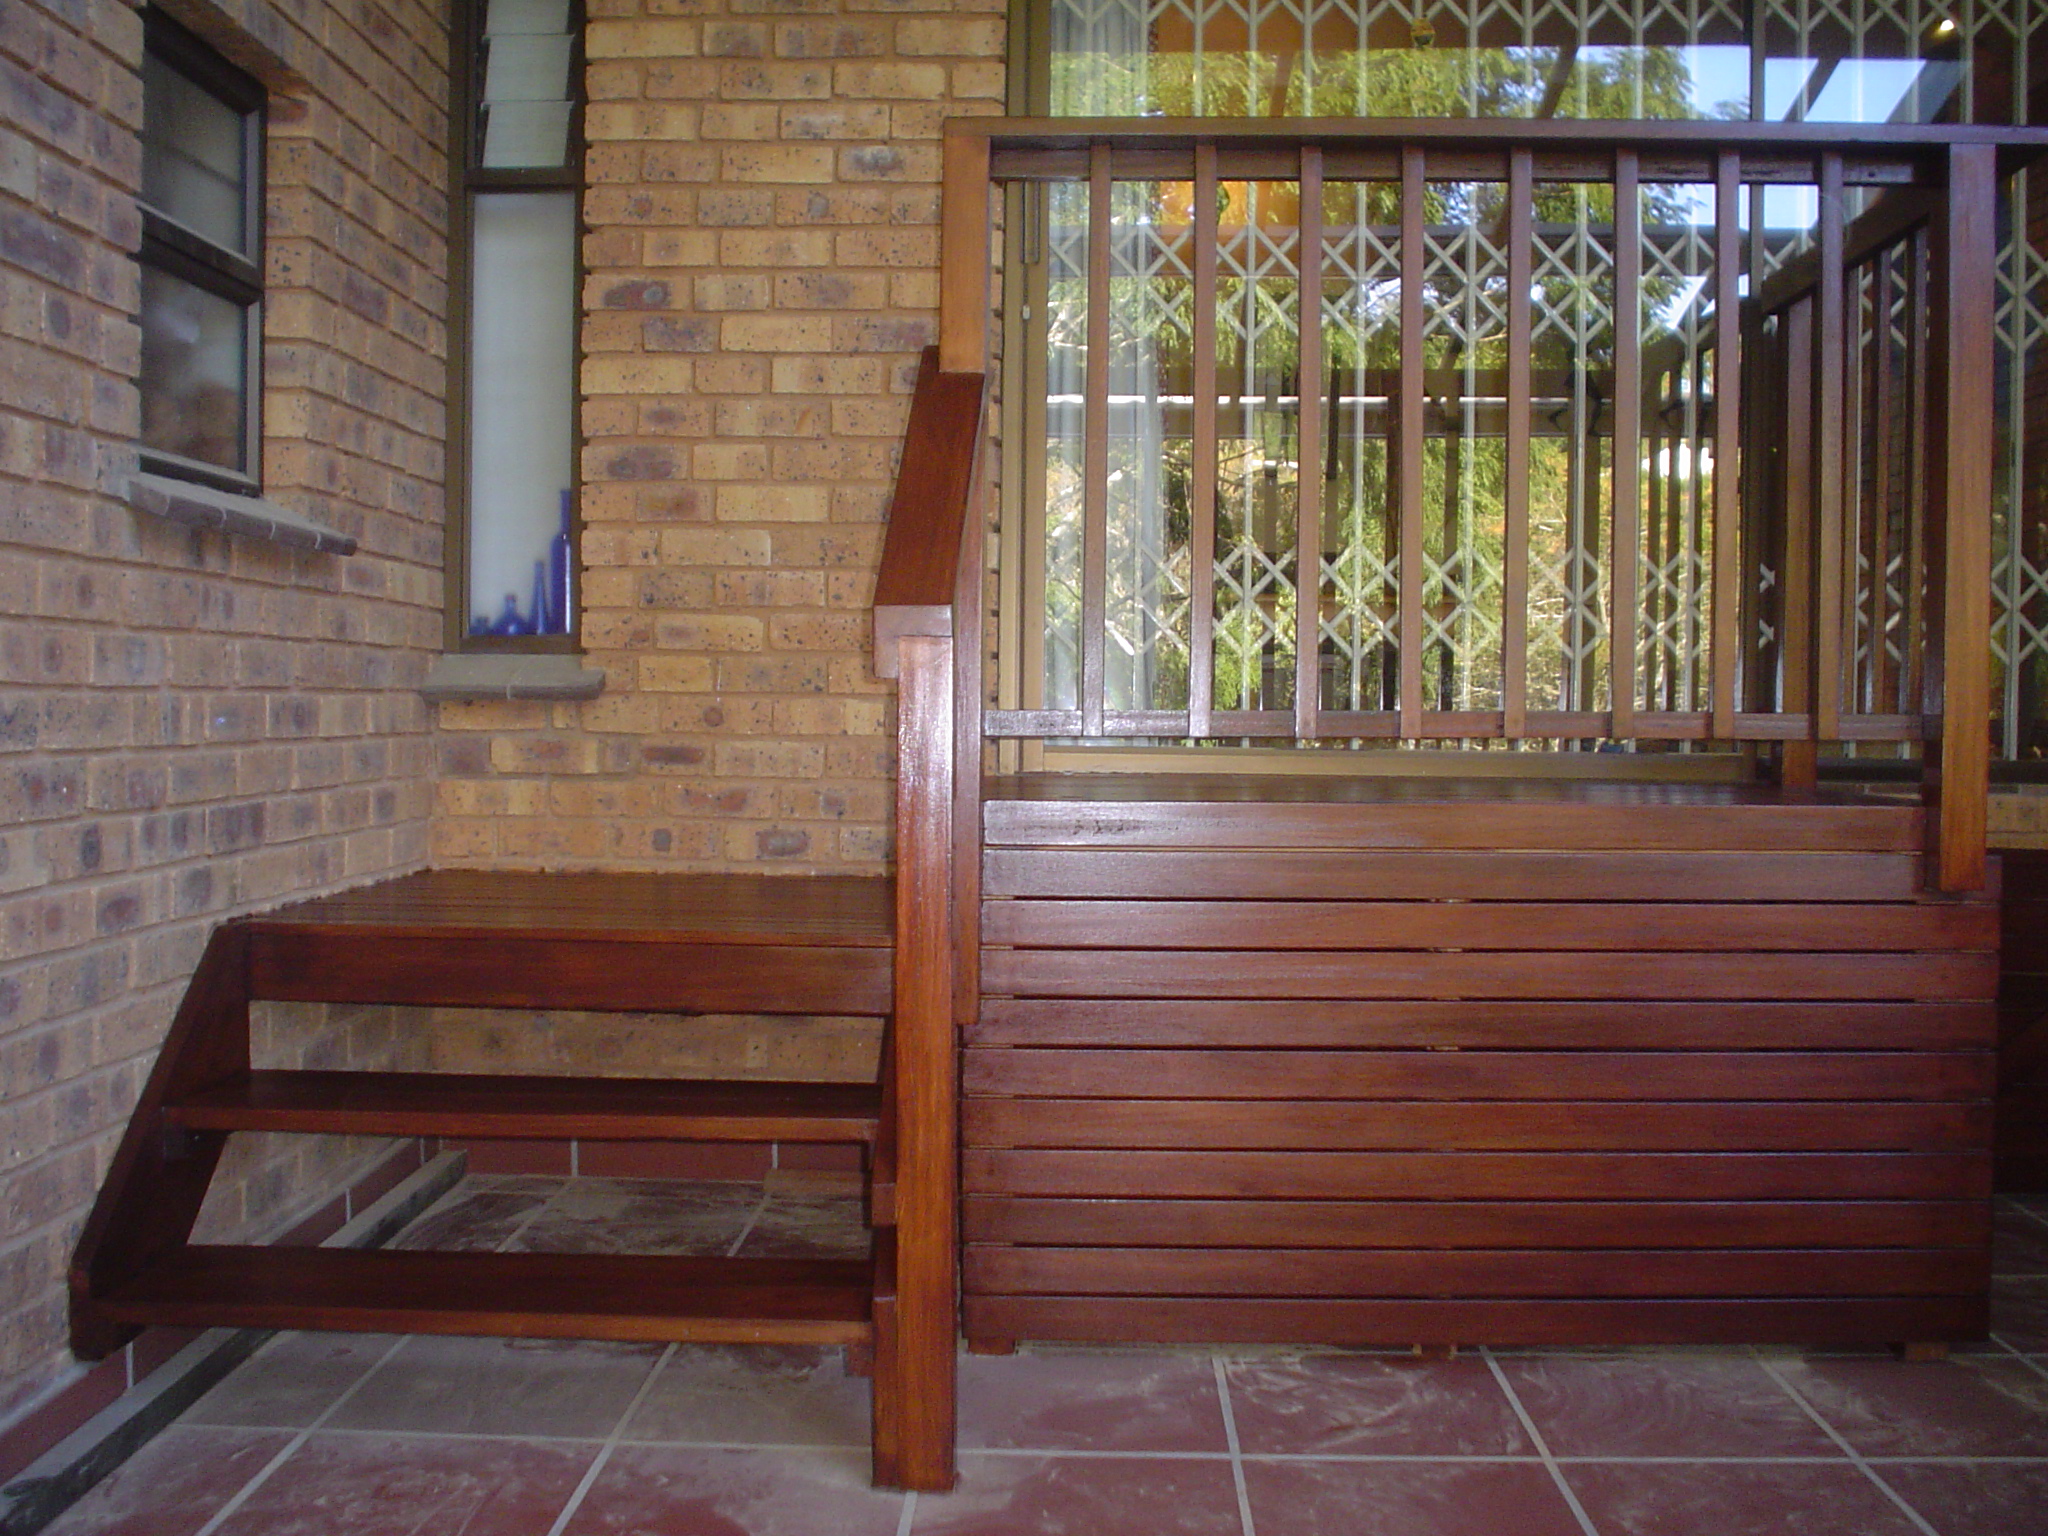
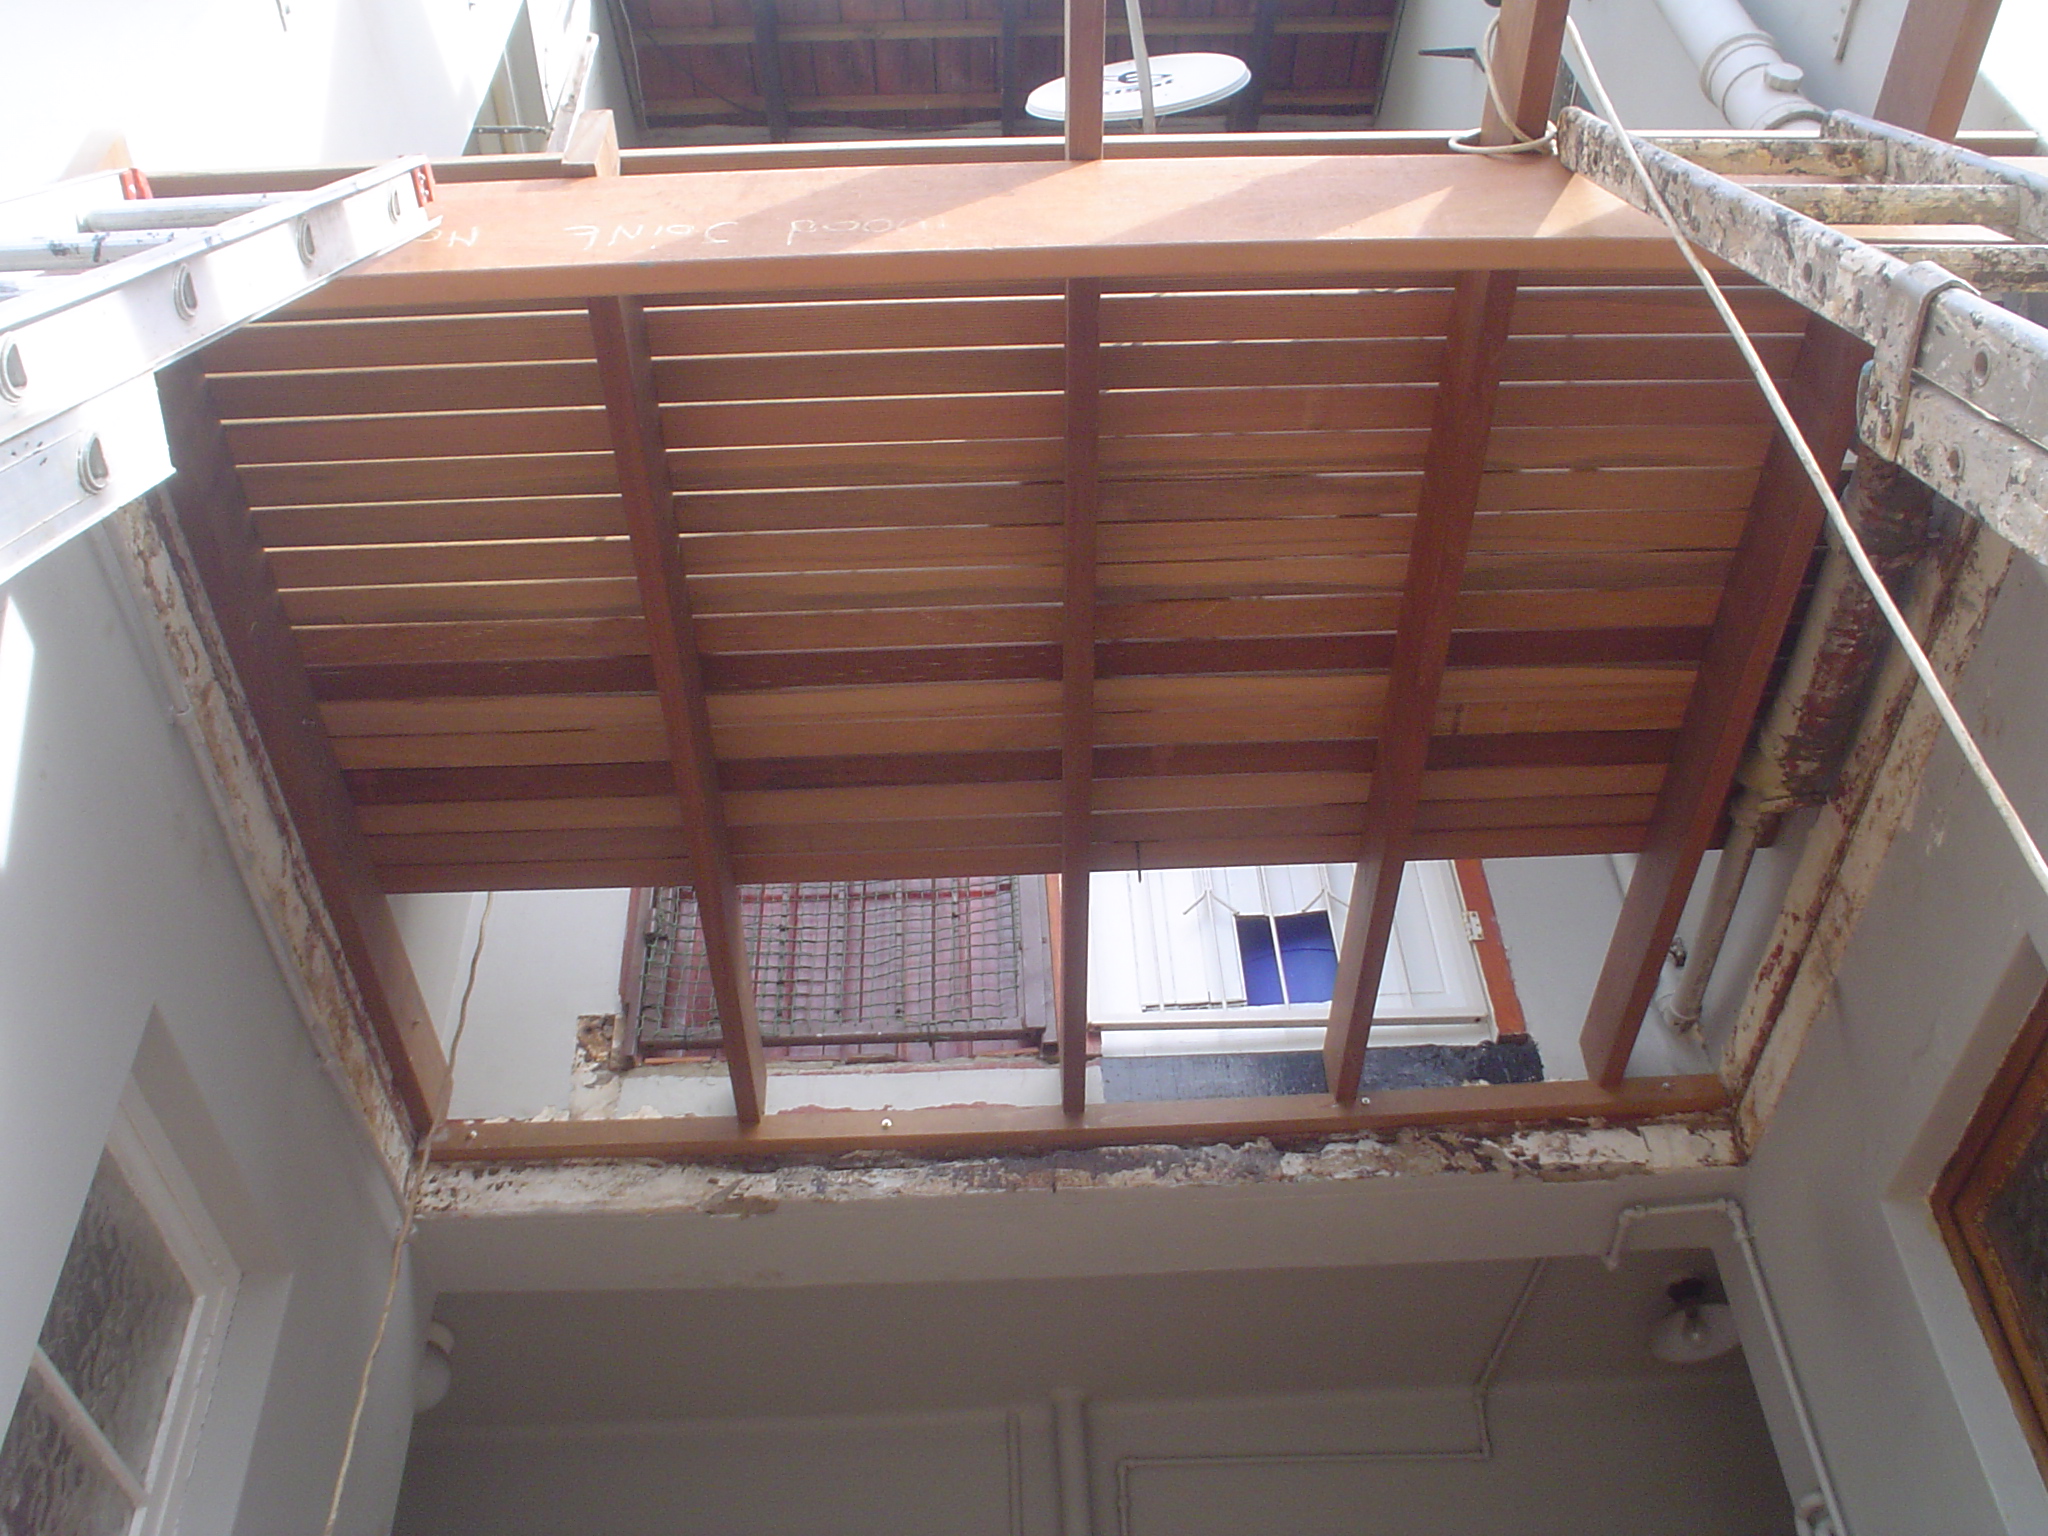
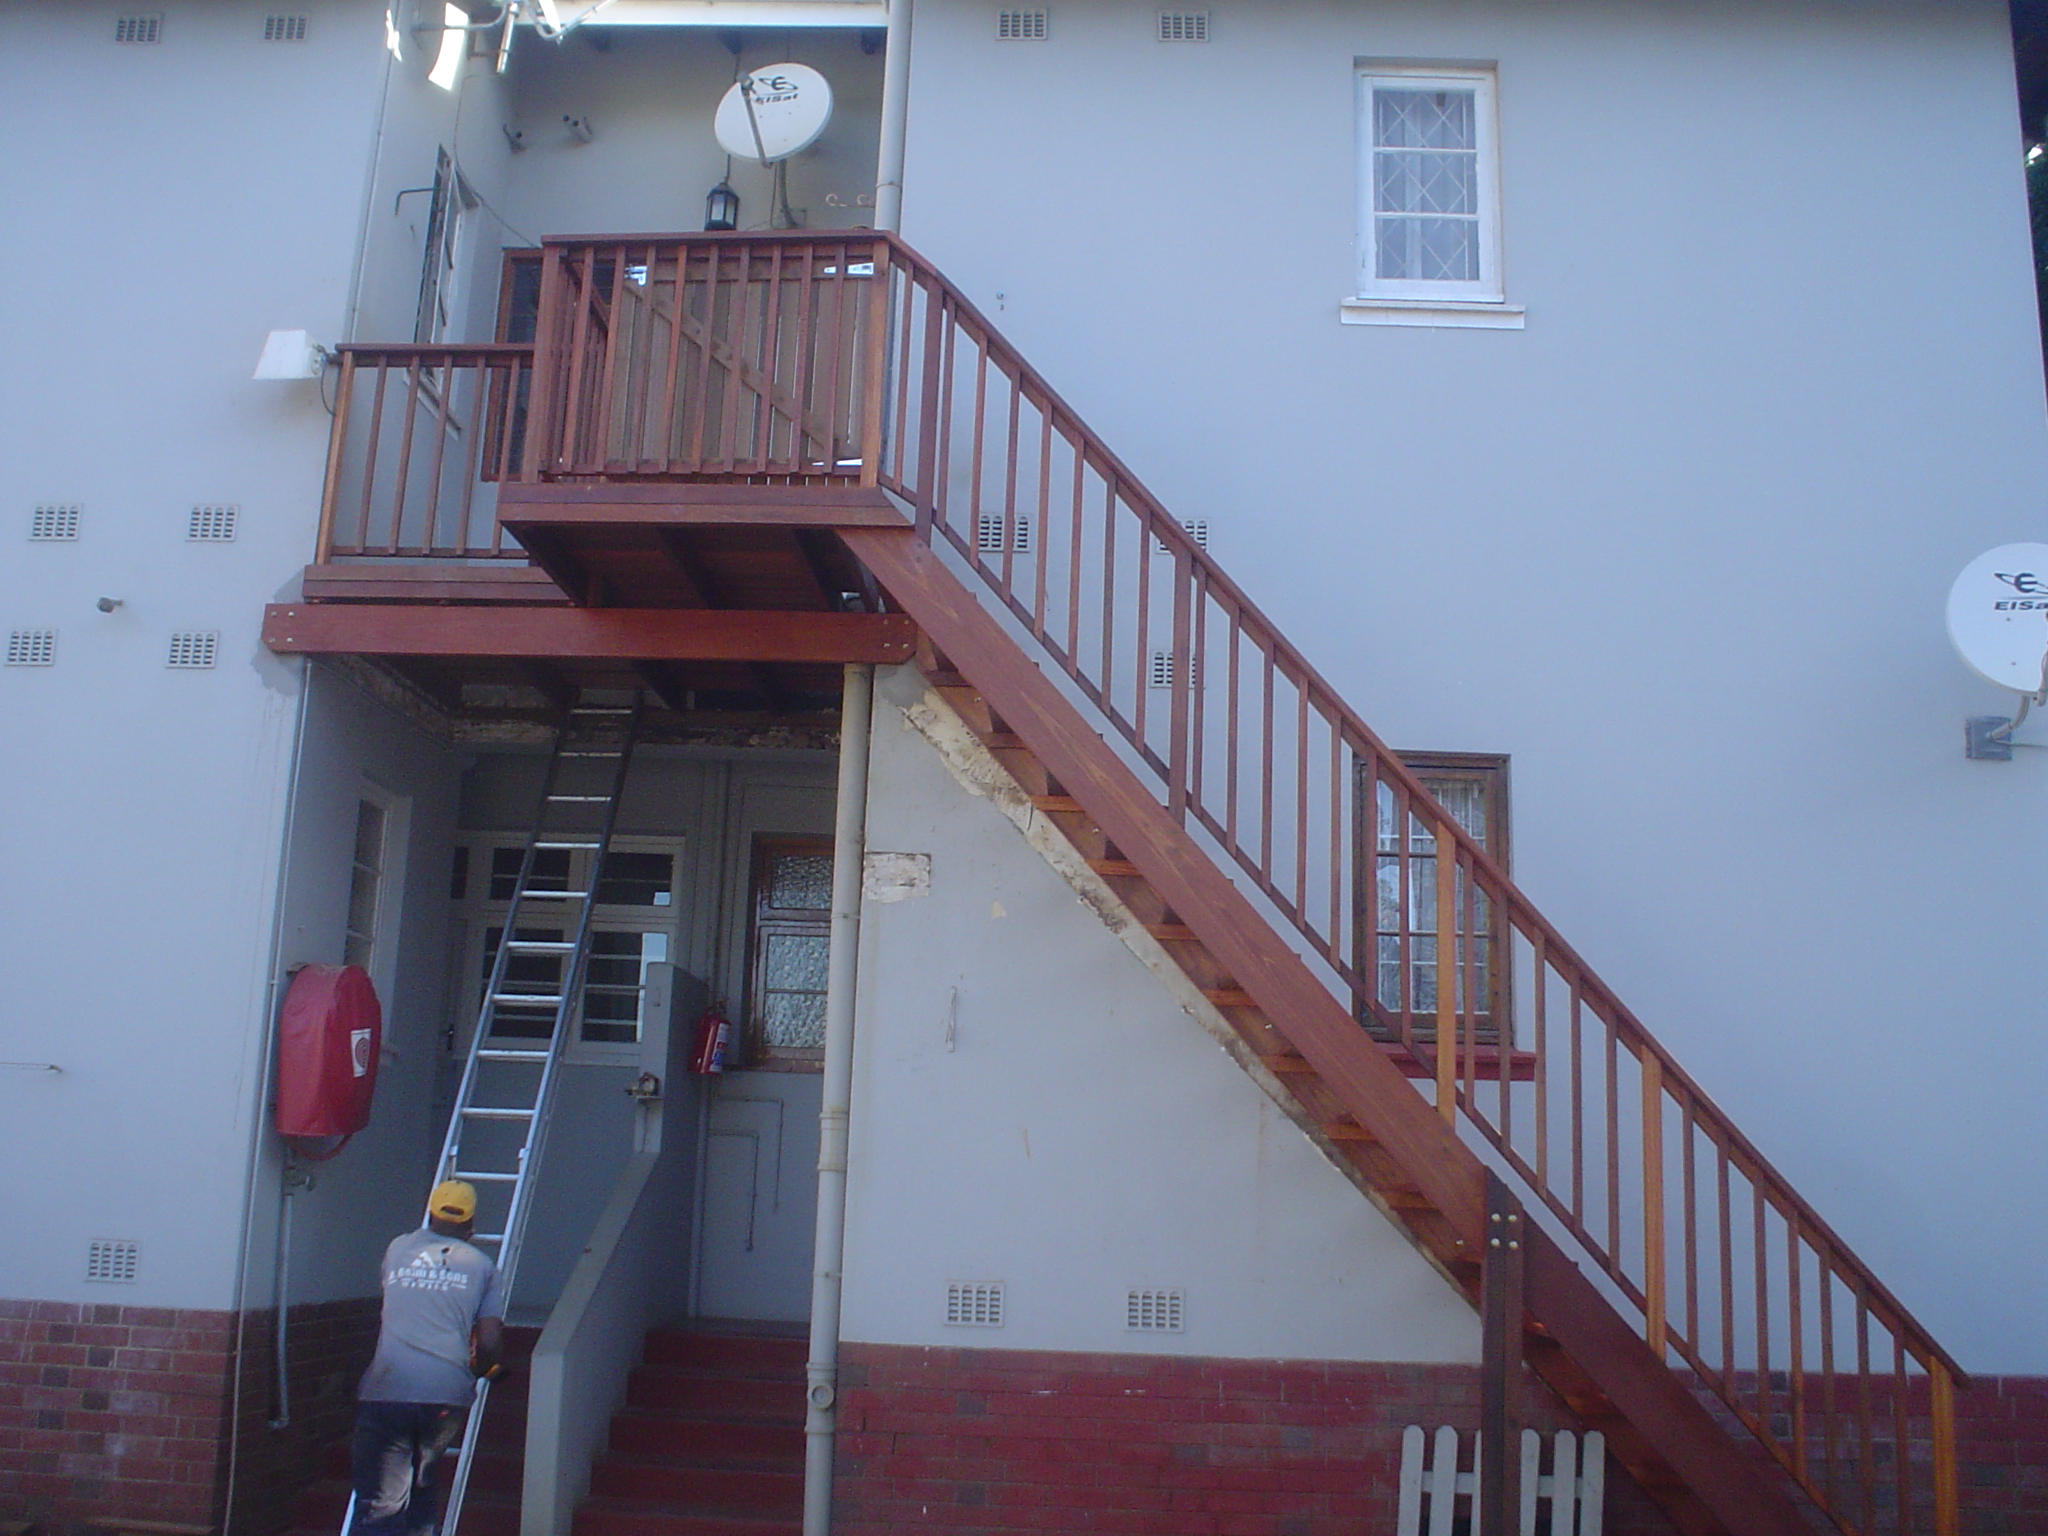
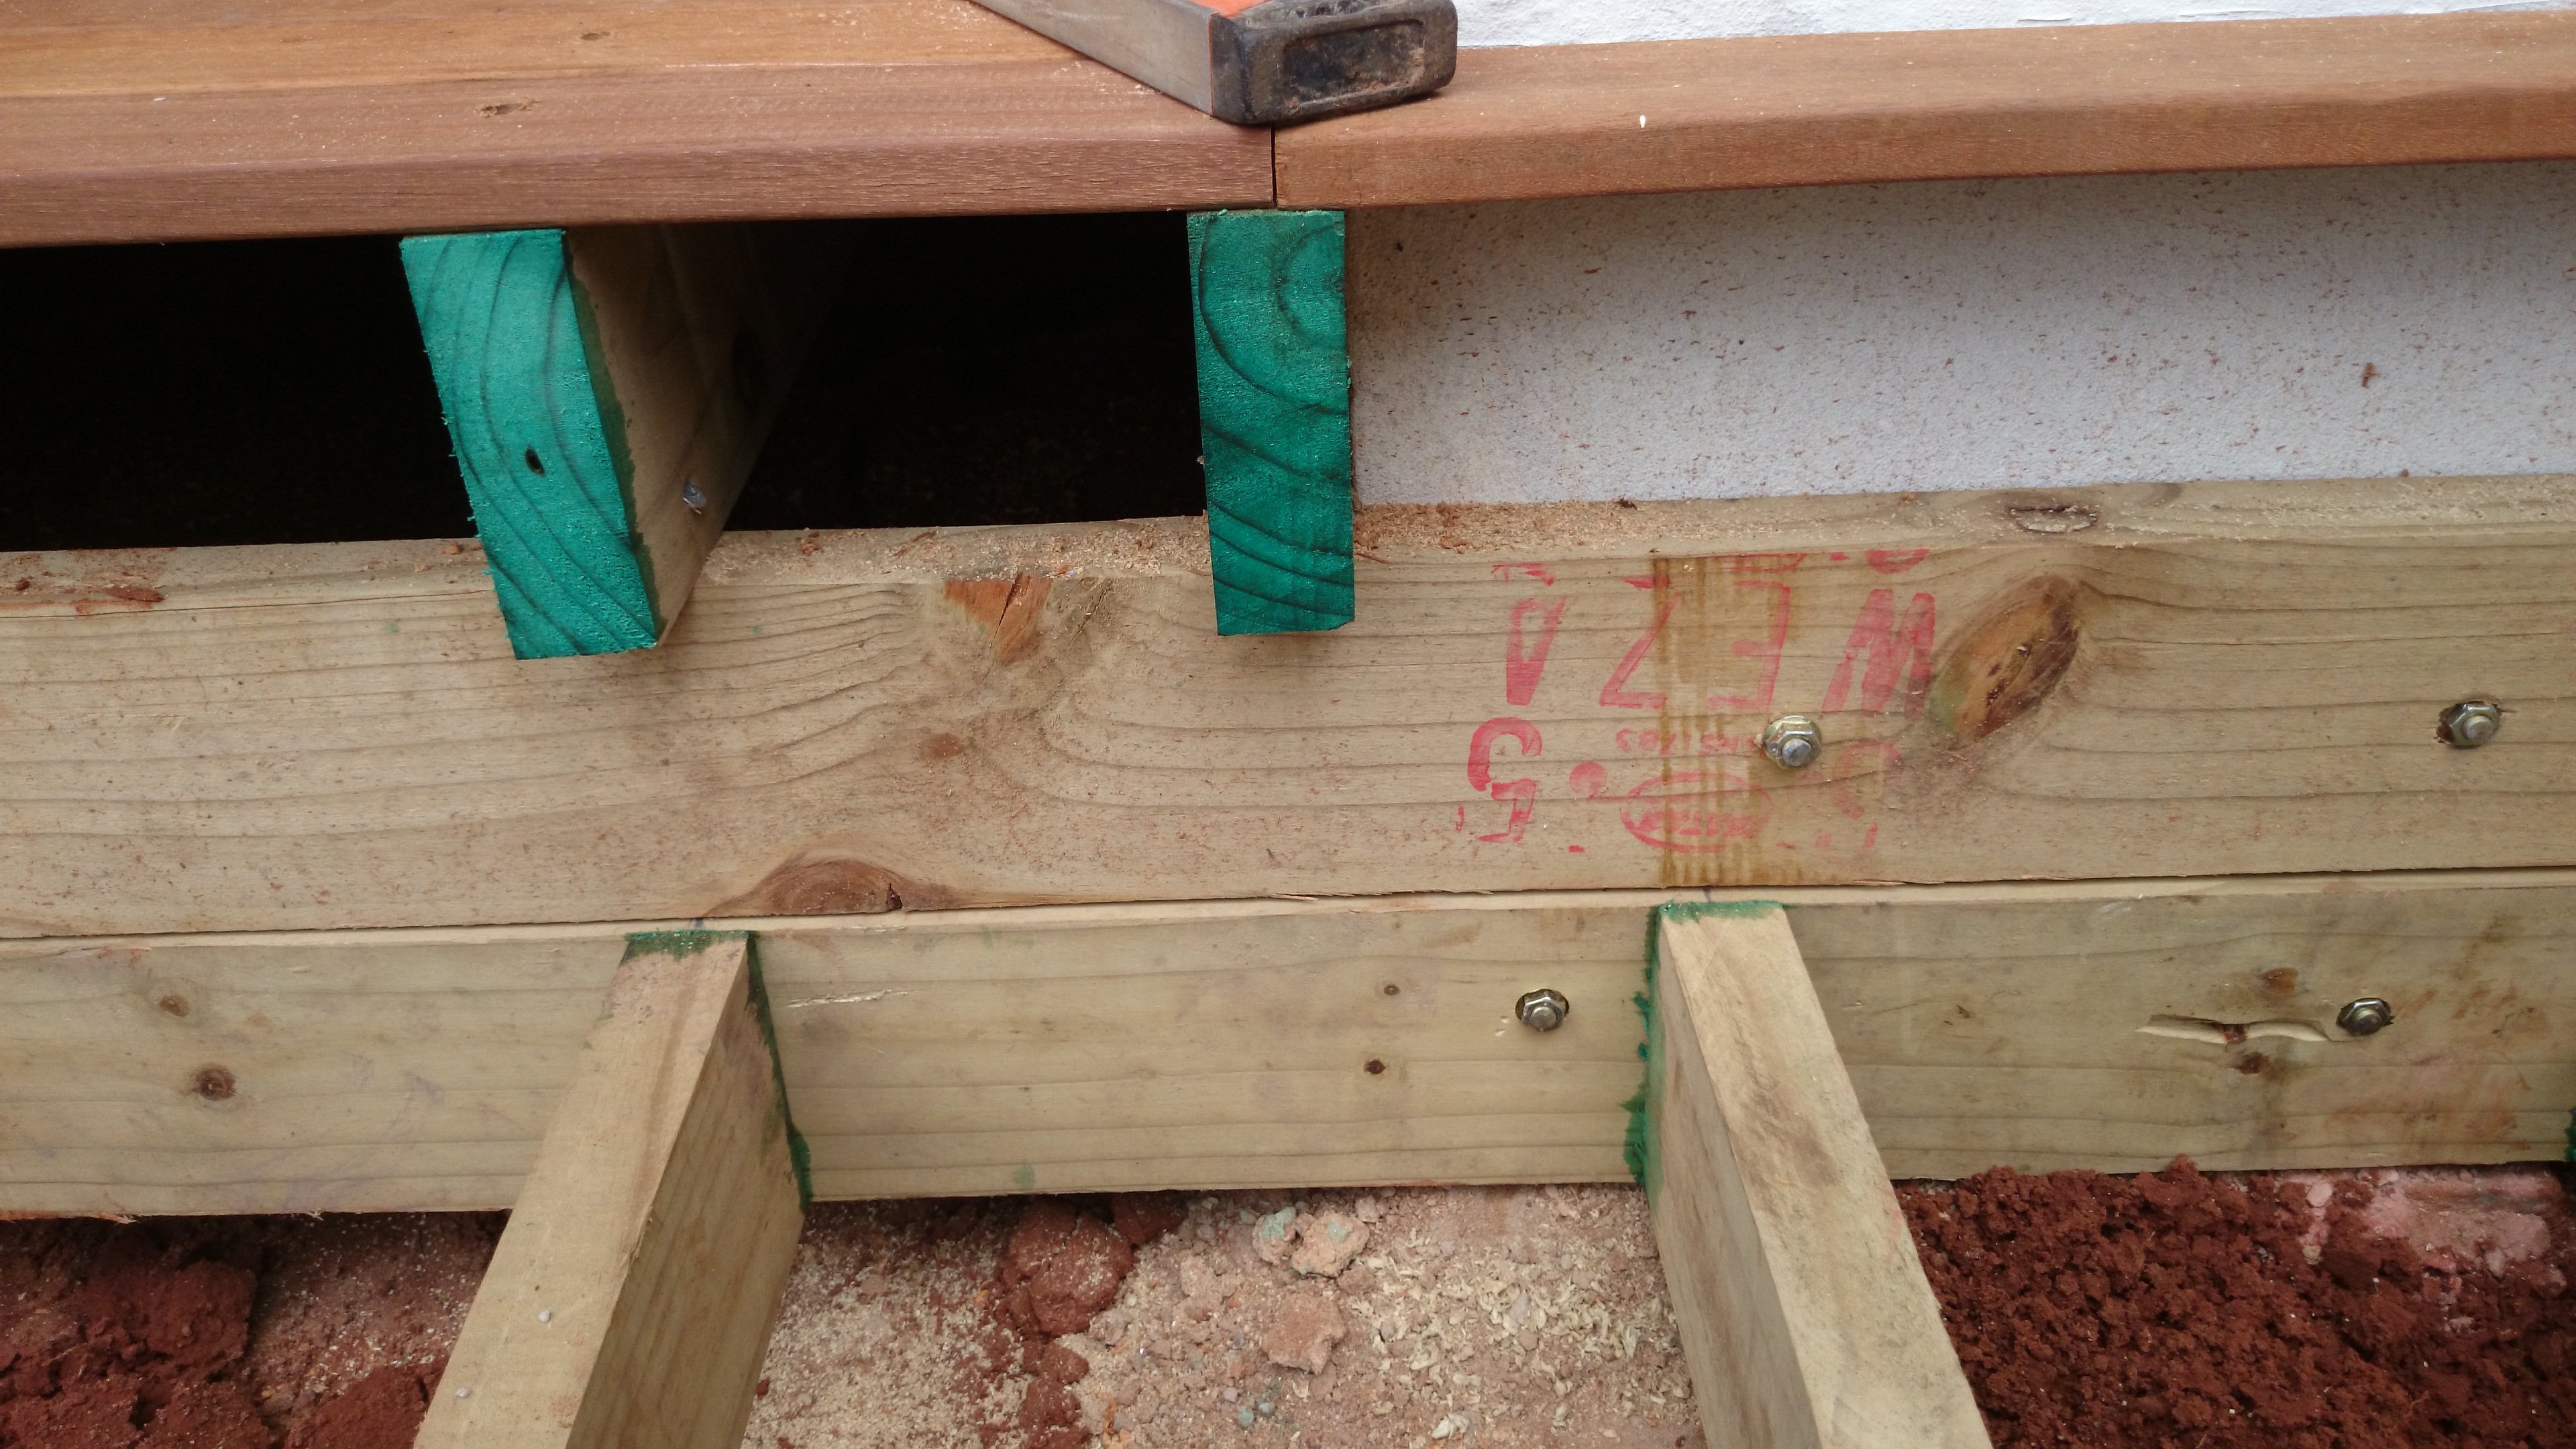
The first one was a relatively small deck. It had two steps off the front edge with closed risers. That was probably the most difficult part of the job but we have worked out a way to build these quite effortlessly. We build the deck with a fascia beam on the front and then we build a box complete with supporting joists frame etc. We then attach this to the fascia beam of the deck we have just built and we are left with a frame which we can clad to create our riser and tread of our stairs. It is much easier to do it this way. Trying to build it piece by piece in situ is a lot more difficult and time-consuming. In fact building decks in sections and then hoisting them up into place is the easiest way to build as it allows you to work on a section of the deck on the floor, get everything square and then simply level it in place and attach it.  We had two concrete columns on the front edge of the deck so it was relatively easy to secure the deck and made for fewer posts and concrete.

Wooden sundecks Durban North

Click to enlarge

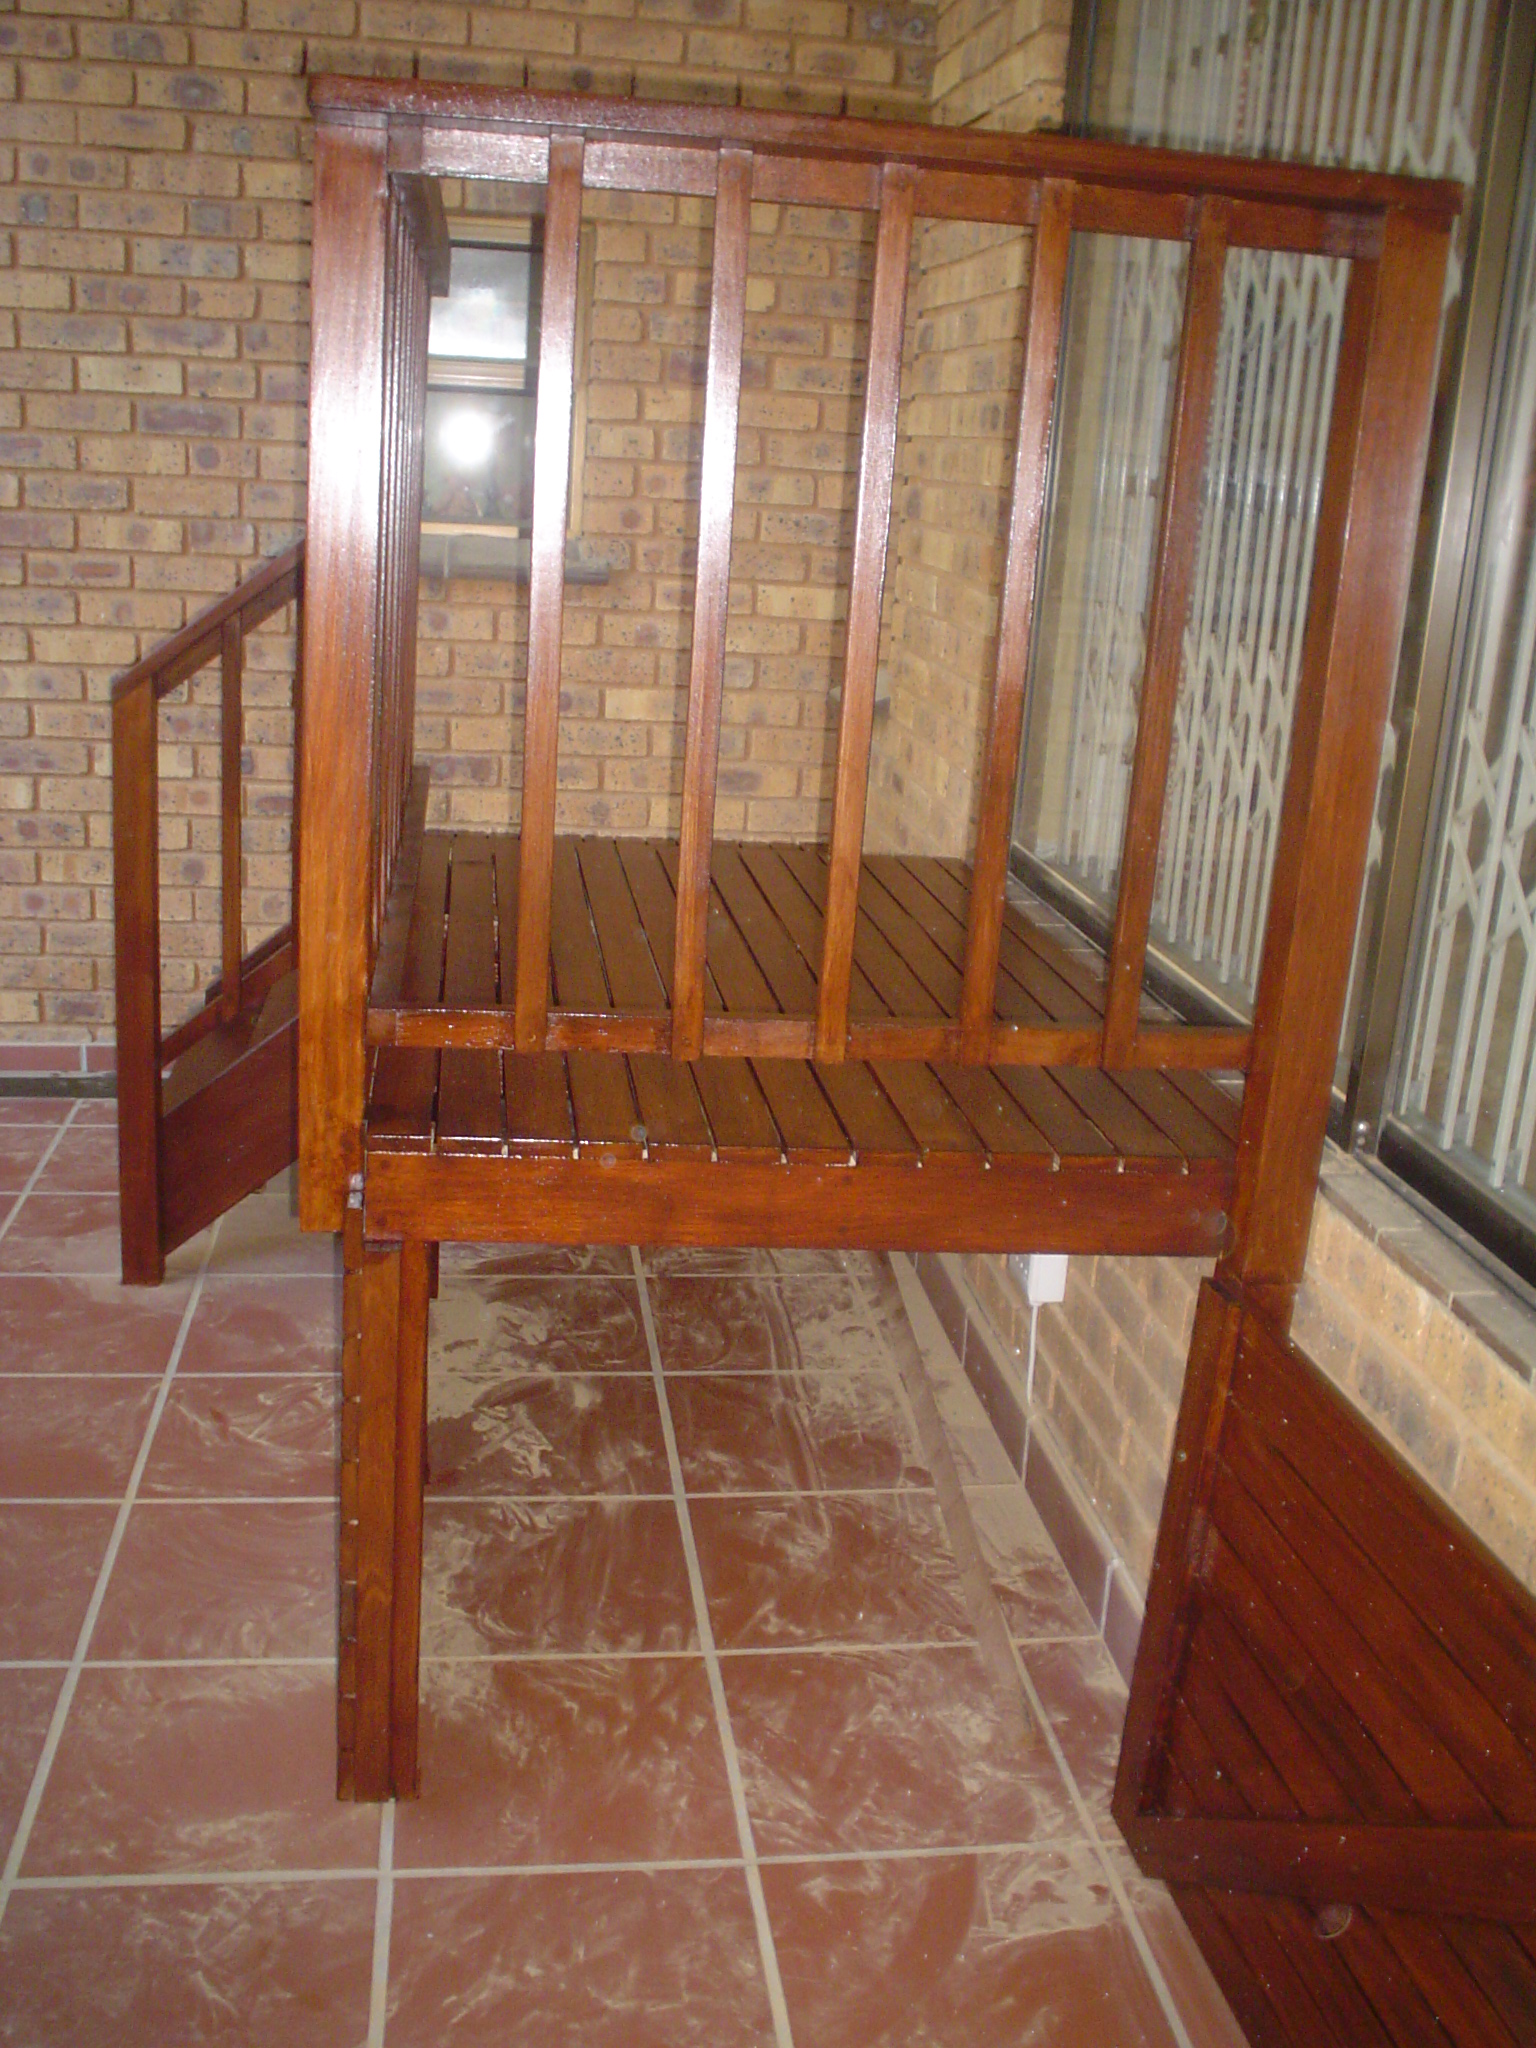
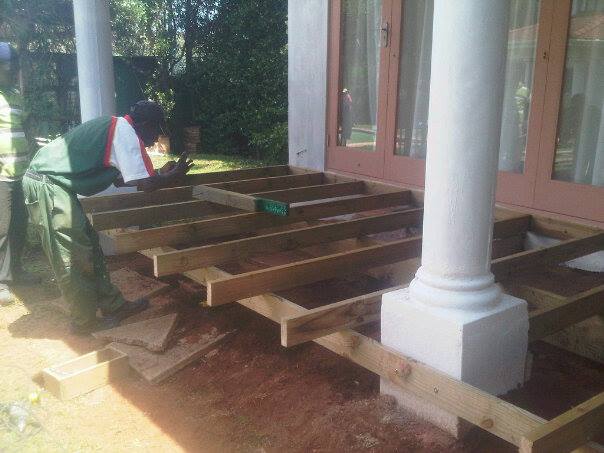
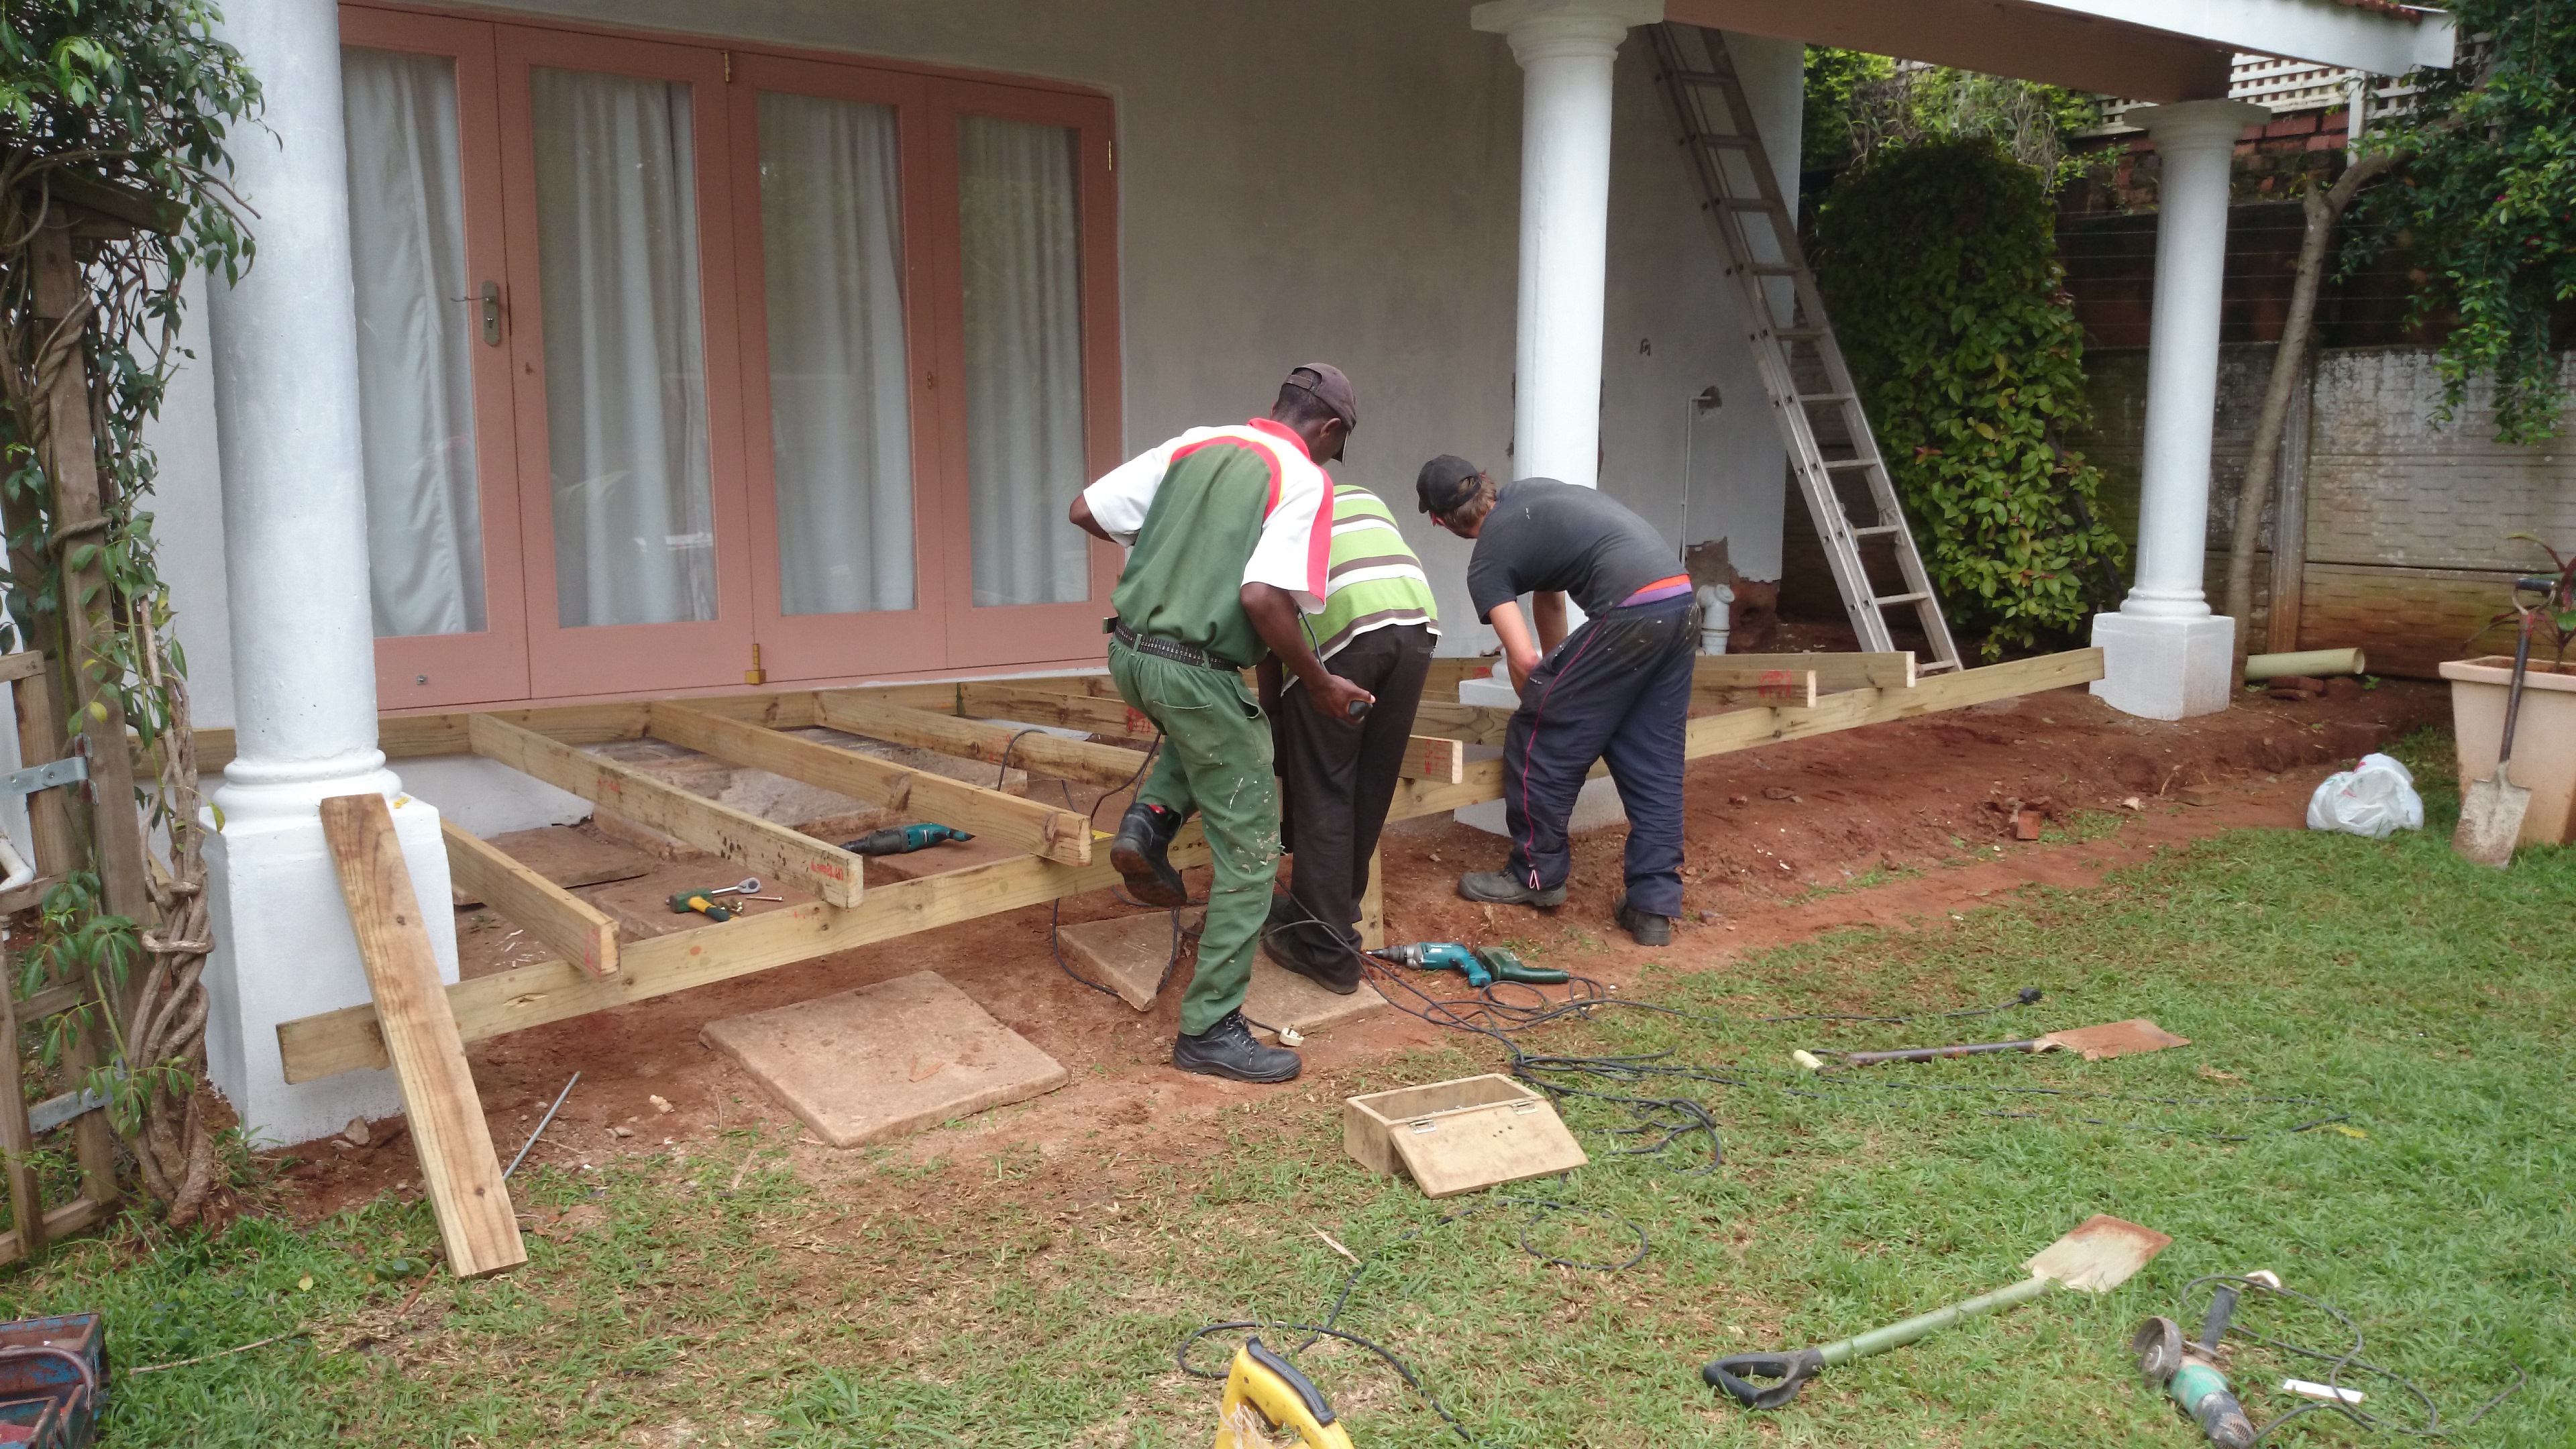
The second deck was closer to ground level off the patio of the main house. Again we built this in sections and lifted them up to secure them to the wall and then secured the front edge with posts to ground using concrete. Because of the length of the deck (11m odd) we had to build it in two sections and lift each section up independently of each other. It becomes a bit cumbersome trying to lift an 11m deck into place. So it is better to build it in two sections and lift each one separately. You need to be careful though that the entire structure remains flat from one end to the other. By doing them in two sections it is easy to get a kink in the middle. So run fish line from one end of the one section to the far end of the other section and adjust the join to get the entire frame flat and level.

In another article I will describe the different methods used to screw the deck boards down. Again there is an easy and quick way or there is the slow process of marking and cutting each board individually. What one wants to do is to lay all boards out and snap chalk line where the cuts should be, then cut them all, put them back and secure them. There is another method too where you screw the boards down and then lift the ends that need to be cut and cut with a skill saw.

Wooden sundecks Durban North

Click to enlarge

These two decks were sealed using Timberlife Satin Wood 28 Base, a sealer suitable for woods of low porosity. Being and oil based sealer it goes on very easily, cannot run or streak and when it comes to maintenance, you simply wipe clean and re-apply. You will need to do it a bit more often than other deck “sealers”, but there will be no more sanding as the oil cannot peel or flake like a coating does. It soaks into the wood, nourishes it, leaving the full natural look of the wood and simply disappears instead of flaking and peeling.

For a free no obligation quote on your wooden deck, balustrades, stairs etc. please call us on 082 496 5444 or use the contact us form below.

← Back

Thank you for your response. ✨

Wooden Screens, Pergolas, Decks and Gates Durban

Driveway gate clad in balau

Click to enlarge

Wooden gates Durban

Click to enlarge

Wooden Screens Durban

Click to enlarge

Wooden balustrades and pergolas Durban

Click to enlarge

We were asked to quote on wooden screens, wooden pergolas, wooden decks and wooden gates on a new build in Prestondale, an area north of Umhlanga, at a development called Izinga Ridge. We originally quoted in about June 2013 and the work was awarded to us for s start date of about 1 November 2013. The job consisted of various screens between brick columns on the boundary wall, a pergola on an open balcony on the first floor, external and internal balustrades, garden gates, a driveway gate and a pool deck.

All the timber we used was balau hardwood with the exception of the substructure of the pool deck which was H3 and H4 CCA treated pine. In other articles you can read about how we have managed to keep our prices down by using this as a substructure whilst still being able to offer up to a 50 year guarantee on this treated timber.

Most of the screens were pretty straight forward with balau cleats on the wall and then clad using a non reeded 19 x 68 deck board. We used non reeded so that both sides would look the same, but we did battle to find non reeded boards as most of the deck boards available are already reeded, or grooved on one side. There were two screens that proved a little more difficult as the wall we were attaching them to was angled. So the boards had to be cut at that angle and secured to each other whilst still remaining level and the join remaining plumb.

The external balustrades were different to our normal vertical picket style balustrades as the client requested horizontal slats instead. Again we used non reeded deck boards for this with a normal post system. On each post we attached vertical cleats to accept the horizontal deck boards or slats. They were installed in line, or on top of the concrete slab, rather than being attached to the front of the concrete slab. The tiles had already gone down so we had to drill through the tiles without cracking them. We installed an “ankle” on the middle post to provide support which is attached to the vertical post and is then shaped to fit around the slab to attach again to the vertical of the concrete slab. This, in effect, allows the post to be attached to the outside but still allows the balustrade to sit on top of the slab. It is much neater but does require a bit more thought and re-enforcing.

Wooden decks durban

Click to enlarge

The pool deck was relatively simple as it was a low-level deck around the pool with a simple frame system using 38 x 114 joists and beams. Extra posts had to be concreted in as it wasn’t high enough to slot an under beam, or main beam, of 50 x 228 in.

The driveway gate was fun. We had the steel made up in a design that would work well by cladding it with wood. We had to source long enough non reeded boards to run the full width of 4m. One cannot join boards in this type of gate unless there is a centre steel vertical support which would spoil the look of the gate a bit. We had run out of standard non reeded boards and so had all suppliers so we sourced a 20 x 140 board and ripped it in half, length ways, to arrive at two boards of 20 x 68.

Wooden balustrades Durban

Click to enlarge

The pictures alongside show some work in progress and some completed work. It was an interesting but challenging job as there were many contractors on site all trying to work, and finish, before the handover of the house. The worst part of the job was fighting traffic from north Umhlanga to the freeway in both the morning and afternoon.

For a free, no obligation, quote on wooden decks, pergolas, garden gates, balustrades and all other outdoor timber work, please call us on 082 496 5444 or complete the form below.

← Back

Thank you for your response. ✨

Wooden Decks Durban – Bluff

Wooden decks Durban

Click to enlarge

This wooden deck in Durban was the second phase of a job we started at the beginning of the year. We were originally asked to build a deck off the main bedroom. First we had to remove the aluminium window and install an aluminium sliding door. I always suggest that clients do this first so that we can build our wooden decks perfectly flush to the new opening.

We had various obstacles to overcome. There was a septic tank that we were building on top of so we had to leave sufficient space and a large enough trap door to access all three tanks. We built one large trap door so that the whole thing could be taken off to access these tanks. During our build a new soak away had to be built as the old one had packed up.

With all of this out-of-the-way, we could continue with phase two which was to complete the main deck with two steps off the front edge leading to the garden and a new second deck in front of the sliding doors to the lounge. This second deck had a corner step similar to the other deck.

Wooden decks Durban

Click to enlarge

These steps were the full length of the deck and had closed risers and treads. In order to build one of these you must basically build a second substructure in the same way as you build the deck substructure in order to span your deck boards across them. So each tread has two beams and joists and is then clad with deck boards. I can clearly remember building our first one which took ages because we tried to build each joist individually. We’ve since learned that with smaller structures one can build a frame and then pull it into position and attach it to the main structure and then clad it. Much quicker, much easier and a lot more accurate.

This was our final job for 2013 and we lost one day to rain which set us back a day and we had to spill over into the weekend. We had originally planned to finish on the Friday, but we had to come back on Saturday morning to seal it.

The original deck we built earlier on in the year had greyed already from the sun so we had to sand it quite a bit to get it back to its original colour for the two to match.
Most of our decks this year have been built using an H3 CCA treated pine substructure. We are able to offer a 50 year guarantee from the supplier for the H3 treated timber and a 30 year guarantee for the H4 treated timber. The cost

Wooden decks Durban

Click to enlarge

difference between balau and CCA pine is huge so we can keep our rates down to our clients and the H3 CCA pine will actually outlast the balau substructure. We still use balau as deck boards and balustrades simply because it is a lot more attractive and more stable so reduces cupping, bowing and checking. In the substructure, because of the size of the timber it is not as important to limit cupping and bowing.

For a free no obligation quote on your wooden decks, pergolas, walkways, balustrades and other outdoor timber construction please contact us on 082 496 5444 or use the contact us form below.

← Back

Thank you for your response. ✨

Solid Wood Flooring Installer Durban


Solid wood floors Durban

Click to enlarge

Solid wood flooring in Durban, and for that matter throughout the world, has risen again in popularity over the last few years. Many years ago solid wood floors were quite popular and in the 1970’s these were replaced with carpets. Many old houses are no finding top quality solid wood floors beneath their carpets and renovating them by pulling up the carpets and sanding and sealing them. Solid wood floors add an air of class to any house and of course add tremendous value.

There are various different types of wood that one can use, all of which vary in price, durability, hardness etc. I’ll list a few of the most popular in order of cost with the most expensive at the top. This list is by no means exhaustive but will give you an idea of what you can choose from. I won’t list current prices as these can change from time to time. For a costing please contact me below or through the contact us page.

  • Teak
  • Kiaat
  • American White Oak
  • Ash
  • Beech
  • Maple
  • Cypruss
  • Oregon
Solid wood floors Durban

Click to enlarge

Being solid wood floors they can be sanded many times, unlike laminates which can only be sanded a few times if at all. They are of course more expensive so one needs to carefully budget to ensure that the right choice will be made.

They can be installed in two methods. One is to glue them down to the substrate, normally the concrete floor using a suitable good quality adhesive. The other is to suspend then on batons about 30mm off the floor. Each method has its own pro and cons and at times one can only use the one method. For instance if the finished surface needs to be raised 50mm or so then a suspended or sprung floor will be required. If the reverse is true then they will need to be glued down. Also if the substrate is not completely flat, then it is better to suspend the boards. Gluing boards to a substrate that is not 100% flat it asking for trouble as the boards will eventually lift and the floor will need to be re-done.

Boards are normally purchased from a manufacturer and can either come straight-edged or with a tongue and groove on them. Normally those that are glued down come with a straight edge and those that will be suspended will come with a tongue and groove so that a nail can be inserted at a 45 degree angle to secure the board through the tongue so as not to be visible from the top.

Solid wood floors Durban

Click to enlarge

Once the floor is down the gaps need to be filled and then sanded to get all boards flat to each other. Sanding will proceed until a smooth finish is obtained and then it will be sealed using a good quality polyurethane. Nowadays there are many water based polyurethane sealers which behave in a similar fashion to the old tried and tested two pack sealers which contain an activator to harden them. Normally three coats are put down with a light sand between coats to ensure a smooth finish. After the first coat, especially with water based sealers, the fibres in the wood will be raised and need to be sanded off before the second coat is applied. This is sometimes not necessary between coats 2 and 3 unless there is dust in the air that settles on the surface before it dries. The best test is to feel the surface between coats to establish if a light sand is required.

For a free no obligation quote, please call us on 082 496 5444 or use the contact form below.

← Back

Thank you for your response. ✨

Wooden Sundeck Constructed in Toti Durban

This wooden sundeck we constructed in Durban was a low-level deck which was barely off ground level. We were taking it flush off the level of the floor in the lounge and extending it outwards into the garden. The grass was not growing properly in this area due to large trees that were creating a large shadow so the client wanted to deck it to eliminate this problem.

The biggest challenge when building a wooden deck near or on ground level is to get a support beam underneath the joists where needed. There are two methods one can use. The first is what I call the cleat and beam system whereby a beam is placed underneath the joists to give them their support. We normally use a 38 x 114 joist and a 50 x 228 beam. One needs to span the 38 x 114 to a maximum of 2m but 1.8 is preferable. So every 1.8m to 2m one needs to slot an under beam below so as to support those joists. Posts should be used every 3m on the 50 x 228 beam. With this spec one can save on timber while still providing adequate support so that the deck is structurally sound.

The problem with this system arises because if you have a 228 beam, plus a 114 joist and then a 19mm deckboard on top of that your total height needed above ground level is 361mm. If the deck is too close to ground it will mean excavating soil to be able to drop that beam down enough to still arrive at the original height of your deck. Although this is quite possible and not that too time consuming, it sometimes results in the main beam sitting in soil or it may come into contact with wet soil over time. One must therefore use at least H4 CCA Treated SA Pine as the beam and in fact that whole substructure should be H4, even though the joists aren’t in contact with soil, to ensure that no rot will occur.

The other method is to create a frame, all in the same plane using 38 x 114 and use no under beam. This will result in the deck only being 133mm in height so that no excavation will be needed in order to bring the deck up to the required height. However now that you don’t have a beam to attach posts to, you will need to attach the posts to the joists and fascia beams. Again this is not a problem, but it will require a few more posts than in the first method as you can only span your 38 x 114 to a max of 2m. Hence more posts, more concrete and more labour in digging holes.

We used the joist and beam system here as we had enough space below to set the beam without having to dig too far into wet soil. So our work was made lighter by not having to dig too many holes.

Once the substructure is up, the deckboards can go down. On this wooden deck we used 19 x 68 balau deckboards. We used two deckboards as a fascia to cover our joists and beams, filled our holes with epoxy, sanded and sealed.

For a free no obligation quote or advice on your deck or other outdoor timber construction please call us on 082 496 5444 or use the form below to contact me.

← Back

Thank you for your response. ✨

Wooden Deck Built in Toti at a Guest House

Wooden deck builder Durban

Click to enlarge

This was one of my first wooden decks in Durban that I undertook. The Guest House we built it for had just opened up the side of the dining room on the first floor with sliding doors and now wanted to extend the area by adding a deck of about 14m². It is always important to first break through the wall and install the sliding doors and then build the wooden deck. This way the deck builder can get the surface of the deck flush with the entrance to the room. I have built one deck before where the client insisted that I build the deck first and then they were going to break through. Although we did our best to measure where the inside floor was, there may still have been a small step up or down once they had broken through. On this build though it was done the right way around and the deck was flush with the floor inside the dining room.

The deck was a normal cleat, beam and joist system where we secured a cleat to the wall with sleeve anchors, installed vertical posts and attached a beam to that and then ran joists between the cleat and beam with a small canter lever. We had to try to set our posts as far out as possible so as to create enough space under the deck that could be used.

Wooden deck builder Durban

Click to enlarge

The balustrade was a normal picket style one. These are the safest and really the only one that is completely compliant with building regulations. Building regulations state that there should be no opening that is larger than 100mm. With all other balustrades there are some spaces that become greater than 100mm. Besides being non-compliant they are not that safe especially for small children. With the pickets running in a vertical direction it is more difficult for children, or adults, to climb up on the balustrade and fall over. The other designs offer more horizontal pieces that people can use to climb up on.

The stairs we built here joined the deck to the pool area which was about half a floor up from ground level. There were separate concrete stairs running from ground level to the pool area but the new wooden stairs we built could now be used to access the pool area, and the rest of the outside area, from the dining room. Because there was no way of supporting the stringer mid-way we had to ensure that we had the correct width of stringer so that it would not break over time. Most of the strength in a piece of wood is in the width and not the thickness as the downward force is exerted on the width.

Wooden deck builder Durban

Click to enlarge

We finished up by filling our holes with epoxy and sawdust and sealing with a Timberlife Satin Wood Base 28 Mahogany tint. In our decks we counter sink the screws which leave a small screw hole that water can get into. It is important to fill these so that no water can get in. If water does get in it can travel down the end grain and will cause the wood to rot much quicker at the point of the screw hole. Water travels through wood along the end grain rather than being absorbed from the face or side grain. Wood filler is also not suitable as it will pop over time due to the weather. Clear epoxy works well mixed with a little saw dust to match the colour. Once it’s dry, use a grinder with a sanding pad to flat it and then sand the grind marks off before finishing.

For a free no obligation quote on your deck or for some advice, please contact us on 082 496 5444 or complete the form below.

← Back

Thank you for your response. ✨

Wooden Balustrade Built in Everton – May 2013

Wooden balustrade

Click to enlarge

This wooden balustrade we built in Everton Kloof, Durban was for an established client of ours that we have done various amounts of work for in the past. She had had some stairs built in brick and concrete down the bank to access the lower level of her property. We had to wait a few weeks in order for the concrete to cure properly before we drilled into the side of it. It is always a pleasure installing a wooden balustrade onto a concrete substrate as opposed to a brick or block substrate. With concrete your holes can be drilled easily and the sleeve anchors used to secure the posts to the side of the stairs take nicely and bind properly. When drilling into bricks, or even worse blocks, the cavity that exists in the brick or block almost always creates a problem in that the sleeve anchor has nothing to set itself against and ends up turning on itself and not binding properly. It is most frustrating and sometimes results in drilling new holes to find a solid substrate or even going the chemical anchor route. If one is drilling into blocks with large cavities, it is sometimes better to go the chemical anchor route from the beginning.

Wooden balustrade

Click to enlarge

Chemical anchors come with sleeves that are inserted into the holes first and then the two-part chemical is squeezed into that and then a thread bar is inserted. The chemicals dry very quickly, in a few minutes or less, and the thread bar is then fixed securely in the wall. A post can now be pre drilled and inserted over the thread bar and washers and nuts fastened onto that. It is a much stronger bond than sleeve anchors, albeit more expensive. Currently chemical anchors can cost about R300-00 per tube, the size of a tube of silicone, and the sleeves are about R15-00 each.

This wooden balustrade needed to have a bend in it that can be seen from the pictures alongside as the top tread was deeper than the rest of the treads. There was a small landing at the top where the balustrade needed to be level with ground. This was the normal vertical picket style balustrade and we sealed it using our favourite Timberlife Satin Wood Base 28 in a mahogany tint. Using this product will result in lower maintenance costs going forward as no sanding will be required when re-sealing. You simply clean and re-seal.

Wooden balustrade

Click to enlarge

Balustrades are not the easiest thing to install. One needs to be very careful that both rails are parallel to each other and that they are parallel to the tips of the risers. Of course the tips of each riser will not necessarily be in a straight line. What we do is run a straight edge or fish line across all the risers to get an average line that we work from. The lower rail is then set parallel to this line and the top rail and hence the capping is set to this, again parallel. One also needs to be careful when taking corners. Often the distance between the capping and the steps can vary, especially if there is a landing involved. Where a balustrade arrives at a landing one needs to step the balustrade so that the capping will remain at the 1m mark above ground.

For a free no obligation quote on your wooden balustrades or other timber construction, please complete the form below and I will contact you or you can contact us on 082 496 5444.

← Back

Thank you for your response. ✨


Balau Screening in Cotswold Downs – June 2013

Balau or timber screening

Click to enlarge

We were called upon to quote on some balau screening in the Hillcrest, Durban area at a new development called Cotswold Downs.

There were various aircons, heat pumps and gas bottles that needed to be clad or screened so as to conceal them.

We used balau 30 x 40 struts or cleats attached to the walls. In some instances we used hiltis as there was not much load on the cleat.   In other instances we used 10mm x 100mm sleeve anchors.  We built a frame using the 30 x 40 balau and then clad it using a standard deck board of 19 x 68 with a 19mm space between. The 19mm space is standard in screening or cladding as it provides enough coverage without being too tight in its appearance. A gap of 5mm, which is standard in building a deck, would be far too close and would give it an odd appearance.

Most of the structures we built here were simple enough with either two or three sides and a removable lid so that access could be gained to change gas bottles or service aircons. Some of them had to have fronts

Balau or timber screening

Click to enlarge

that were removable as well as tops so that access could be gained from above or from the front. Some were removable lids and fronts and some were hinged. One needs to be careful which hinges you chose as they need to be strong enough and weather resistant. Solid brass hinges are expensive and with the weight of the balau can be problematic. Solid stainless hinges with bearings are best if the weight of the door is quite large. On the smaller door we used aluminium hinges as the door wasn’t too heavy and the aluminium will stand up the weather.

There were two doors we made which measured 2.5m high and 750mm wide each. That size door in balau is quite heavy and we used three galvanised strap hinges on either side. The only problem with strap hinges is that they need to be placed on the side of the door that opens, so they were visible on the outside. Some may say it adds character to the door, but sometimes you don’t want to see them. Being galvanised steel they are difficult to paint but can be painted with a Hammerite product specially designed for galvanised steel.  The only other alternative to these were to use the galvanised strap hinges that have a bent arm and slot into another piece attached to the frame. However these would have resulted in a large gap between the frame and the door or gate. Normal butt hinges wouldn’t have been strong enough to hold the door due to the sheer weight of them in balau.

Balau or timber screening

Click to enlarge

When building this type of structure it is often easier to try to build the whole thing in situ. So a frame goes up first, then you set the braces at the back to the correct length and then start adding deckboards, leaving one side long which can be cut afterwards.  If it is quite large then the door needs to be built on the ground, leaving the ends long and hung, then cut in situ.

They are unlike a normal door in that they can’t be successfully planned to fit the frame because the end grain is on the side.

We finished them off by filling holes with epoxy, sanding flat and sealing with Timberlife Satin Wood Base 28 in a mahogany tint.

For a free no obligation quote or advice on your decking or screening requirements please complete the form below and I will contact you, or you can call us on 082 496 5444.

← Back

Thank you for your response. ✨

Wooden Stairs Built in Cowies Hill, Durban

Wooden stairs Durban

Click to enlarge

These wooden stairs we built in were quite interesting because the client had a dining room which was raised about 600 from the patio outside. He wanted to be able to access the dining room through the new sliding doors. So we designed a small landing and some stairs to fit snugly in on one side so as to not take up too much space on the patio yet still allow a safe passage down the stairs. There were only a total of two treads plus the landing. It not only added value by creating an access point but also added charm with wood.

We built the entire landing on the ground from balau, screwed it all together and then lifted it into place and attached it to two walls of the house using sleeve anchors. This method also kept the whole landing in the same plane i.e. no cleat and joist system but rather a joist and fascia beam system. Each method has their own applications. If it is a fairly large deck where it would be impossible to attach each joist to the beam and then lift it into place, then one would need to use a cleat, beam and joist system. However where it is possible to attach each joist to the beam or fascia beam then it can be semi pre assembled and lifted into place. This can also successfully be done with a deck that is quite close to ground as the ends of the joists can be supported quite easily while the other ends are attached to the fascia beam which is then attached to the wall. However a deck that is raised off the ground would pose problems in trying to support each joist individually while attaching them and then lifting the entire structure up. The fascia beam system also allows one to keep the structure in the same plane and if space beneath the deck is limited then this is a better option.

Wooden stairs Durban

Click to enlarge

We clad or screened the underside of this landing to create a storage area with a hinged door on one side so that it could be closed and locked.

This one we finished with Timberlife Ultra Care Gold as it was not exposed to direct sunlight. The Timberlife Satin Wood Base 28/28 has a much lower wax content so tends not to blemish that easily in direct sunlight. The Ultra Care Gold however has a much higher wax content and the UV in the sunlight tends to make it go a bit blotchy which can result in you having to sand it all off when it comes to maintenance. The key to low maintenance in wooden decks is to apply the correct finish correctly. To sand an entire deck back to wood and remove all traces of finish is almost impossible and at times I have thought it would be cheaper to simply replace the entire deck.

This was a small day which took us a day to complete. We also added a small gate for him on the existing deck, so in total it was a two-day job with sanding and sealing.

For a free no obligation quote on stairs or other wooden structure please complete the form below and we will contact you or you can call us on 082 496 5444.

← Back

Thank you for your response. ✨

Wooden Stair Case Build Durban

Wooden stair builder

Click to enlarge

This wooden stair case build by The Wood Joint in Durban was a tricky one. The client was a committee member on the body corporate for a small block of flats in Durban. There were about 4 units in the block and the existing steel fire escape had rusted to a point where it was unsafe. So first we had to remove the steel structure. With a little help from my friends, we came in and chemical anchored stainless eyes into the wall on both sides above the steel platform you see in the pics. From there we rigged up some climbing equipment to be safe and started cutting sections out of the steel structure and lowering them slowly to the ground. We had to cut small sections as the steel was 10mm thick and we didn’t want to damage the walls, windows or doors on the way down. We managed to get most of it down in one day with a small piece remaining for day two. We battled slightly in getting the main support off as the sewage pipes had been installed after the steel so we had to cut the steel out around the pipes so as not to damage the pipes. In removing it we inadvertently damaged a corner of the wall as the rawl bolts there were quite large, rusted and pretty much part of the building by now. We patched that using structural grout which was hard and strong enough to support our main beam to.

Wooden stair builder

Click to enlarge

With the steel gone, we set out to build a wooden stair case and landing that could act as a fire escape. The small landing part was easier enough and we canter levered it so as to keep our posts out of the way below for parking. In these smaller blocks of flats in Durban space is very limited so posts need to be kept well out the way of parking space. Because we were canter levering it we needed to use 30 x 140 joists of balau rather than our normal 30 x 102 joists.

The stringers for the stairs were also tricky as we had to follow the original line of the stringers because there was a window beneath that we couldn’t cover and we could only protrude to the end of the wall without obstructing the driveway. This resulted in our stringers being placed at 45 degrees which resulted in our risers being of equal length to our runs or treads. It is not ideal as it makes the stairs very steep but we had no option due to space and height. We were a total of about 4m in the air to the landing.

The treads went on alright, the balustrade too and we had to join the stringer on the outside with two independent posts to ground to support it as the timber we could get wasn’t long enough to run the full length of the stringer.

Wooden stair builder

Click to enlarge

We went back there a year or two later as one of the treads had popped a screw. Sometimes the timber moves more than one wants it to and breaks the screw off. We do however put additional back up screws in each piece we secure so they are safe in the event that one screw does break.

For a free no obligations quote on wooden stairs or any other outdoor timber construction please complete the form below or you can call us on 082 496 5444.

Wooden stair builder

Click to enlarge

Wooden stair builder

Click to enlarge

← Back

Thank you for your response. ✨