Wooden Sun Decks Durban and Cape Town

Wooden decks Durban and Cape Town

Click to enlarge

A wooden sundeck is a valuable extension to your house in that it is relatively cost-effective whilst still increasing the living area and total coverage of your property. If properly installed and maintained it will give you many years of warmth and enjoyment and you will retain the value of it when ultimately selling your property. It is more cost-effective than brick, concrete or steel and with the trend moving towards sustainable and green building, a sun deck, sourced from sustainable forestry will retain its value for many years to come.

We generally use CCA treated pine in our substructures as it is a lot more cost-effective than using balau and we are still able to offer a 50 year supplier guarantee on the timber used in the substructure. This is provided we document the build with photos, retention records from the treatment plant, the date and invoices of when we bought the timber etc. As a rule we build in accordance with their criteria for the guarantee, but if a guarantee is required, we must be notified beforehand so that we can obtain these documents during our build. We use balau deck boards on the surface of the deck because they are infinitely more stable and do not warp or twist as much as balau. This is not as important in the substructure because it is largely covered from the sun and the pieces we use are a lot thicker so don’t warp or twist as much. Deck boards on the other hand take the full brunt of the sun and tend to warp more quickly. Also we source our balau at very competitive prices and can therefore build a deck at very competitive prices, even compared to using pine deck boards. Pine deck boards are much softer so one has to use twice as much wood negating the cost saving by using a cheaper timber. The structural pieces in balau are more expensive per cubic metre than pine so using a CCA treated substructure reduces the cost which we pass on to the client.

We use kalgard screws which are guaranteed by the supplier against rust for 25 years, we counter sink them and close the holes using an epoxy and saw dust mixture to match the colour, thus eliminating water ingression through the screw holes thereby reducing rot at the screw hole. They are sanded flat and we seal our decks using an oil based sealer which penetrates the timber rather than leaving a coating or film on the surface. Maintenance is therefore easy and inexpensive. You simply wipe clean the timber, clean any greasy marks off with turps and re-apply using brush, sponge, cloth or spray.

For some expert advice or a quote, please contact us on 082 496 5444 or complete the contact us form below.

Go back

Your message has been sent

Warning
Warning
Warning
Warning
Warning
Warning

Warning.

Wooden Floors and Laminates

Solid Wooden flooring Durban and Cape Town

Click to enlarge

We specialise in Solid Wooden Flooring, Laminates, Parquet flooring, Dustless Floor sanding and Sealing and repairs to wooden floors.

Wooden floors exist in many different forms from Swiss Parquet, Parquet, Sprung or Suspended Floors or wooden floors that are adhered to the substrate. They come in many different types of wood and each one has its own unique characteristics and pro and cons. From the menu bar on the right you can navigate to the different types and read up and view pics of the different styles. Alternatively you can use the search bar above to the right to search for something more specific. There are articles on this site of jobs we have completed with pics and the various challenges we overcame in the installation.

Solid wooden floors were very popular in years gone by and in about the ‘70s were all covered up with carpets and other types of flooring. They are making a strong come back now and are very popular due to their warmth, charm and the ability to maintain them relatively easily and cost effectively. Take a look under your carpets and you may find some very nice teak flooring that can be restored back to its original beauty at a relatively low-cost.

For a free, no obligation quote, on all your wooden floor requirements please contact us on 082 496 5444 or use the contact us form below.

Go back

Your message has been sent

Warning
Warning
Warning
Warning
Warning
Warning

Warning.

Laminate Flooring Installers Durban and Cape Town

Laminate flooring Installer Durban and Cape Town

Laminate flooring installation in Durban and Cape Town is a fairly large industry with many contractors and many suppliers. Installation prices are normally within a tight band with most installers charging more or less the same amount to install. Materials however can range greatly with some very affordable laminate floor boards and some more expensive ones. Quality varies too and one should always purchase them from a reputable supplier so that in the event of defects they can be swapped out or a refund obtained.

It is not uncommon for a client to select and purchase their own materials and to then appoint an installer to install them. However, as is the case with most contracting jobs, the client should be careful to purchase the right amount of materials so as not to waste materials and also not to slow the contractor down. There is nothing more frustrating for a contractor to arrive at the job to find that he can’t do it because a crucial part of the material is missing. It slows him down and takes extra days to complete. A contractor makes his money by doing the job quickly and correctly the first time. If he is waiting for materials he loses days and if he rushes his job and takes short cuts he ends up coming back to fix problems which also results in lost days. is first laid on the floor to provide a cushion between the boards and concrete.

One of the most important aspects of installing laminate flooring is to make sure your floor is clean and flat. If the floor is too far out of being flat it will result in boards lifting. Having said that, there is some tolerance because the boards are not as rigid and unforgiving as solid wood. So run a straight edge over it and make sure it is relatively flat. If it is not and it is very badly out of flat, consider screeding it to get rid of the high and low spots. Also small stones or bits of building rubble can result in boards having to be lifted for obvious reasons, so sweep the area properly and if possible vacuum it with a good quality industrial vacuum cleaner to make sure that all debris is lifted off your surface.

The laminate boards will come in equal lengths but when laying them you don’t want a join line all in the same place so you will need to cut shorter lengths to create a staggered joint. Keep the off cut because it will be used on the other end of the room. Be careful too to get the ends the right way around. On each end of the board there will be grooves to clip into each other, so you want to make sure that you use the right side on each end of a length with your cut end up against the wall. On the next row of boards don’t cut the short one to the same length as the previous row, make it a little longer or a little shorter, so as to never create a straight line of joints. The joints should always be completely randomly staggered.

Gaps of about 6 to 10mm should be left on the sides and edges to allow the wood to expand and contract. This can be covered later with a skirting. If no gap is left, the wood will try and expand, push up against the wall, and the boards will pop.
For a free no obligation quote on laminate or hardwood flooring please complete the form below.

Go back

Your message has been sent

Warning
Warning
Warning
Warning
Warning
Warning

Warning.

Parquet Flooring Installer Durban and Cape Town

Parquet flooring Installer Durban and Cape Town

Parquet flooring was very popular many years ago but a lot of it was covered up with carpets back in the 70’s. It seems crazy now that one could cover the parquet flooring with carpets, but that was the thing of the day and fashions come and go. I’ve recently refurbished several parquet floors by sanding them down and re-sealing them after old carpets have been lifted and they still hold their charm.

There are various types of parquet floor one can get using different wood that gives a slightly different grain, colour and texture. Of course you should always purchase your parquet flooring from a reputable supplier to ensure that you are getting top quality. Your floor will need to last many years and you don’t want to spend the money on installing it only to have to re-do the work later. Also as timber ages it naturally darkens so to try to match the colour of timber with new pieces is very difficult.

Parquet flooring comes in tiles which are made up of the small strips you see. So they are not all laid individually but rather as a sort of tile which is about 300mm x 300mm squares. It makes it much easier to lay and will result in a better finished product because of course there is less room for error in laying them. They are glued down to the floor using a suitable adhesive. Again the floor needs to be completely flat in order to achieve a good quality result. If the floor is not flat, screed it first to remove low and high spots first and then lay your floor.

The individual strips are normally laid perpendicular to each other to give it effect but some very interesting patterns can be found such as herringbone, triangles and inserts are also possible. Parquet flooring is very versatile and you can lay the tiles in just about any pattern you wish and the choices are limited only by your imagination.

For the budget concerned folk out there an alternative to buying new parquet flooring is to use second-hand parquet flooring. I have seen many houses have their old parquet flooring ripped out and discarded. This timber is still sound as most of the older houses used good quality teak in their floors. With a little cleaning and sanding those parquet floor tiles can be made to look like new. Don’t discount the value of second-hand tiles.

To finish the floor, you should sand it using the floor sander, fill any gaps with a suitable gap filler, sand again and then move up to finer grits remembering to sand into the corners with a smaller rotex style sander. A good quality polyurethane should be used either in mineral based or water based. Water based is of course more easily applied, less messy and one can apply multiple coats in the same day as it dries very quickly. Remember to sand lightly with a fine grit paper between coats to get rid of the hairs which stand up after applying coats. This will result in a smooth finish. The polyurethane comes in either high gloss, matt or satin. The choice is yours.

For a free no obligation quote or advice on your parquet flooring please complete the form below or call us on 082 496 5444.

Go back

Your message has been sent

Warning
Warning
Warning
Warning
Warning
Warning

Warning.

Solid Wooden Flooring Installers Durban and Cape Town

Solid wood flooring installer Durban and Cape town

There are two ways one can install a solid wooden floor. One is to apply the boards directly to the concrete substructure using adhesive and the other is to suspend the floor with joists or batons. This is sometimes referred to as a sprung or suspended floor.

In the first method it is imperative that the substrate is completely flat. If the floor is not completely flat, the boards will lift because they will go down under stress and over time will pull themselves up. If the floor is not completely flat you MUST screed it and get it flat. Or you can opt to install a sprung floor. However installing a sprung floor will result in the surface being about 50mm higher than it was or 30mm higher than the other method. Reason being is that there will be a baton underneath the boards to accept the floor board. So double-check where your floor will end up before choosing the method.

I will go into more detail about each method in two separate articles which you can search for in the search bar on the right, but for the purposes of this article I will just touch on the types of timber one can choose and a broad outline of solid wood flooring.

There are various types of timber that can be used for solid wood flooring. Each one comes with its own characteristics and properties. Some are harder than others, some are less prone to marking because they are dark coloured. What I find most important is to choose a timber that will not move much after installation. All timber will move as it expands and contracts due to fluctuations in temperature, moisture in the atmosphere and other factors. These will all vary with the seasons and in different parts of the country the variation will be different. It is always a good idea to bring the timber to site where it will finally be laid and let it acclimatise for a few weeks before installing. If the timber for instance was kiln dried and then stored in Durban on the coast, then later moved to Gauteng it will move because of differing temperatures and moisture in the atmosphere. So it should be allowed to rest for a few weeks before installing. In fact it should be allowed to rest before machining so that any movement can be removed through the machining process resulting in a flat, square, stable board. There is nothing more frustrating than laying solid wood floor boards only to find that later they have cupped or bowed slightly and unsightly gaps appear between boards or worse still they start to lift. It is not always possible to let them rest before machining but at least allow them to rest before installing so that any movement can be seen before installation and corrected where possible.

One can try to match the colour of the timber to the rest of the room. Saligna for instance is slightly pinkish in colour whereas teak will be a much darker wood and sometimes with dark heartwood and lighter coloured sapwood. You can get creative in matching the colours and interspersed dark with light. If you feel like get really clever you can use different types of wood in your floor but be careful to try to match the timber in their density so that all the pieces will expand and contract at a similar rate.

Your floor should be finished with a good quality polyurethane either in mineral based or water based. Water based is normally preferred as it allows you to apply several coats in the same day. Also it is better for our environment.

For a free no obligation quote or advice on your solid wood flooring please complete the form below or you can contact us on 082 496 5444.

Go back

Your message has been sent

Warning
Warning
Warning
Warning
Warning
Warning

Warning.

Wooden Fencing in Durban

Wooden fencing can come in many different designs and they are limited only by ones imagination.  All our timber is sourced from companies who adhere to renewable forestry practices.  There are a few designs or types of wooden fencing that we install mentioned below.  However we can custom design wooden fences for you using best building practices and aesthetically pleasing ideas.

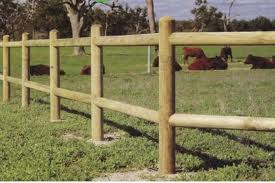
POST AND RAIL FENCING

Post and Rail Fencing Durban

Click to enlarge

Post and Rail Fencing is quite common and often found in areas where horses are kept. It has become more popular in recent times in suburban areas where some sort of fence needs to be in place without obscuring the view. They don’t provide much boundary protection as they are not that high, and therefore are more popular where the fence doesn’t need to protect the boundary.
They can be covered with weldmesh to provide more of a barrier. On their own they have large openings that people and small animals can climb through but they prevent larger animals from moving through such as horses. They are often installed in gardens of secure estates where the main purpose is not to keep people out. They come in various heights from 900mm to 1.8m.

The posts and rails are normally all H4 CCA Treated so are able to live in the ground in constant contact with wet soil without rotting for up to 30 years. The best timber to use here is pine sourced from the Cape as they have fewer tendencies to split. Because the post or rail is machined from a single log, they are naturally more prone to splitting, but if sourced from the Cape, then the splitting is limited.

Picket Fencing Durban

Click to enlarge

PICKET FENCING

Picket fencing is a natural alternative to other materials that can be used to provide a barrier at boundaries of properties to keep both humans and small animals in or out. They can be installed as a solid fence (i.e. no gaps between pickets) or they can be installed with a slat’s width between pickets.

The pickets are normally 22mm x 72mm and are installed using gum poles set every 2m or so with rails on top and bottom to which the pickets are attached. The tops can be square or they can be shaped into sharp pickets. Again these wooden fences can vary in height limited only by the length of slats available.

The gum poles are normally H4 CCA treated gum and the slats and rails are normally H3 CCA treated pine. Hence they can last for 30 to 50 years without rotting.

DROPPER FENCING

This type of wooden fencing is similar to picket fencing in that it is installed using gum poles of H4 CCA Treated Gum, rails and pickets, or droppers. The main difference being of course that this fence is made entirely from round poles and not machined timber. All of it is gum so they are a bit stronger and the chance of a dropper splitting is less than the chance of a slat breaking.

Again the tops of each dropper can be left square or they can be machined to spikes, thus providing some security for would be intruders and also varying the visual appeal of them.

WELD MESH

Weldmesh fencing Durban

Click to enlarge

A weldmesh fence is one of the cheapest form of fencing. It is installed using gum poles and stays on either end with intermediate posts every 2m or so. The height can vary depending on your requirements. Straining wire is then pulled taut between the main posts and weldmesh is bound on to that. Various heights are available and various grades of weld mesh are available. The actual wire that the weld mesh is made from varies in gauge and the rectangles that this wire forms can vary in length and width. All poles used are H4 CCA treated gum poles.

For a free no obligation quote on your wooden fencing requirements please give us a call on 082 496 5444 or use the contact us form below.

Go back

Your message has been sent

Warning
Warning
Warning
Warning
Warning
Warning

Warning.

Outdoor Garden and Patio Furniture

Outdoor garden furniture - Lutyens Bench

Pictured is a bench with a curved centre backrest. The benches we now make have a straight piece as the centre back rest. The curved top backrest remains as pictured.

Besides installing sundecks, wooden floors and wooden fencing we also produce a range of outdoor garden and patio furniture to compliment your outdoor wooden structures such as sun decks etc.

We’ve focused on top quality wooden outdoor and patio furniture. We don’t do flat pack. If you’re after that Makro or Game is your best bet. Our products are made to order, so taker a little longer, and are all manufactured with longevity in mind to give you many years of enjoyment.

Rain and sun always play a role in the decay of outdoor furniture and it is therefore very important to select the right timber for the product. The timber we use varies from H3 CCA Treated timber which is suitable, and guaranteed by the supplier, to last outdoors in the rain and sun for up to 50 years to balau in some of our pieces, although it is considerably more expensive than pine but it is a lot sturdier, stable and will also last many years in the sun and rain.

Depending on your budget and the product being manufactured we will advise the best timber and finish to use. We seal our products with an oil based sealer which penetrates the timber, leaving no waxy film or coating on the surface. Wax and coatings will always blotch, peel or flake and maintenance then becomes expensive due to the sanding or stripping that is required. With an oil based sealer it simply disappears as it degrades and cannot peel or flake because it is not a coating. Hence maintenance is inexpensive. You simply clean and re-apply.

From this page you can navigate on the menu bar to the left to view pics and details of our various outdoor furniture products. You can also search, using the search bar on the right, to search for specific items. You will find many articles on this blog of products we have made. From the info we provide you may even want to try it on your own, but if not you can contact us on 082 496 5444 or use the contact us form below.

Go back

Your message has been sent

Warning
Warning
Warning
Warning
Warning
Warning

Warning.

Dustless Floor Sanding Durban and Cape Town

Hardwood floor sanding in Durban and Cape Town is normally done by making use of a specialised company such as The Wood Joint. Some wooden floor sanding companies hire them in when needed but if you are sanding floors regularly then you may want to consider buying one. There are, broadly speaking, two different types of floor sanders or floor grinders. They are relatively expensive to buy and therefore expensive to hire.

Drum sander

The drum sander is an older technology machine that uses a drum with sand paper of varying grits attached to it. The drum spins in a horizontal direction and removes sealer or coating from the wooden floors. One would typically start with a rough grit like a 40 grit paper or rougher and then proceed through the grits to get a finer, smoother finish on the floors before sealing them. These machines come in different widths and different size motors. All of these machines do a similar job. The wider ones at 300mm wide obviously remove sealer a lot quicker as they are covering more surface area. There are two type of paper one can use. A paper-backed sandpaper which is cheaper but will tear or rip more easily if the drum catches a nail or rough edge on the floor. There is also a cloth backed paper which is about 3 times the price. Being cloth backed it is a lot more durable and won’t tear or rip as easily as paper-backed sand paper. Also because it doesn’t get as hot, it last a bit longer than paper-backed before it becomes dull. This is well worth the investment especially if you have a floor that has rough edges or nails protruding or if the drum sander is an older machine. Older machines tend to rip paper more easily because of worn parts. These machines, if calibrated properly work fairly well as they remove 300mm of sealer at a time. They can be difficult to “drive” as they are continually trying to run away from you in a forward direction and the machine needs to be pulled back against the direction of turn. They can also be very messy because the drum is rotating in a horizontal direction and throwing saw dust up into the air. A word of caution when using these machines. When they are switched on make sure the sand paper is not making contact with the floor as the machine will move on its own, probably slap bang into the wall if no-one is hanging on to it. Or worse still slap bang into the pool if you are sanding a deck. The machine can be tilted back so that the paper doesn’t engage the floor,or they are sometimes lever driven. Always work the floor sander in the direction of the boards to avoid scratching the boards against the grain.

Planetary System Floor Grinder

The other type of machine is essentially a floor grinder and is the same machine used to grind concrete floors to a smooth finish. It works with a motor in a vertical position and the shaft spins vertically as opposed to horizontally. Below the motor are three disks of 180mm diameter which can accept various tools, with varying grit, for different applications. Each disk spins in one direction while the whole set of three disks spins in the opposite direct. It is called a planetary system. They move a lot slower than the drum sander but because they are moving in the vertical direction they tend to keep the dust down rather than throwing it into the air. With the correct tool you can achieve the same result more quickly, with less effort and less mess. Even without dust extraction they are a lot less dusty and the dust can be controlled and extracted up as the machine works. Because they spin slower they are a lot easier to use and can be pushed along with one hand. Dust extraction can be fitted to the machine to result in a 99% dust free process. The idea is to start with a course grit tool, or paper, and move through the tools, or papers, until the desired level of smoothness is achieved. There are also other steel tools which act as rasps or files that can be used for stubborn sealer or to level a newly installed floor where small ridges have been left between boards after installation. These machines sand about 10mm to 20mm from the edge of the skirting so the edge sanding is minimised greatly. These machine can be used with or against the grain as they are spinning cross grain anyway.

At The Wood Joint we use both machines depending on what the application is.

A good finish to use is a water based polyurethane as you will be able to apply multiple coats in one day as it dries very quickly. Apply by roller and brush in the corners. Attach a broom stick to your roller so you can stand and do it rather than kneeling on the floor. A light sand with a very fine grit should be performed after the first coat as the first coat will raise the fibres in the wood. Once these have been sanded off very lightly the second and third coats can be applied. Make sure to vacuum properly to remove all dust before the second coat. Dust settles into the polyurethane and dries leaving it rough. Allow it to dry as per the manufacturer’s specification which should be dry enough to walk on after a short while but it will take several days to hard dry. It is best to take your shoes or boots off when sealing and walk in your socks.

This machine can also attend to concrete floor grinding. There is a separate article on this blog regarding concrete floor grinding.

For a free no obligation quote on dustless wooden floor sanding, please contact us on 082 496 5444 or use the contact us form below.

Go back

Your message has been sent

Warning
Warning
Warning
Warning
Warning
Warning

Warning.

Outdoor Garden and Patio Furniture – Lutyens Bench

Outdoor garden furniture

Pictured is a bench with a curved centre backrest. The benches we now make have a straight piece as the centre back rest. The curved top backrest remains as pictured.

The Lutyens Bench was designed by Sir Edwin Landseer Lutyens, referred to as “the greatest British architect” and is known best for having an instrumental role in designing and building a section of the metropolis of Delhi, known as New Delhi.

The Lutyens Bench contains a unique design on the back rest and the front posts which can be seen from the pictures alongside and elsewhere on this blog. There are various designs which have surfaced as carpenters adapt them and some include a curved centre back rest piece while others contain a straight piece. Fundamentally though the signature design remains much the same.

We construct these benches largely from balau timber as we obtain them from off cuts from our decking activities. Balau is a very hard, dense weather proof timber which contains many oils and resins which naturally repel water. Hence rot is reduced to a minimum. It also contains toxins which prevent insects from eating it, but are harmless to humans and animals.

If left unsealed balau will turn a grey colour which is often referred to as natural balau (unsealed). It won’t necessarily rot any quicker if left unsealed but it does tend to dry out more quickly resulting in fissures opening up on the surface of the wood allowing water to collect in them. If sealed, I recommend using oil based sealer which penetrates the timber and cannot peel or flake. It is then easy and inexpensive to maintain by simply cleaning it and applying more oil. The oil can be applied by brush, sponge, spray or cloth. No sanding is required. I have painted them white in the past but balau doesn’t take paint that well because of the oils and resins and may result in higher maintenance going forward.

There are more pictures available in the gallery and you can find articles on other benches we have made if you use the search bar on the top right.
The price varies from year to you. As of Feb 2014, at the time of writing, they are selling for R7, 850-00 each in balau. I wouldn’t recommend using pine as the pieces are thin in some areas and the pine contains knots which result in pieces breaking.

They are made to order and the lead time is up to 4 to 6 weeks. Courier services are available at about R1, 500-00 per bench to Gauteng. Courier rates should be obtained prior to ordering. We are based in Durban.

Please contact us on 082 496 5444, or use the contact us form below to get an updated price and lead time.

Go back

Your message has been sent

Warning
Warning
Warning
Warning
Warning
Warning

Warning.

Outdoor Garden Furniture – Picnic Tables

Outdoor furniture - picnic tables

Click to enlarge – pictured is an example of a table in the 40 x 140 range

Outdoor Garden Furniture such as picnic tables comes in a variety of shapes and sizes. There is the climb in models or the walk in models. Some have backrests and some don’t. Some are 4 seaters, some are 10 seaters and some are round or octagonal. The choice of design is endless really and limited only by your imagination. A garden, in my opinion, is incomplete without one and many a day will be spent utilising this very cost-effective, yet versatile piece of Outdoor Garden Furniture called a picnic table.

They can be made from a variety of timber but we have found CCA treated Pine to be the most cost-effective. Provided the timber is treated to at least an H3 level, the picnic table will last many years in the rain and sun. H2 is what is normally available from your timber yard because they are supplying largely the roofing industry, but H2 is not treated enough and will rot. H3 is your normal decking material and is suitable to remain outdoors exposed to the elements. We can however make them out of whatever timber you require, but some timbers do become cost prohibitive, unless you are working to a uncapped budget.

Outdoor furniture - picnic tables

Click to enlarge

Our biggest sellers are the walk in design with or without backrest. The walk in allows you to slide along the chair without having to climb over the seat to get your feet in. The walk in does however take up a bit more space than the climb in but are, in my opinion, more comfortable and is what you normally find in most pubs around South Africa. The walk in with backrest takes up considerably more space than the ones without the backrest, but does allow you to lean back of course. They also need to be accessed from either side instead of climbing over the seat. They can be made with an attached bench, the most popular, or with a detached bench. The ones with detached benches are sometimes used indoors too as breakfast tables. In this instance one might want to consider using a timber other than pine to give it a cleaner and more appealing look than pine.

Our picnic tables are generally made from stock that is 30mm thick and 100mm wide although this can vary from 23mm thick to 110 wide depending on how much machining needs to be done to get the wood to planned on all four sides.

Screw holes are covered using clear epoxy mixed with saw dust to match the colour and they are then sealed in a choice of tint using a good quality timber preservative. Timber preservative keeps maintenance to a minimum as there is no sanding that is required. When it comes to time to re-seal simply clean and apply 2 or 3 more coats. Applying varnish type coatings will result in the coating peeling and flaking over time and all of it will need to be sanded off which is near impossible.

Kiddies picnic table

Click to enlarge

Again we do not produce these tables in flat pack as they simply won’t last. They are pre manufactured in our factory and then transported to site.

A similar design is also available in a kiddies size and can be painted in bright colours rather than a wood stain effect.

For a free no obligation quote, please complete the form below or call us on 082 496 5444.

Go back

Your message has been sent

Warning
Warning
Warning
Warning
Warning
Warning

Warning.