Wooden Balau Deck Built in Malvern, Durban

Wooden balau deck built in Malvern, Durban
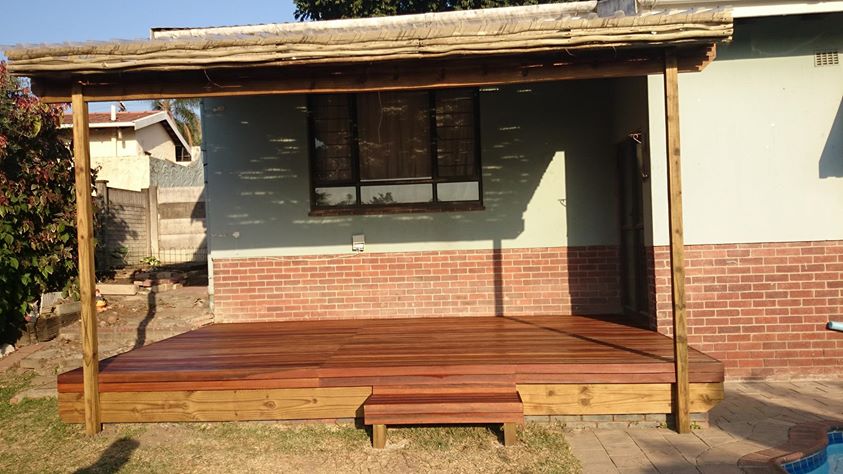
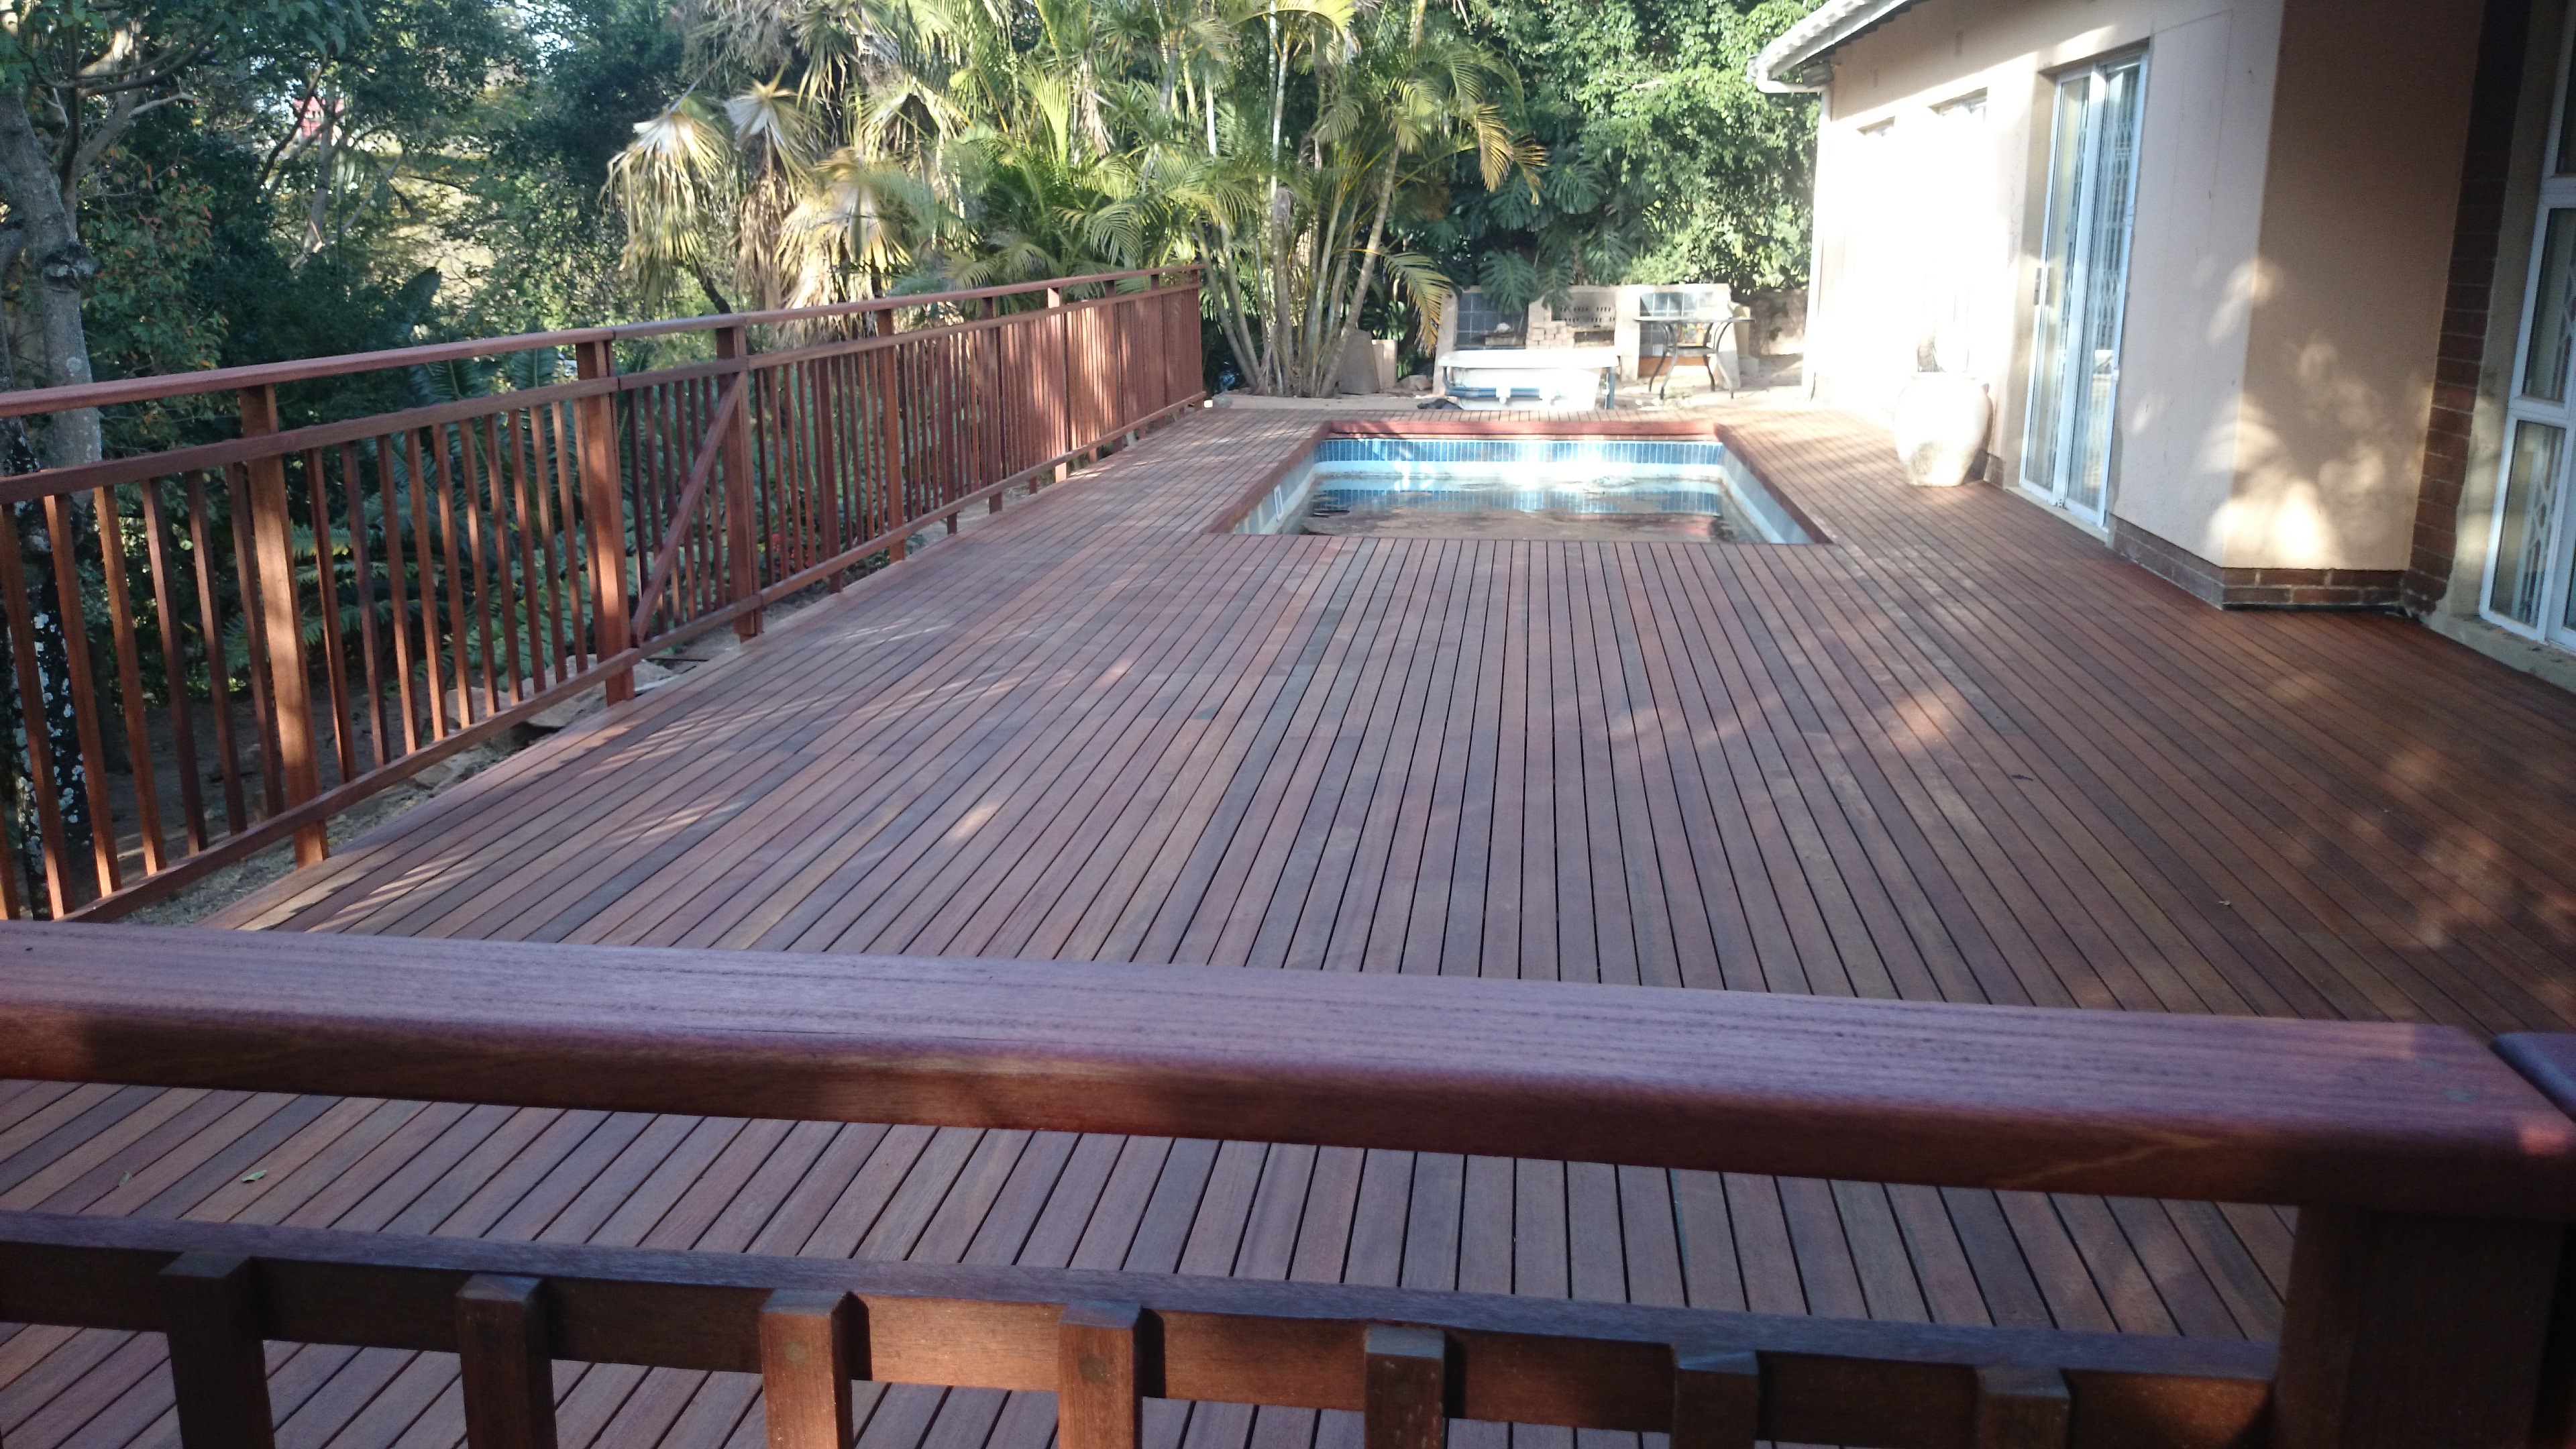
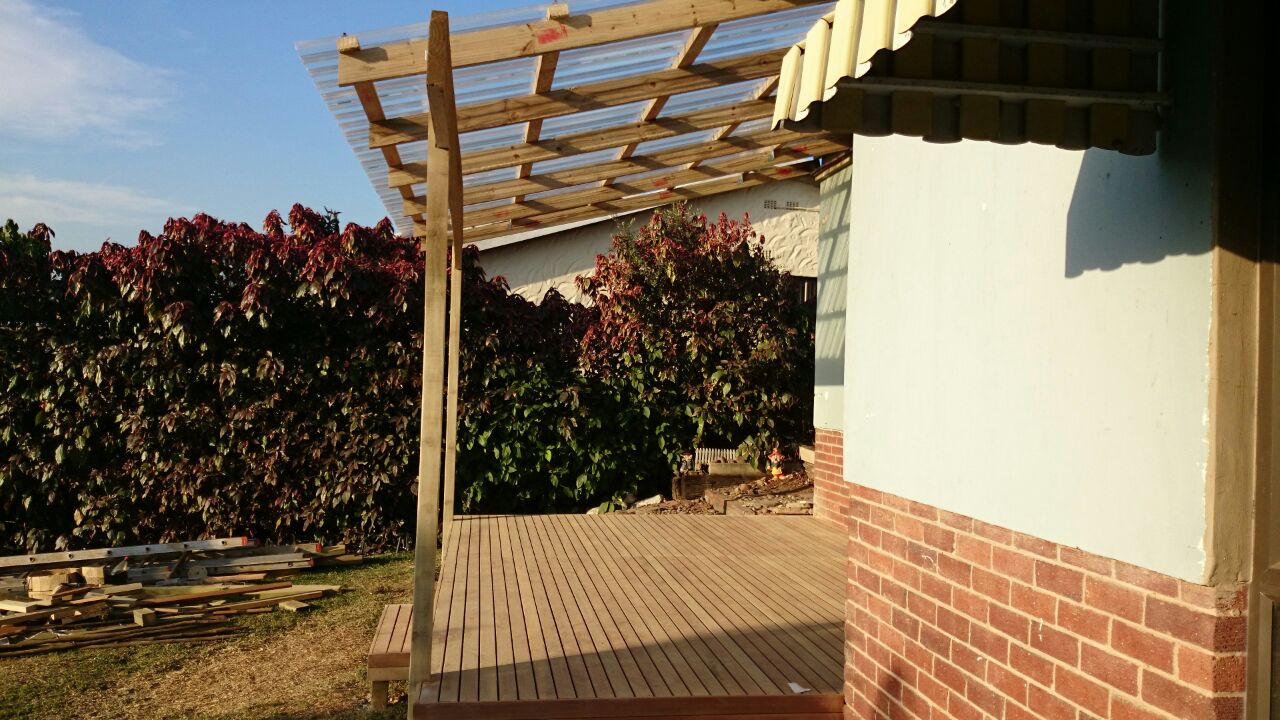
We incorporated a pergola style roof covering into this wooden balau deck we built in Malvern, Durban.

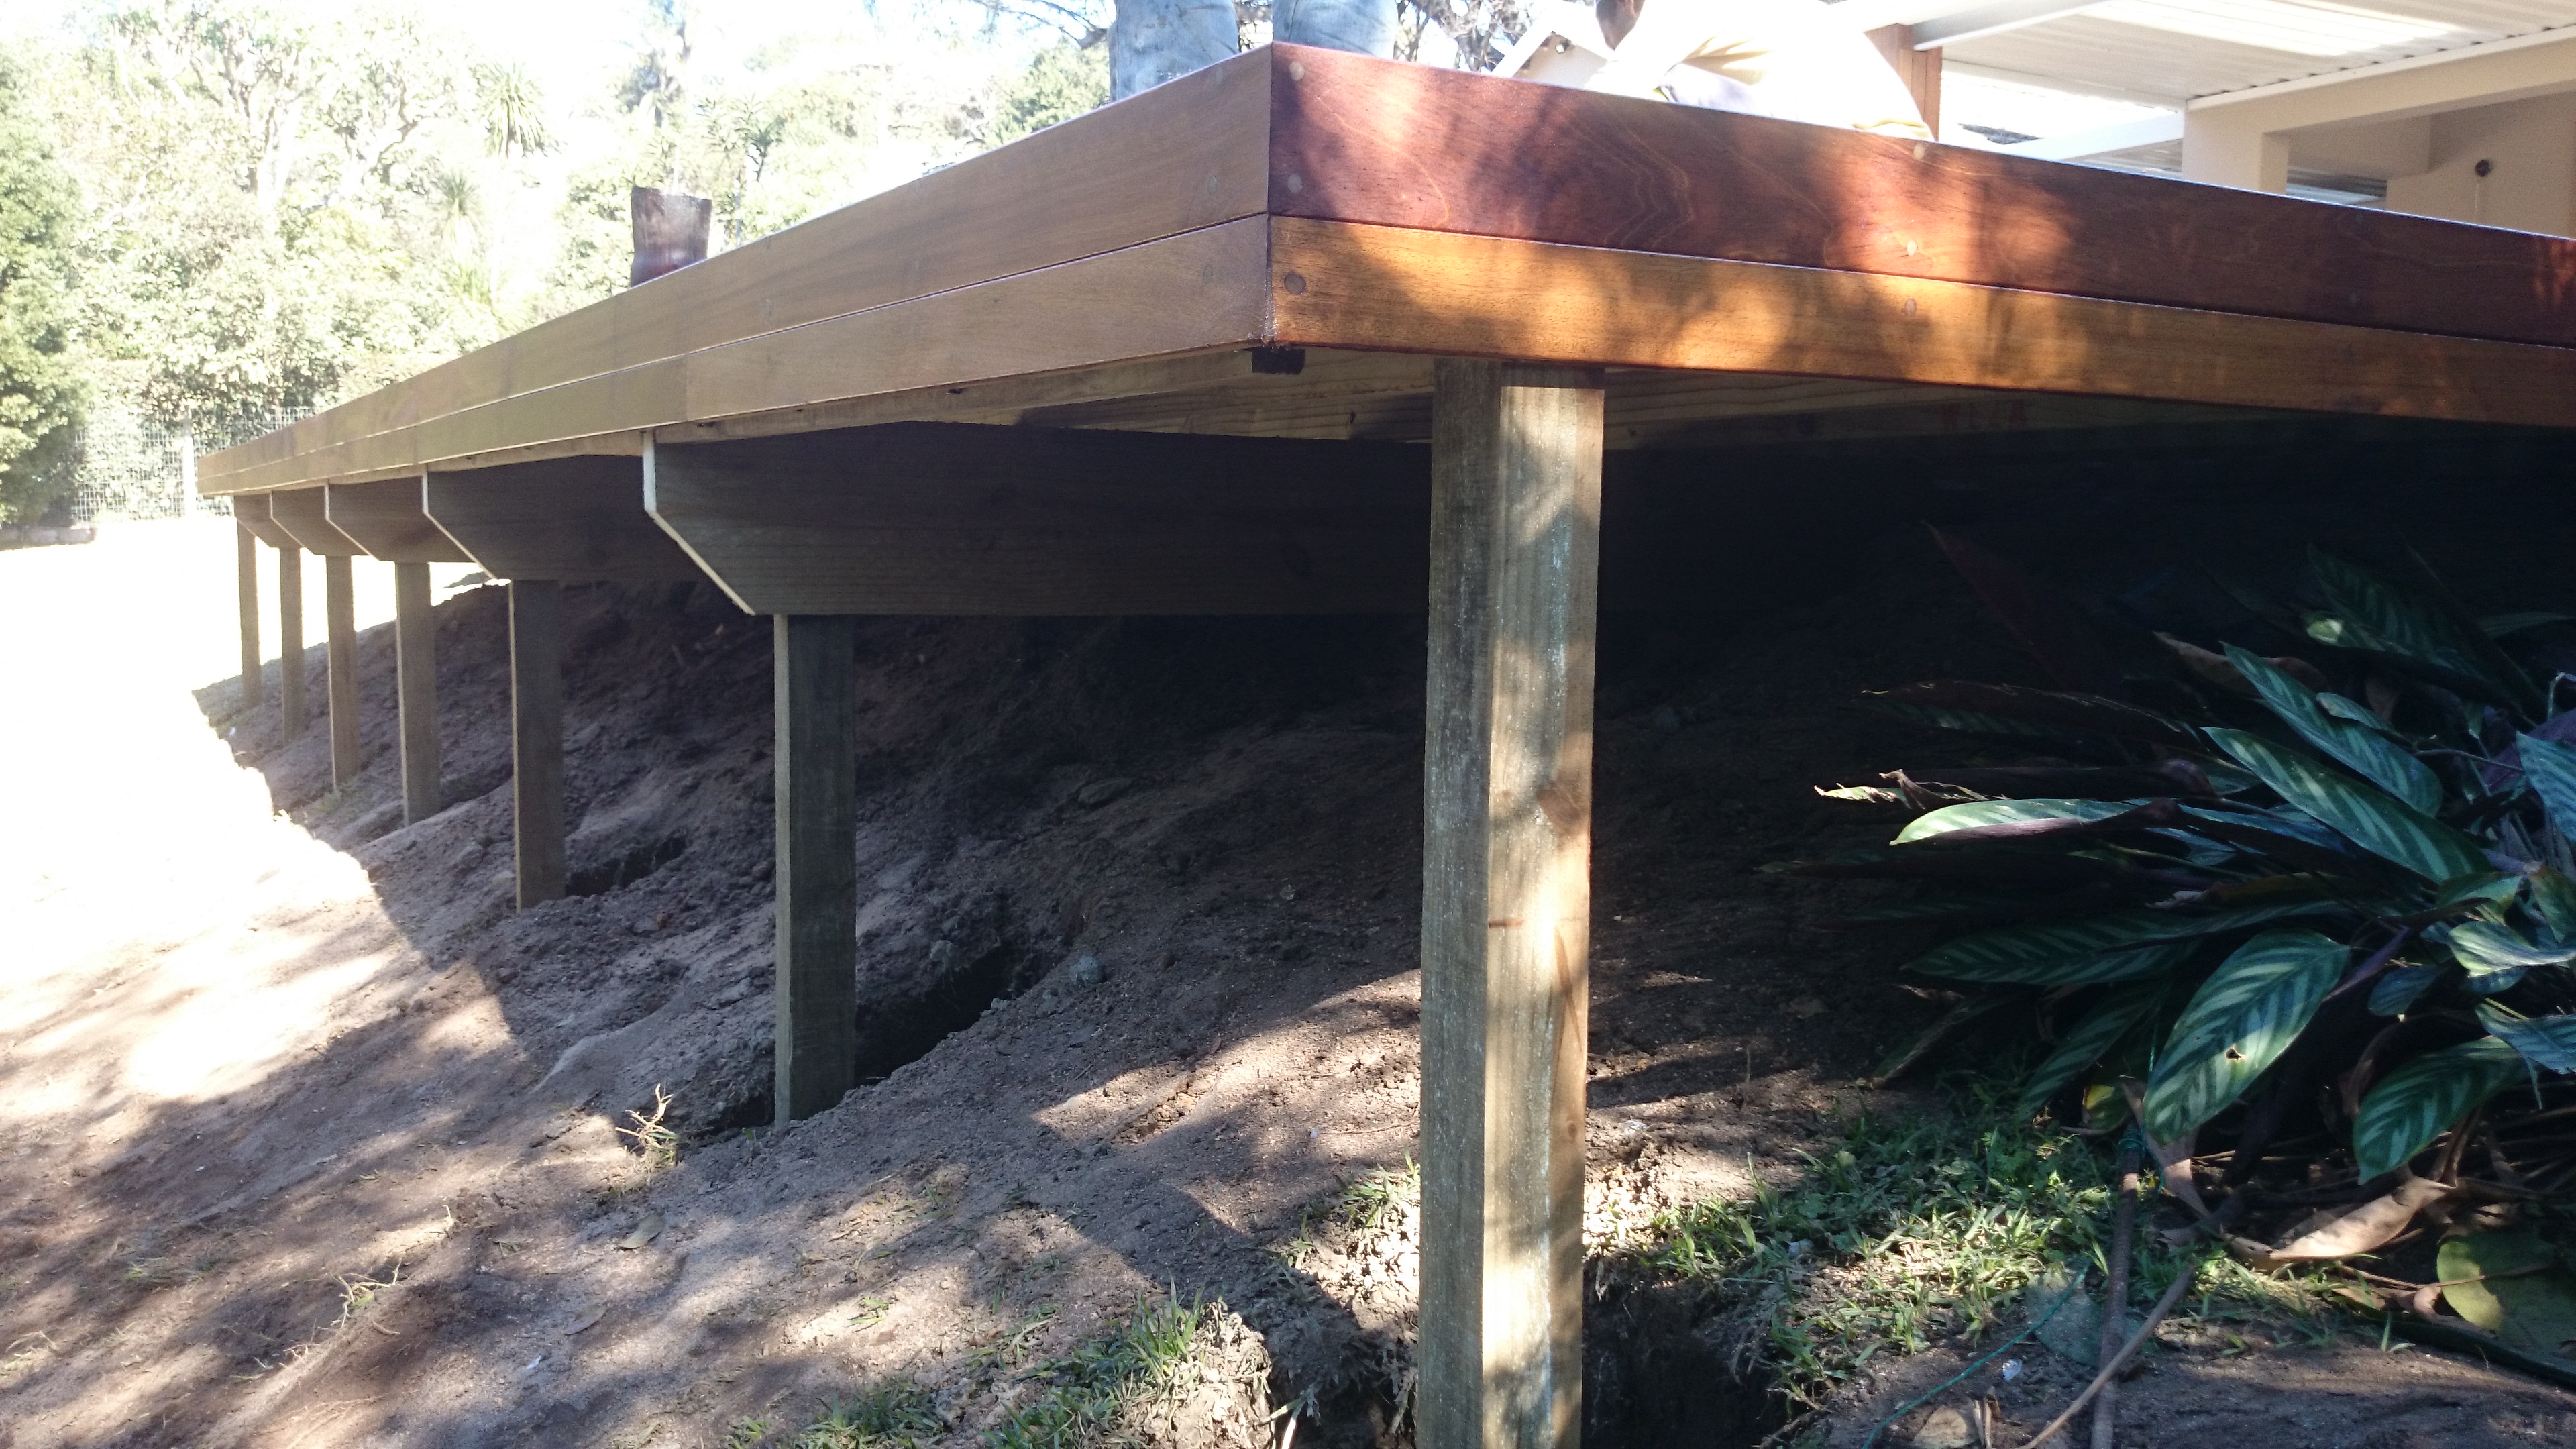
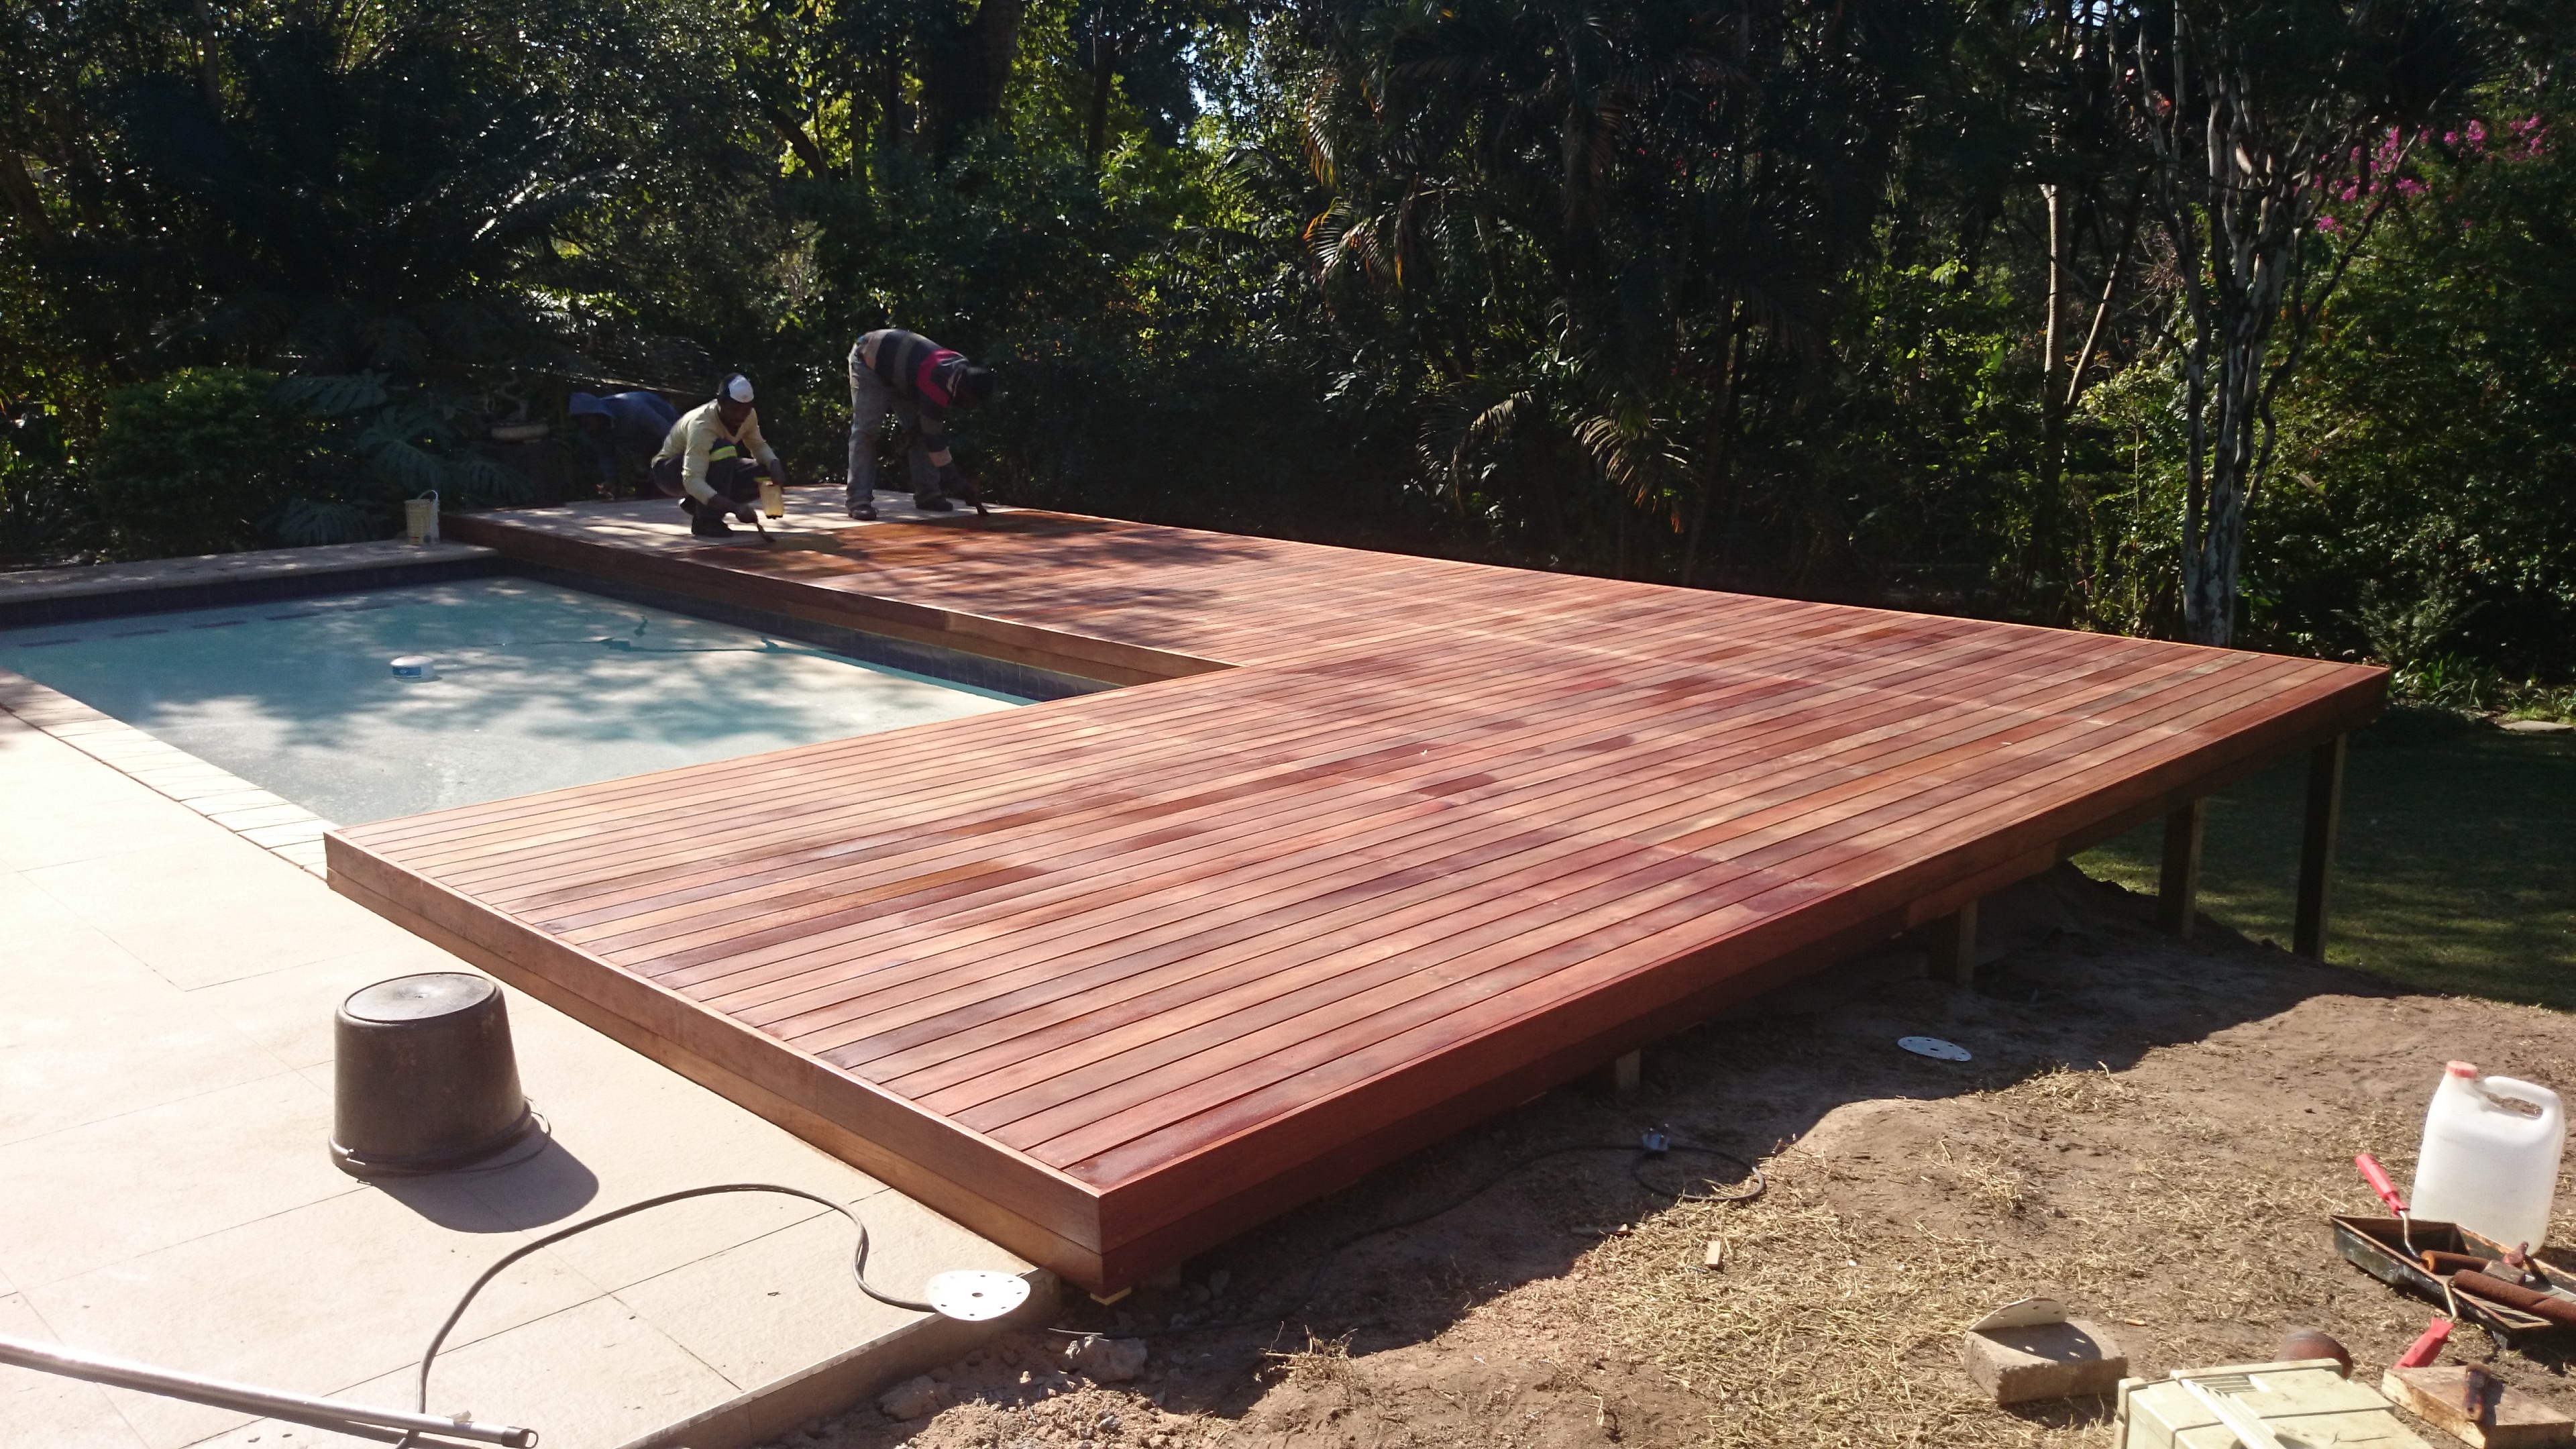
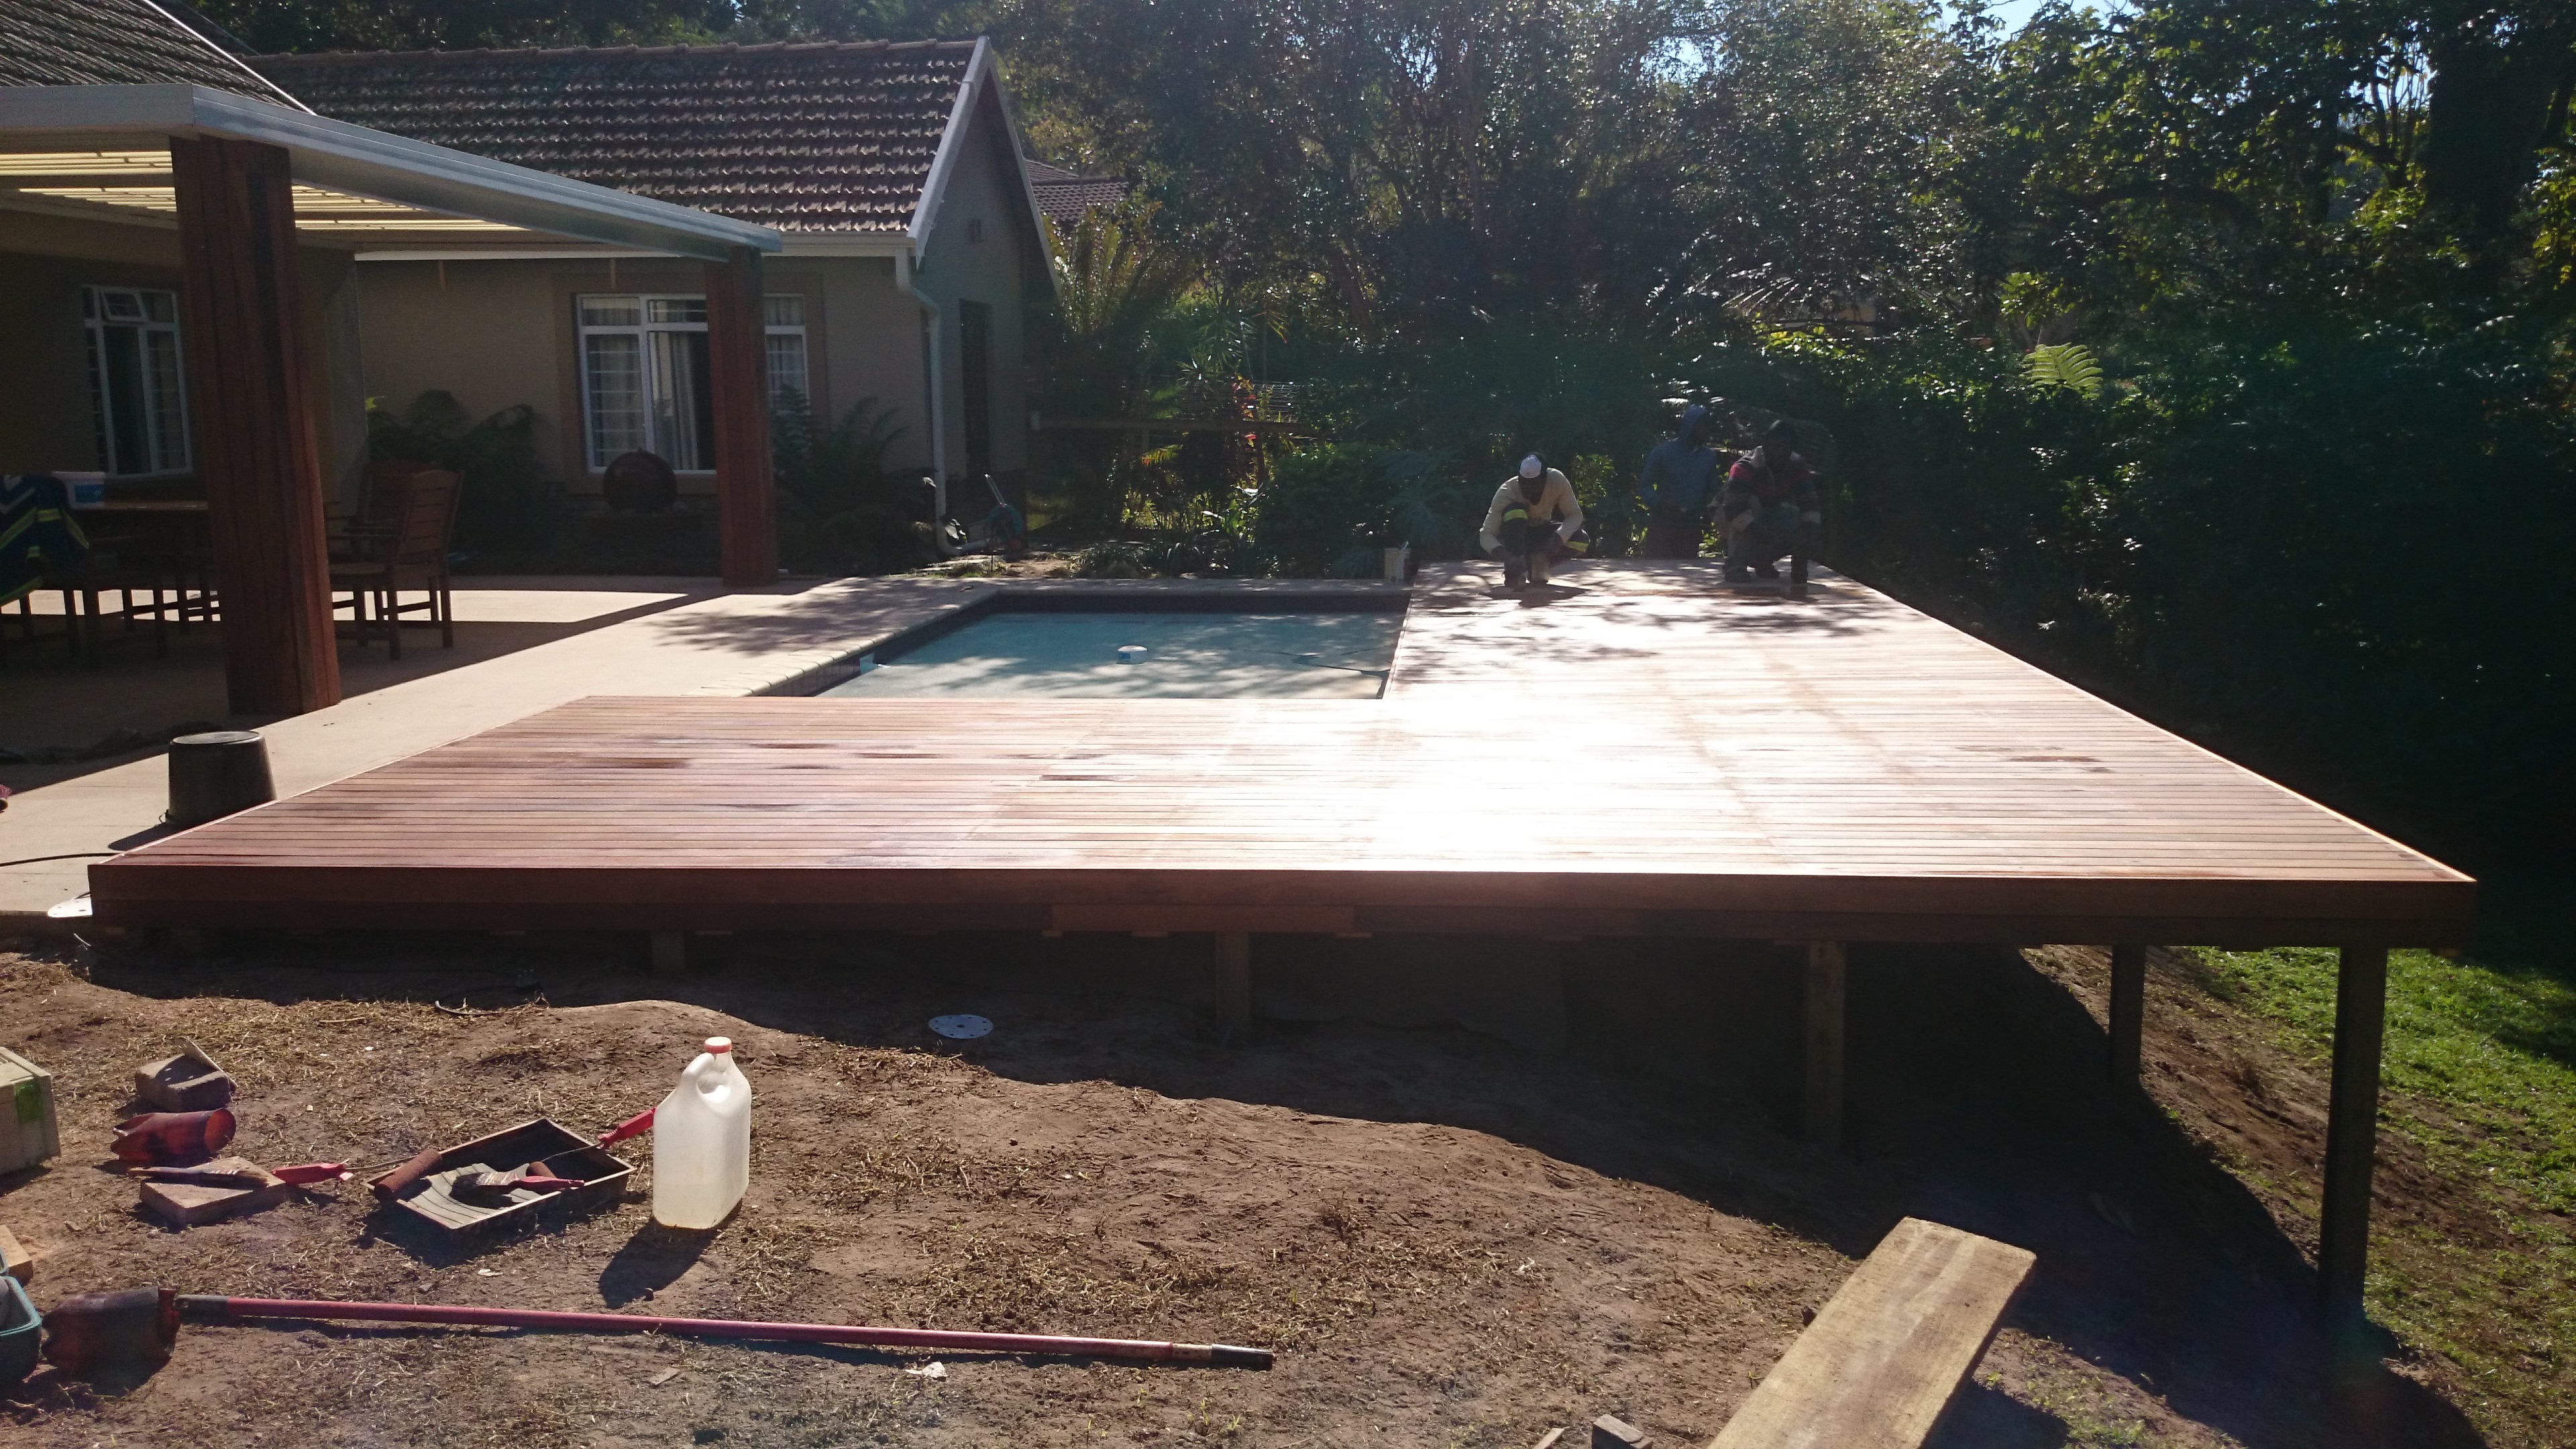
We started with our deck in a normal joist and beam system, but installed our main beam of 50 x 228 on the front in line with the joists rather than slotting it in underneath. This was simply because we didn’t have much space below the deck to slot it in. On the front edge it was fine to use a 50 x 228 beam, but midway across the deck we couldn’t use a 50 x 228 and had to secure each joist to the ground with a small post. It wasn’t a problem though because we were placing it directly on top of the slasto substrate. So there were no holes to be dug and filled with concrete.

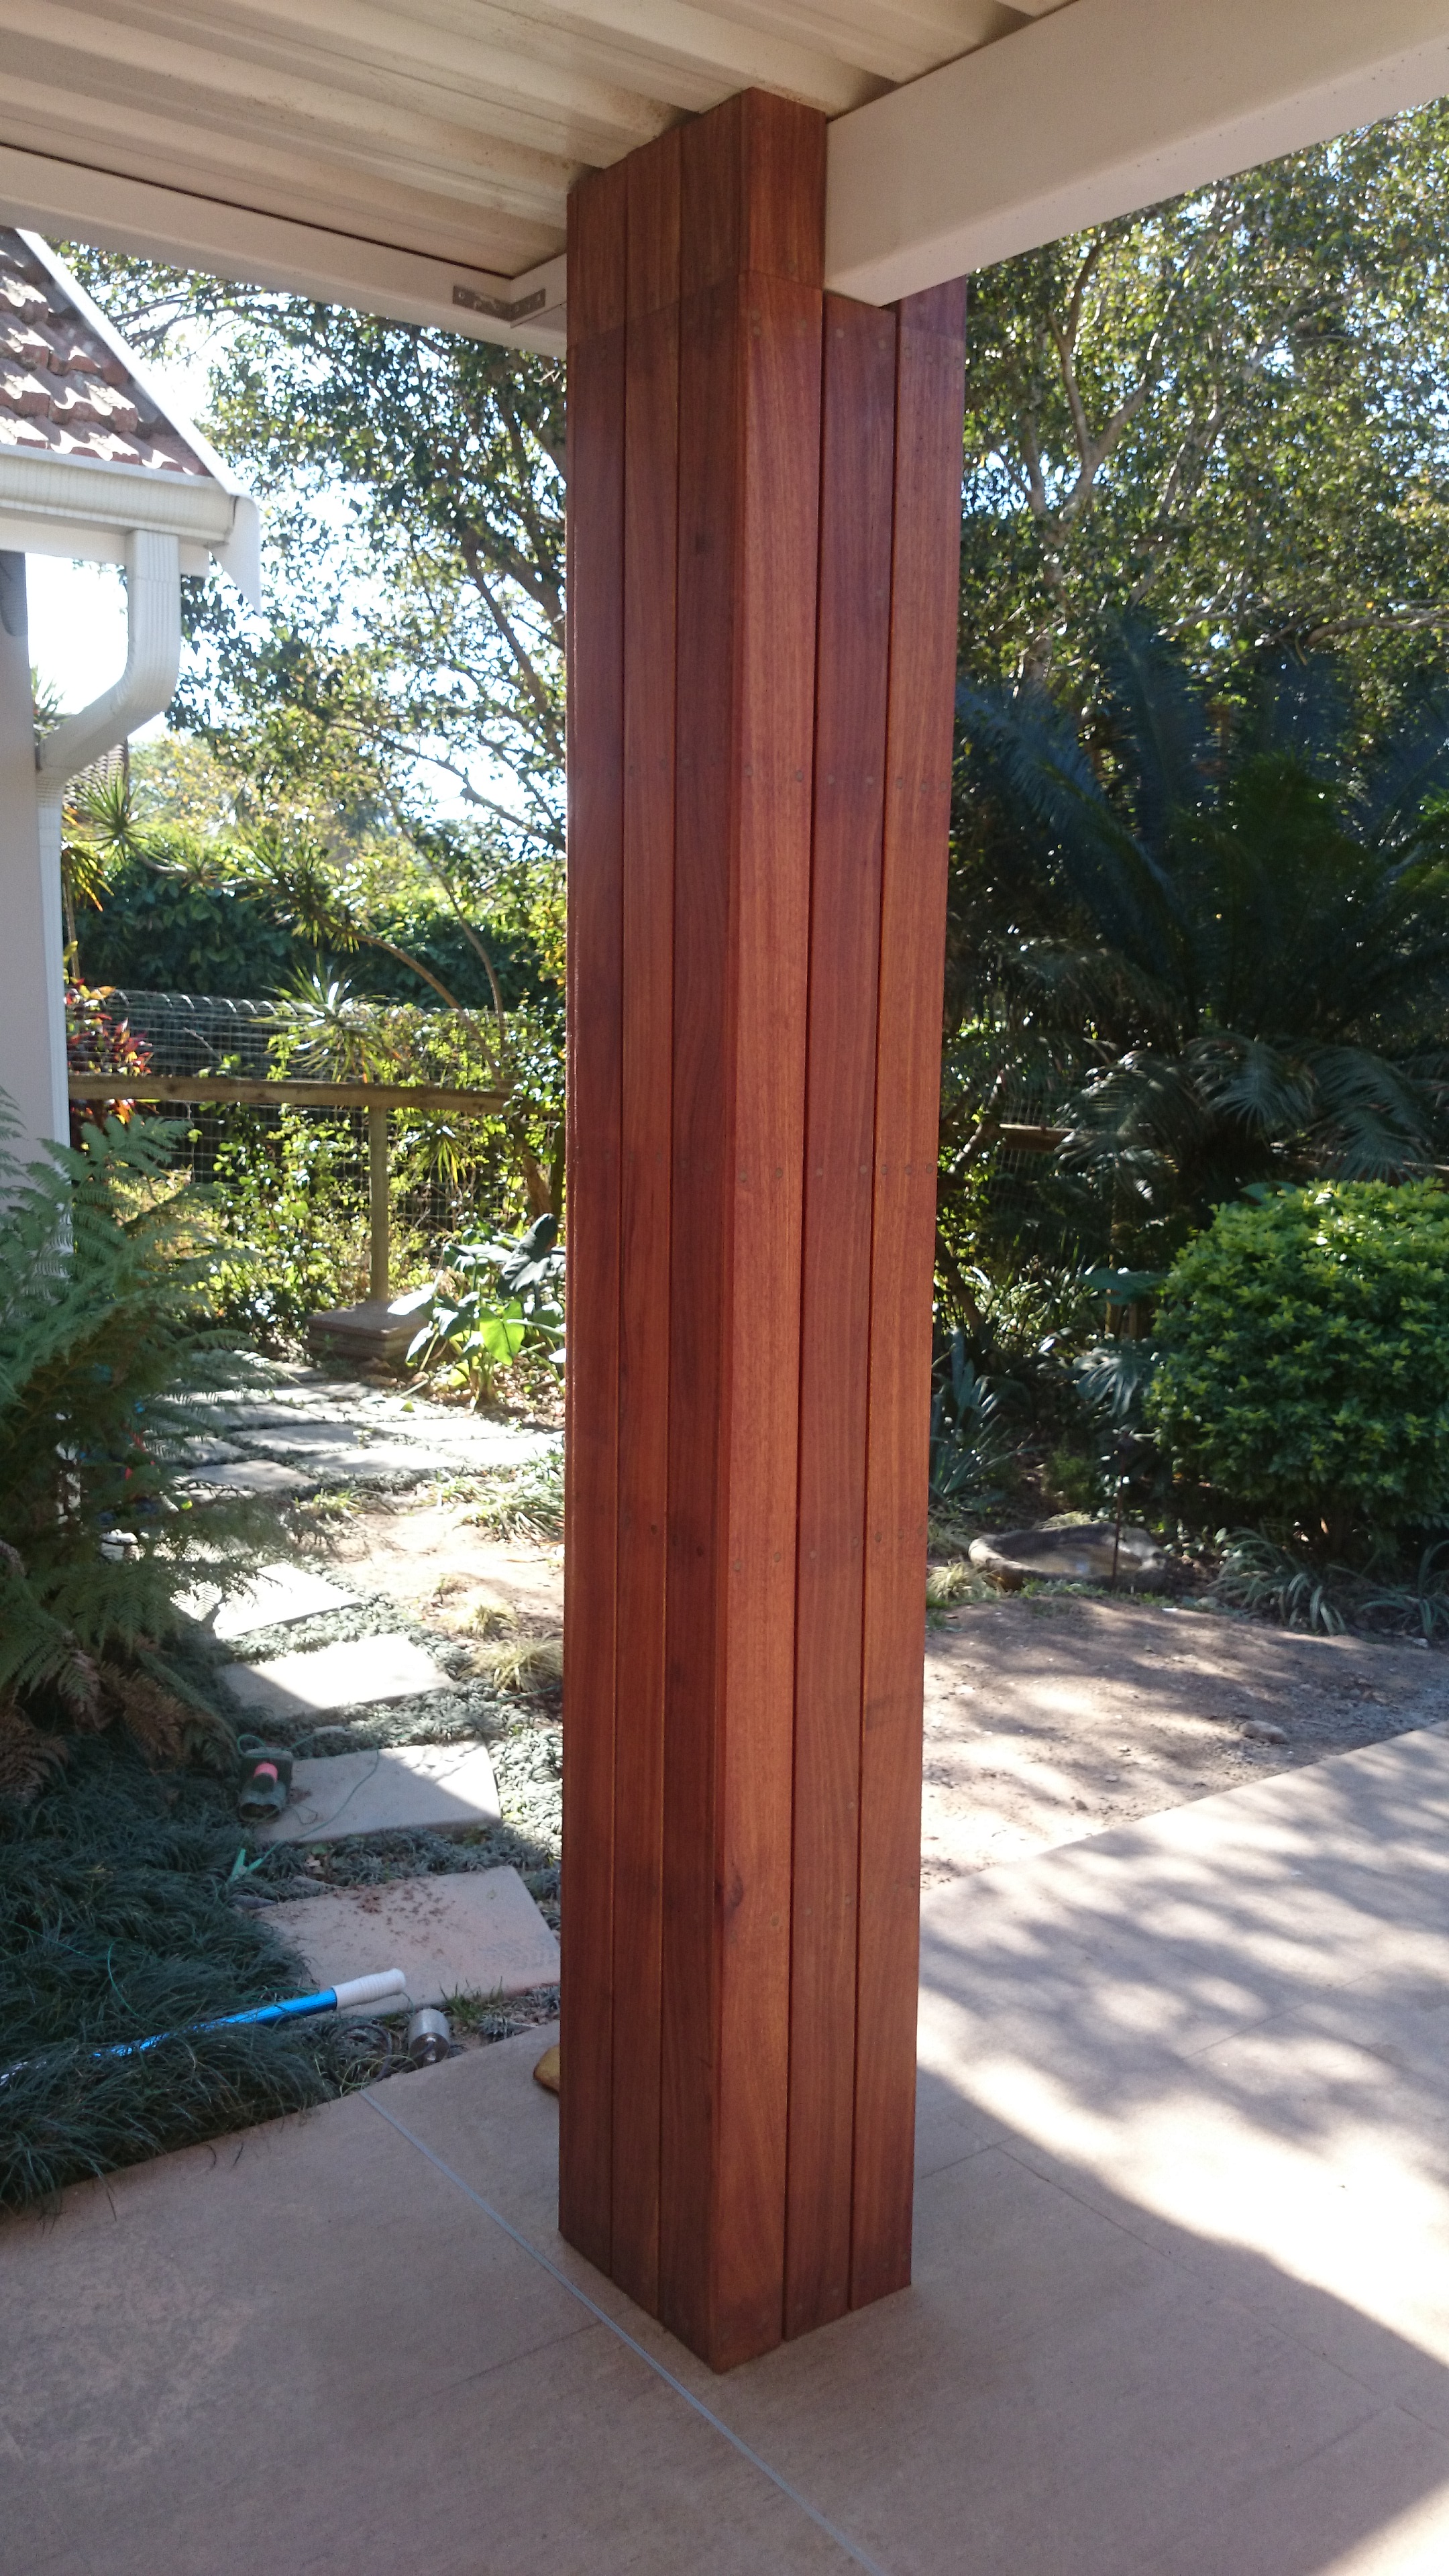
We then attached two 76 x 76 pine posts, which can also be replaced with balau 90 x 90, to give us some posts to work from for our pergola. Our pergola was built using a 50 x 228 beam on the front, but this could have also have been replaced with a 38 x 152 as there is no real weight on top of the pergola. You do get some wind loading from beneath in pergolas with fixed roof sheeting, but not much weight from the top. We only used two posts as our main beam on the front was long enough to span across the 5.2m of the front of the deck. Adding extra posts in between clutters up the front of the deck.

Wooden balau deck built in Malvern, Durban
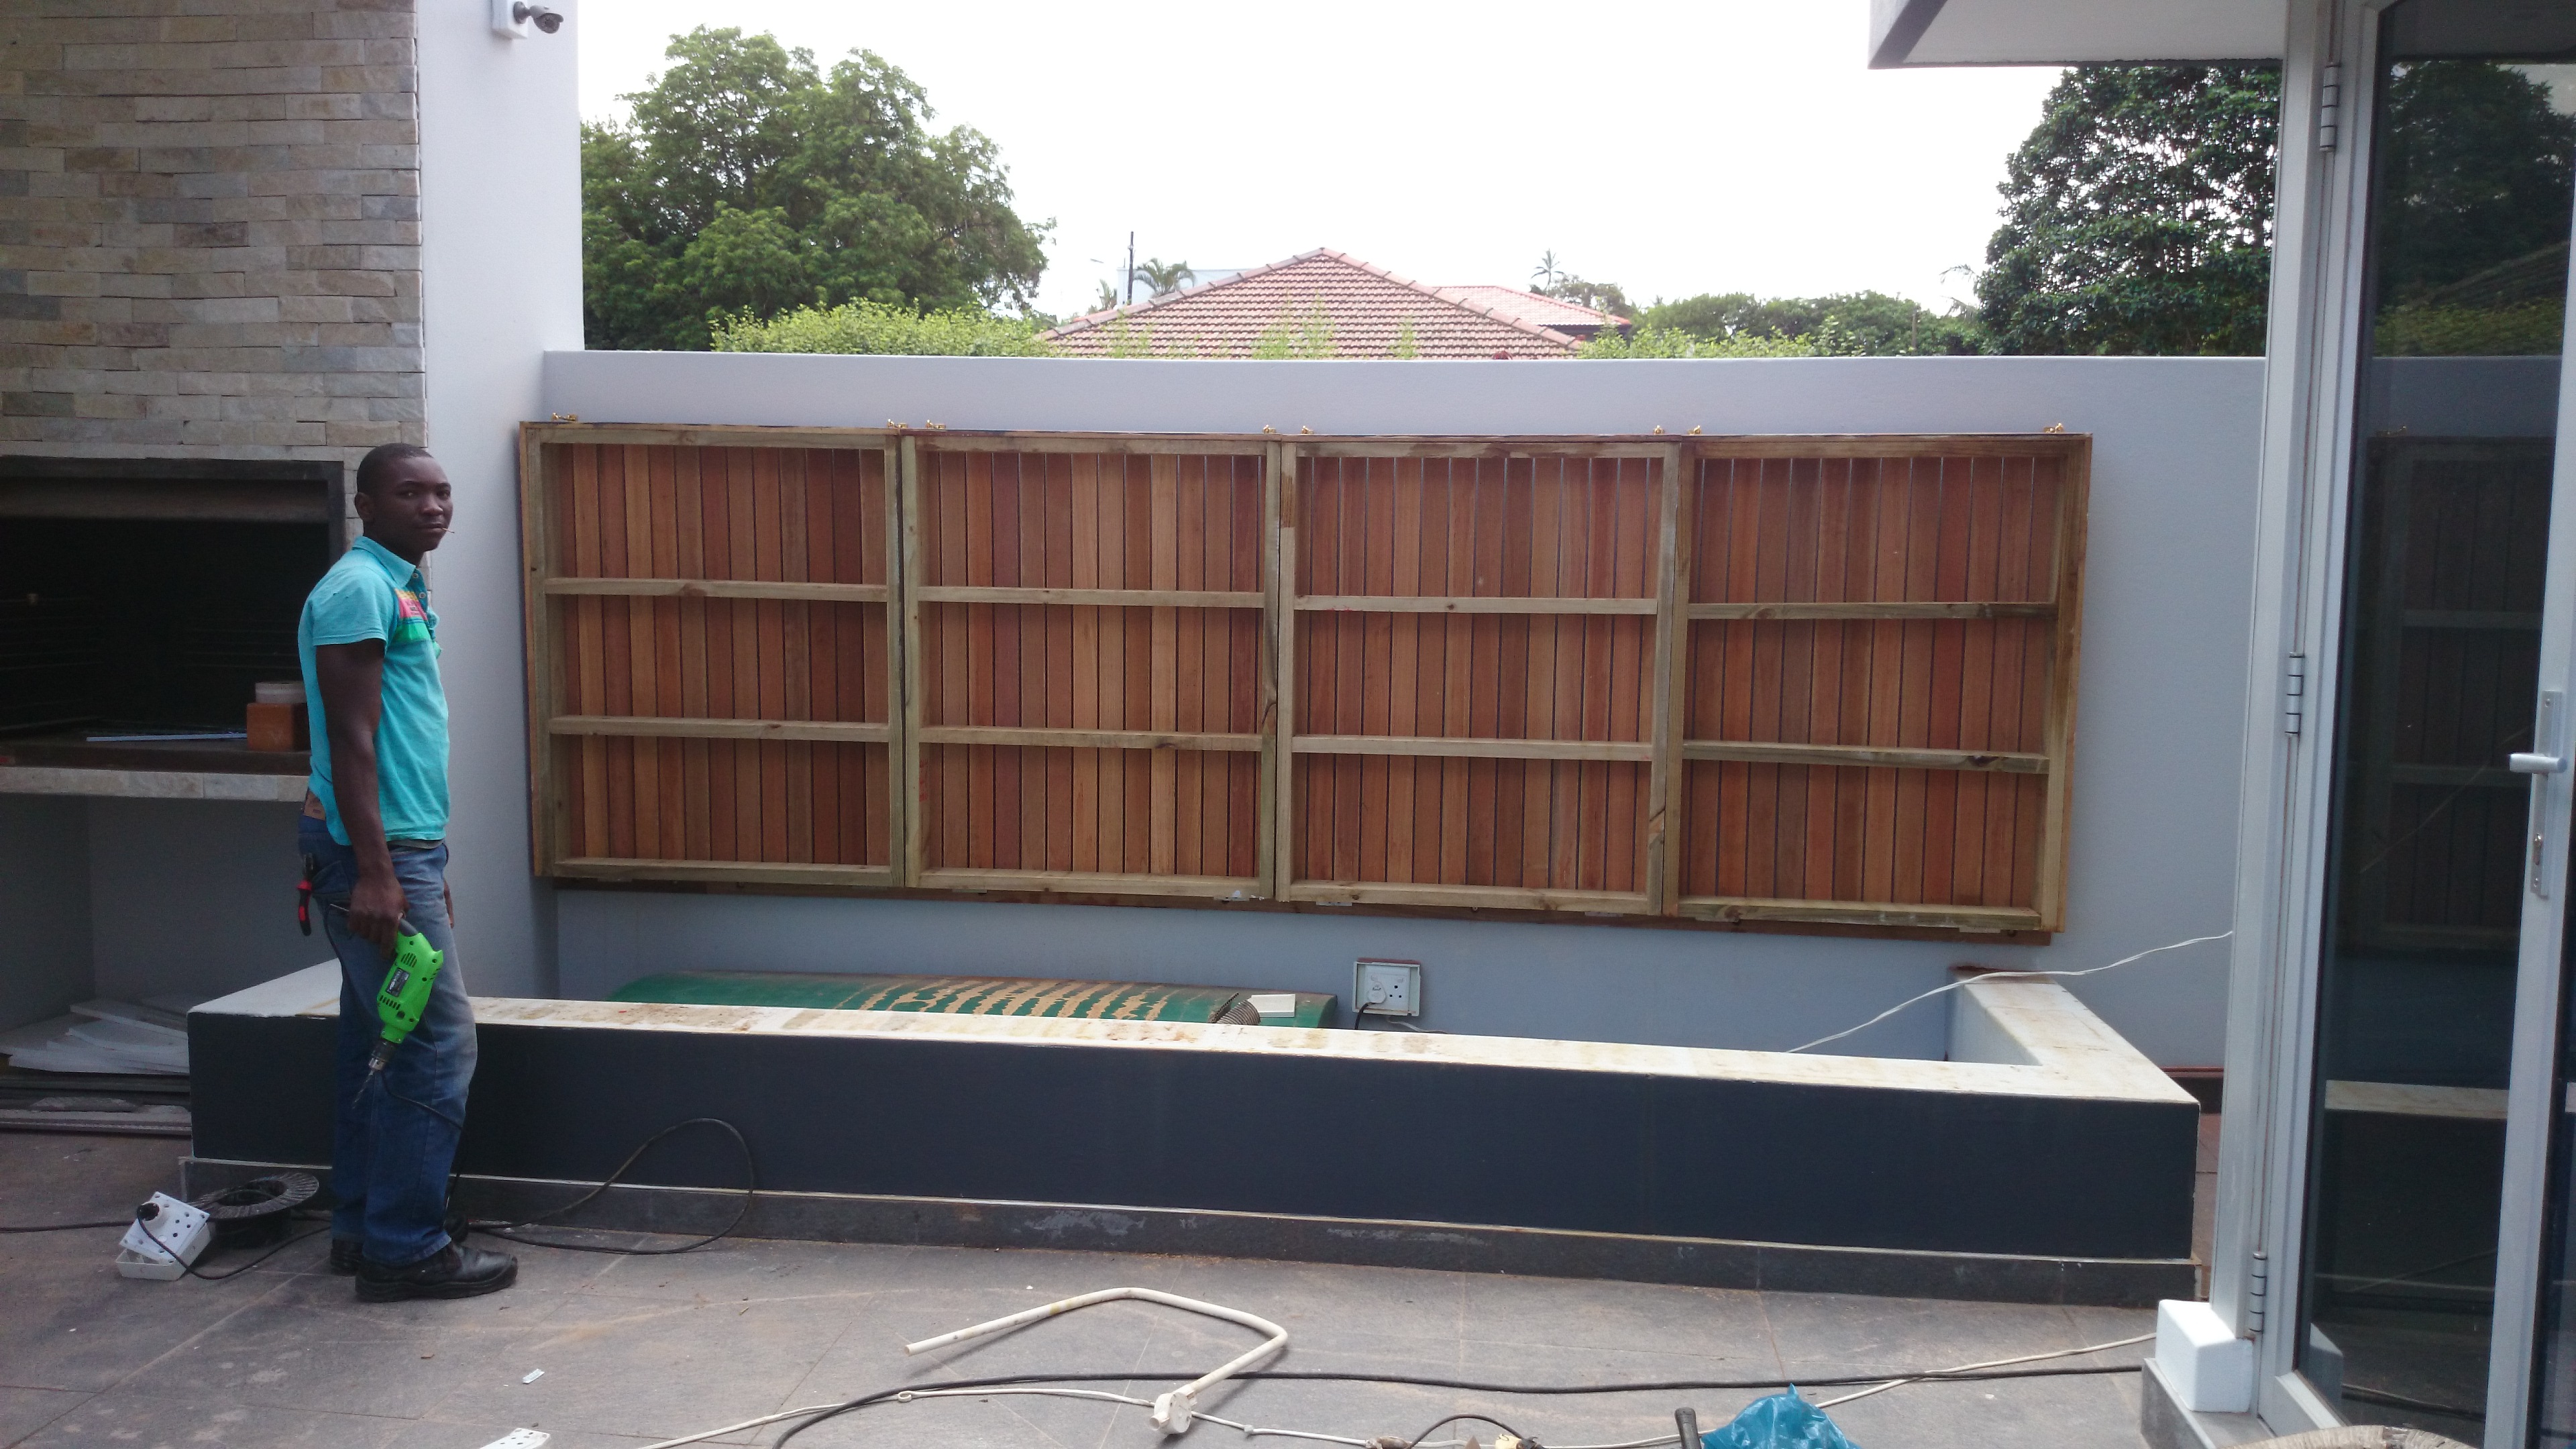
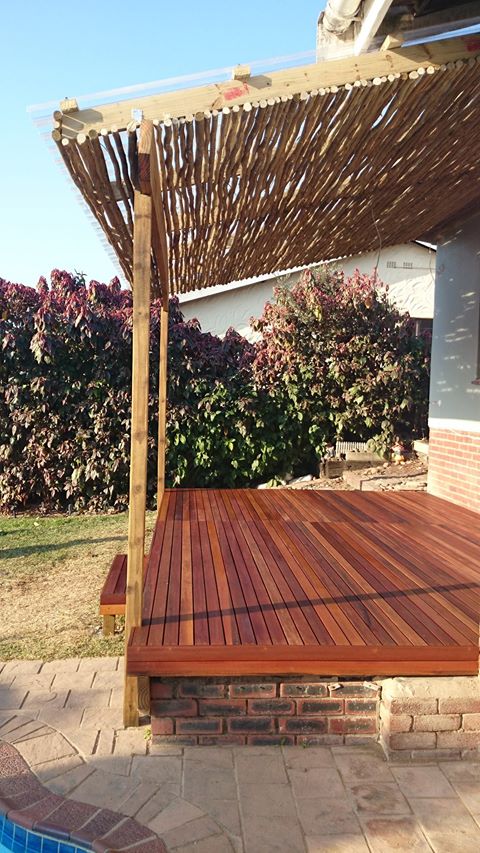
We added 50 x 76 purlins and covered that with clear polycarbonate roof sheeting. This allowed the light to still get in but it will be protected from rain. This roof sheeting is however not that attractive from beneath so we clad the underside with thatching laths with no gap between them. I’ve tried building one of these before with a laths gap between laths, but it doesn’t work as you can then see the roof sheeting clearly. Because the laths are not a regular uniform thickness all the way along, you still do get some gaps, even if placing them side by side, which allows light through but takes away the view from beneath of the roof sheeting.

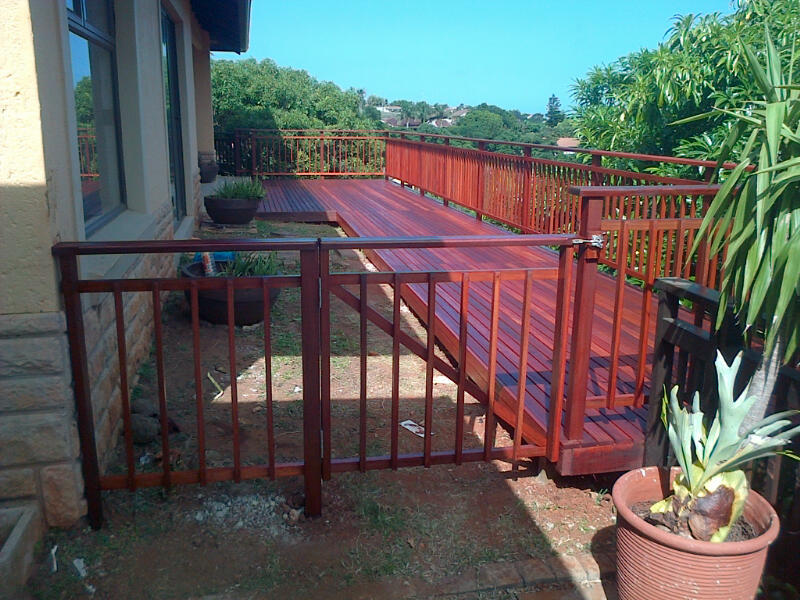
We added a step on the front, as the top of the deck was more than 200mm off the ground on the front so this made for easy access to the garden from the deck.

In the pics alongside you can see the roof sheeting on before we placed our thatching laths on. We’ve also previously used a translucent bronze roof sheeting which works very well to cut the glare from the sun. The polycarbonate roof sheeting is far better than fibre glass roof sheeting, albeit more expensive, as it doesn’t contain strands as the fibre glass sheeting does.

For a free no obligation quote on your wooden deck, pergola or any other outdoor wooden construction, please call us on 082 496 5444 or use the contact us form below.

Go back

Your message has been sent

Warning
Warning
Warning
Warning
Warning

Warning.

Wooden balau deck built in Malvern, Durban

Substructure on Low Level Wooden Pool Deck


We are busy with a new wooden pool deck build in Hillcrest, Durban and I have taken a video to show how the substructure is built before the deck boards go down.
This is a low-level wooden pool deck that we are building which is only about 200mm off the ground. Because it is 200mm off the ground we can’t simply use 38 x 38 cleats as we have done in the past which are secured to the ground. We still need to use a joist of at least 114mm wide which is supported every 1.6m with a foot or post as there will be a void beneath the joist and the paved substrate. We have aimed to get our deck flush with the floor inside the house which is about 200mm above the paved area around the pool.

We built our substructure in a number of separate frames which are then lifted up into place on the wall side and secured using sleeve anchors. The opposite ends of each frame are then also lifted up to get the top of the joists level and flat and supported using a 76 x 76mm square post which rests on top of the paving. We will also remove some paving on every other post and sink that into the ground to ensure that the deck doesn’t sink over time if the paving sinks. The separate frames are then all attached to each other.

We have left our joists long to extend over the pool and now that the side of the frame is attached to the house we can work out exactly where we want our joists to end so as to get our fascia board on the inside of the pool completely flush with the vertical of the coping of the pool. This way we can slide our fascia down to cover the coping neatly. We can now trim our joists to the correct length and install another 38 x 114 joist running at right angles to the main joists. We could not make use of a beam and joist system here because we don’t have space beneath our joists to install a beam. We would need an extra 228mm to do this. So our frame is assembled in one single plane rather than having joists sitting on top of beams.

We’ll install some truss hangers where the joists meet the side beam which is attached to the wall. All that is holding those joists to this side frame now are two 60mm screws from behind so they need to be supported with a truss hanger to stop them ever dropping if the screws fail. Those screws are screwed into ends grain which is never that strong in terms of fixing.

The trick to this type of deck is to get the fascia frame around the pool to sit completely flush with the coping of the pool so that a fascia board (two deck boards) can be installed in the vertical plane to cover the fascia. Once that is all fixed in place and can’t move then we can deck.

Balau deck boards will be secured on top of our joists and we will start our deck boards on each side of the pool and deck towards the house and towards the grassed area. When decking towards the house we need to hope that the pool is parallel to the house and if not then we need to adjust our spaces between boards to accommodate any difference. So for instance if one side, between pool and house is 20mm shorter than the other, then we will need to increase the gaps between deck boards by 1mm for 20 boards to get the deck parallel to the house. If not we will end up with a wedged shape board as the last board which will be unsightly and will fail more easily. Also we need to try to end on a full board rather than a ripped half board as that too will be unsightly and may fail prematurely. Again we will adjust the gaps as we go to ensure we end on a full board. The gaps are normally 5mm, but we can adjust them to 4mm or 6mm without being noticed. Then we will “fill” the section between each long side of the pool and again we need to ensure that we don’t end on a half board, by adjusting our gap to 4mm or 6mm. The final result will be a deck with full deck boards and no wedges.
The grassed side is easy enough in that we can protrude over the end of the paving to end on a full board and terminate our deck there. On this end we will install a screen of 1.8m high the length of the deck. So we will tie our upright posts for the screen into the posts for our deck to secure the deck into the ground with concrete to prevent any slippage, and at the same time providing an upright of 1.8m for our screen.

For a free no obligation quote on your wooden sundeck, pool deck, balustrades, screens, cladding, walkways etc. please contact us on 082 496 5444 or use the contact us form below.

Go back

Your message has been sent

Warning
Warning
Warning
Warning
Warning

Warning.

Wooden Balau Pool Pump Covers

Wooden balau pool pump lids

Click to enlarge

Here’s some pool pump covers we built for a client using balau wood. He had just refurbished his house completely and had added a koi pond and therefore a pump and filter system too. He had built a solid brick wall around the system and wanted to cover it with wooden balau lids that he could open to clean filters and operate the pump.
The width of these lids was 1.5m and the total length to cover was 4.1m. Because we were using balau which weighs in at about 850kg to 1, 000kg per cubic metre, they were very heavy and we had to split the 4.1m length into 4 sections to reduce the weight. Even at 1.5m² each, they were quite heavy to lift and latch on the wall behind.

They were hinged on to a wooden cleat we installed on the back wall and rested on the brick wall on the front and side edges. We built the frame using an H3 CCA Treated pine structure and then clad the top and sides with balau. In their open position, you can see the pine which we stained darker to match the balau in colour. Each lid can now be opened individually to access that section of the pump or filter and we installed cabin hooks on the wall so that in their open position they can be hooked up on the wall.

Wooden balau pool pump lids

Click to enlarge

Balau is a very heavy, hard, dense wood. I have had some pieces of balau which have sunk in the pool. One would normally expect wood to float, but if its density is more than that of water, then it will sink. This would mean that those pieces that sink are weighing more than 1, 000kg per cubic metre. Because of its hardness, density and other factors such as oils and resins and toxins that repel insects, it makes a very good decking material. It is however expensive so we try to use a properly treated (CCA Treatment) piece of pine wherever we can to reduce cost. If the CCA Treated pine is treated to the correct Hazard level, then it can be guaranteed for up to 50 years against rot or insect infestation. Wherever we can use it we do and then we cover it up with balau as it is not as visually appealing as balau.

Unfortunately there wasn’t enough space to allow the lid to fall backwards slightly to avoid having to latch it to the wall. The latches of course are visible when the lids are in their closed position. It would have been better to try to avoid using cabin hooks, but it would have meant building a wider cleat at the back wall to allow the lids to fall backwards slightly in their open position. This would have interfered with the accessibility to the pump and filter.

We used 100mm stainless steel hinges with bearings in the spine as these are extremely strong and a lot more cost affordable than brass.

In their closed position, the lids act as a bench that can be used to sit on or a low-level table.

For a free no obligation quote on your outdoor timber construction, please contact us on 082 496 5444, or use the form below to send me an e-mail.

Go back

Your message has been sent

Warning
Warning
Warning
Warning
Warning

Warning.

Wooden Pool Deck Built in Westville, Durban

Pool deck built Westville Durban

Click to enlarge

Balau Deck board

Click to enlarge

50 degrees

Here was a nice size wooden sun deck, or pool deck, we built of approximately 60m². I say a nice size because at that size one can reduce the costs slightly, pass a saving on to the client, and make a little bit more money on the job.

Wooden deck with jacuzzi cladding Durban

Click to enlarge

This wooden sun deck was built around the pool as you can see from the pics alongside. It also extended to the far end of the house and was enclosed by a balustrade on two sides with two gates leading to the garden. Access to the deck was from two bedrooms on one end in front of the pool and from the lounge on the other end. The level of the floors, in the rooms, near the pool, were not the same level as the level of the lounge floor so we were left with a choice to either step the deck or have a small step up to the lounge. We chose to create a small step up to the lounge because having a step in the middle of your wooden pool deck is only going to lead to someone tripping and hurting themselves.

In this article I want to write about the different ways of laying the boards when it comes to pool decks or any other deck where the boards can possibly run in both directions. If a deck needs to be built with deck boards all running the same way it is relatively easy to install them in that the ends do not need to match up. The problem one can have in trying to match up ends of deck boards is that if they are not cut at precisely 45° then the length of the cut ends will differ. I’ve drawn a sketch alongside to illustrate this.

It is highly unlikely that any pool will be perfectly square. When installing the wooden pool deck it may be necessary to cut one end at say 44° and the matching board that runs at right angles to it, at 46°. The two ends will not be of equal length and will therefore not match up flush with each other. The problem is compounded with each deck board that is added. Let’s assume that the one cut end is 2mm longer than the other. After installing 15 deck boards (or one metre) the boards will have shifted by 30mm (15 x 2mm). This will be unsightly. The problem is also compounded by the variance from 45° which results in the difference in lengths of cut ends being greater.
There is a way to overcome this problem and that is to install a joiner between the cut ends as the sketch alongside illustrates. The other way is to run the deck boards all in the same direction (i.e. not all parallel to the edge of all sides of the pool, but rather all parallel to each other).

Pool deck built Westville Durban

Click to enalrge

Another advantage though of running the deck board’s parallel to all edges of the pool, with corner joins, is that you will have face grain facing the pool and not end grain. Water is absorbed largely through the end grain of wood and if this end grain is facing the pool, then it stands to reason that the deck boards on this side of the pool will be exposed to more water and will tend to rot more quickly than those with face grain facing the water. Even though we use balau for our deck boards, which is rot resistant, all wood will rot and by employing methods that will inhibit rot, makes good sense. Having said all that, it is easy and cheap to replace deck boards and if a deck board with end grain facing the pool gives you 15 years life, the cost vs. preference is not that great.

For a free no obligation quote on your pool or sun deck, or any other outdoor timber construction, please call us on 082 496 5444 or use the contact us form below.

Go back

Your message has been sent

Warning
Warning
Warning
Warning
Warning

Warning.

Balau Wooden Sundeck Built in Kloof, Durban

Wooden Sun decks Durban

Click to enlarge

Here’s a balau wooden sundeck we’ve just built on Kloof, just inland of Durban.

We used a 19 x 90 balau deck board on this wooden sun deck at the client’s request. We normally use a 19 x 68 balau deck board as they are considerably less expensive per square metre than the 19 x 90 balau deck boards and we can pass that saving on to our clients. Granted it is quicker to install a deck board that is wider as you need less boards per square meter (in this instance 15 boards per square metre using a 68mm wide board and 11 using a 90mm board), but not by that much that it warrants paying 35% more for it. 90mm boards are about 35% more expensive per square metre than 68 mm boards.

Wooden Sun decks Durban

Click to enlarge

When screwing down a 19 x 90 deck board I put two screws, per board, in each joist line, one in each shoulder. I have seen other deck builders putting one in

Wooden Sun decks Durban

Click to enlarge

every alternate shoulder. It does work, but if you do get a board that is particularly prone to warping it will warp where the one screw has been left out. It is not a huge cost or effort to put a second screw on the opposite shoulder of each board at each joist line. Obviously the wider the board the more prone it will be to warping. Why they are more expensive I haven’t yet worked out because good balau is good balau is good balau. If the wider boards we taken from a different part of the tree, the heartwood vs. the sapwood, then I would understand the price difference, but they aren’t. It is a preference, at a price, that’s all.

Wooden Sun decks Durban

Click to enlarge

We ran the deck boards all in the same direction on this wooden deck. With this deck we ran the deck boards parallel to the edge of the pool meeting each other at a 45° angle on the corners. It is far easier to run them all in the same direction as you will never get a problem of matching the cut ends. If one board is cut at 46° and one therefore at 44°, they will be of different lengths and will not match up. In this instance you need to install a barrier between then (one deck board’s width) to hide any difference in length between cut ends. But I’ll write another article about that later. Running them all the same way on both sides of the deck eliminates this problem.

You need to be careful though to start installing your deck boards in the middle of the deck and not on one end. If you start on one end, you may very well reach the 90° corner and find that you have to rip a deck board in half to cover your space. This is unsightly and will result in that deck board failing more quickly than the rest. So start in the middle and move outwards to both ends and end with a full deck board.

There was also some other work on this wooden deck build in that the client wanted a planter stand built so he could place potted plants in it and he wanted his Jacuzzi walls clad. We battled a bit with the Jacuzzi cladding as the original brick structure that was there was skew and we had to try to mitigate this by building up

Wooden Sun decks Durban

Click to enlarge

our substructure to bring it back to square.

The cladded vertical posts you see in the pics alongside are 19 x 90 boards (x 3 of) around a 76mm steel awning post. We needed to build the steel awning post up to get to our 290mm and then attach it to the post. Although it looks very nice to have such bulky wooden posts, it does block the view slightly when sitting at the pool. Why 290mm when each board is 90mm (90mm x 3 = 270mm)? Because we set each corner chasing the other surface. And let’s just forget about the 5mm gap we had in between each board.

For a free no obligation quote for your wooden sundeck, pergola, walkway, screens or other timber construction please use the contact us form below or call us on 082 496 5444.

Go back

Your message has been sent

Warning
Warning
Warning
Warning
Warning

Warning.

Balau Cladding or Screening

Balau cladding or screening

Click to enlarge

Balau cladding or screeningZ

Click to enlarge

Balau cladding or screening of brick walls is quite popular and attractive. It takes an otherwise boring brick, plaster or concrete look and transforms it into a beautiful wooden clad structure. It can of course be clad balau or any other timber, but balau being the most popular outdoor timber for cladding of brick walls. Pine is a lot cheaper buy nowhere near as durable and will warp, cup, twist and bow a lot quicker than balau. Balau is very stable and the deck boards will remain flat for a lot longer.
We use either the standard deck boards of 19 x 68mm or we can use a 19 x 90mm board. The 19 x 90mm board is however more expensive per square metre than the narrower boards.

What works quite well too when cladding brick walls with timber is to have differing widths of boards. So one might start with a 19 x 68 board, and then install a 19 x 90mm board and then a 19 x 30mm board.

When cladding brick walls with timber it is best to keep the gaps to about 5mm. Normally with screens we leave a 20mm gap, so that you can still see through the screen if you walk right up to it, but with cladding there is nothing really to see on the other side. So keep the gaps to 5mm to have a nice tight compact finish.

This was a job we did in Westville for a corporate client who was renovating their reception area. It was initially a brick portico sort of structure that had small blue mosaic tiles stuck to it. The blue mosaic tiles were painted black prior to us cladding so that they would not be visible between the gaps. We simply installed cleats of 19 x 68 deck boards in balau on to the tiles which had been painted black and then on top of that we installed the cladding. We had to be careful not to protrude the cladding more than about 45mm from the wall as it would have caused the main door to snag on the cladding.  On the corners we mitred the edges at 45° to give it a nice neat finish.

There was an access control system that we needed to work around. The company installing it came to site on the same day that we clad that area and we worked with them to cut out the necessary areas so that the various control panels could be installed neatly on our timber cladding.

The job was finished with closing the screw holes with epoxy, sanding smooth and sealing using Timberlife Satin Wood 28 Base, an oil based deep penetrating timber preservative that repels water. Because it is oil it can never peel or flake making future maintenance easy and inexpensive. You simply clean the timber and apply more oil.

For a free no obligation quote on your timber cladding requirements, wooden sun decks, pergolas and other outdoor wooden construction, please contact us on 082 496 5444 or use the contact us form below.

Go back

Your message has been sent

Warning
Warning
Warning
Warning
Warning

Warning.

Wooden Balau Horizontal Balustrade using Deck Boards

Wooden Balau Horizontal Balustrade using deck boards

Click to enlarge

Wooden balau balustrades can be designed and built in many different ways. One gets traditional picket style wooden balustrades, which seem to be the most popular with nice clean straight vertical lines. There are the criss cross designs and criss cross with a box in the middle. These are all very basic descriptions for these designs. They are also known by other names such as Zimbali, Colonial etc. They all carry with them their own individual cost due to the different size timbers used in their construction.

The cost of standard deck boards are a lot less expensive, in terms of per cubic metre rate, than the structural pieces of balau. Structural pieces refer to sizes such as 60mm x 60mm which is used for the vertical posts, 30 x 40 which is used for rails etc. So it stands to reason that a balustrade that is made from deck boards of 19 x 68 will cost less in timber.

The pics alongside show a balustrade that we built using deck boards. The gaps were 20mm wide and the deck boards were attached to a cleat which was fixed to the vertical brick columns. Obviously the smaller the gaps between the boards, the more expensive it will be because more deck boards will be used. I wouldn’t increase the gap to more than 68mm, being one deck board’s width. For the cleats we used a 30mm x 40mm which is our standard rail in the picket style balustrade. The cleat only needs to be about 850mm or so, so these pieces can be taken from off cuts of previously built picket style balustrades resulting in a further cost saving that can be passed on the client. For the capping we used a standard capping of 30 x 102, but this can be changed too to a narrower one. I wouldn’t go narrower than 30 x 60. This is then bull nosed on the corners using a round over bit in the router.

This job was built in between brick columns, so these can actually be referred to as in-fills rather than a balustrade. This can also be built using 60mm x 60mm posts in place of the brick columns and these should be spaced about 1.5m apart to give the structure rigidity. The 60 x 60 posts can also be substituted for 30 x 60 posts, for intermediate posts, if budget is a concern. I prefer to use 60 x 60 posts on corners and ends though.

Wooden Balau Horizontal Balustrade using deck boards

Click to enlarge

What to watch out for in building one of these is that the tops are all level and at the same height. Sometimes you will find that the distance between the top and bottom of the brick column varies. In this instance you will keep the tops level and it will result in a varying gap at the bottom. When looking at a balustrade or in-fill one looks at the top so it is better to have your variation in gaps at the bottom.

For a free no obligation quote on wooden balustrades, in fills or any other outdoor timber construction please contact us on 082 496 5444 or use the handy contact us form below.

Go back

Your message has been sent

Warning
Warning
Warning
Warning
Warning

Warning.

Driveway Gate Clad in Balau Wood

Driveway gate clad in balau

Click to enlarge

Here’s another driveway gate that we clad in balau in Umdloti, North of Durban. In the pics you can see the old gate which we left in place while we installed the new balau timber clad driveway gate and them removed it afterwards and scrapped it. Because this gate is right on the road facing the beach it had rusted beyond repair.

The steel gate was designed using 38mm x 76mm rectangular tube as a rectangular outer frame which then had a cross flat bar of 5mm x 30mm running horizontally across from one side to the other. At the top and bottom we welded flat bar on to the rectangular tube which had pre drilled holes in it to accept our deck boards. The horizontal cross flat bar was there to stop the deck boards bowing over time. It was all hot dip galvanised. I don’t recommend painting the galvanised steel. It can be done quite successfully but will always be a maintenance issue and will need re-painting every year or 18 months.

We set he track in concrete and attached the brackets which keep the gate plumb and then set the gate on its track. Only once it was on its track did we attach the deck boards to the flat bar on the top and flat bar on the bottom by lining up the board with equal spaces and drilling a hole through the wood. We used a 40mm galvanised hex bolt with a nut on the back-end and then finished it off with a stainless steel dome nut. It would be better to use stainless throughout, that is the bolt, washers nuts and dome nuts as they won’t rust.

Driveway gate clad in balau

Click to enlarge

We left the timber unsealed as the client wanted it to turn natural grey. It doesn’t really affect the longevity of the timber. Balau contains natural resins and oils which slow down the process of rot considerably compared to other woods.

The trick in setting these deck boards is to make sure that they are equally spaced. It is fairly simple because the pre drilled holes are calculated to be dead centre so theoretically each hole should be drilled through the centre of the board. Practically though you need to still be careful to get the space between boards equal even at the cost of not drilling dead center of each board. The time-consuming part of this job is pre-cutting the deck boards to exactly the correct length to fit snugly in below the top and bottom tube.

The flat bar on the top and bottom, to which the board is attached, is set off centre so that the steel on the front of the gate is flush with the deck boards once they are installed. i.e. the deck boards are recessed.

When measuring for the steel frame you want to get the whole frame visible when the gate is in a closed position. You always set your boards so that the good side is on the outside.

What goes very nicely with these types of gates is matching timber in fills on a masonry boundary wall.

Driveway gate clad in balau

Click to enlarge

For a free no obligation quote for driveway gates clad in balau or other timber, timber in fills on boundary walls and all your outdoor timber construction, please contact us on 082 496 5444 or use the contact us form below.

Go back

Your message has been sent

Warning
Warning
Warning
Warning

Warning.

Timber Decks Durban – Umhlanga

Timber decks Durban

Click to enlarge

This existing timber deck in Umhlanga Durban had reached a point of no return and our recommendation to the client was that we remove it and replace it. It’s never a good thing to hear that you must throw it away and buy a new one because it can’t be fixed, but often wooden decks are not built as they should be built and they therefore do not last as long as they should.

From the picture alongside you can see the damage done to the posts at ground level as a result of insects. Given another year or so and those posts would have failed and although the deck might not have come falling down, it would have become unsafe and a danger to those trying to enjoy it.  See far below for pics of the finished product.

The existing deck had been built out of pine and I can only think that the wrong H class was used. As I’ve mentioned in other articles, pine used for decking purposes needs to be CCA treated to at least an H3 level and any pieces in direct contact with the ground should be treated to H4 level. You can read up more on the H levels here http://www.sawpa.co.za. In a nutshell though, off the shelf H2 treated timber will not last. And don’t be fooled by the timber yard telling you they will “double dip” it. The pressure between H2 and H3 treated timber is different, so doubling dipping H2 will not make H3, it will make H2 + H2 and it WILL rot. On the other hand if the correct H level is used the suppliers will offer up to a 50 years guarantee on this timber against rot and insect infestation. Who’s building a deck that will still be around in 50 years?

We first removed the existing deck boards so that the joists were exposed. We removed all joists but left the main beam on the front edge so that we could use it as our guide to installing the new beam. We used the existing posts as temporary posts to build our substructure, then installed our new beam and dropped posts to ground from there. We then removed the old beam and old posts and were left with a new timber deck substructure in pretty much the same place as the old one. It made our life easier and took a lot less time.

There was a gate we built and installed along the one side. We used stainless steel hinges on it. I’ve found that stainless steel hinges with bearings in the spine are not that costly. In fact a lot less expensive than brass and, in my opinion, a lot more durable. The solid brass can sometimes be a bit soft whereas stainless steel is a lot harder. This is especially the case when talking about screws. Brass screws tend to sheer of quite easily under pressure.

Timber decks Durban

Click to enlarge

It was a nice job to kick the year off with as it was relatively simple. The only hurdle was trying to build 3m in the air on a very steep slope. We used extension ladders but still it makes it difficult and a bit slower because someone has to hold the ladder and keep moving it when screwing down pickets on the balustrade which is time consuming.

For a free, no obligation quote on your timber decking and other outdoor timber construction needs in Durban please call us on 082 496 5444 or use the contact form below.

Go back

Your message has been sent

Warning
Warning
Warning
Warning
Warning

Warning.

Timber decks Durban

Click to enalrge

Timber decks Durban

Click to enlarge

Timber decks Durban

Click to enlarge

Wooden Screens, Pergolas, Decks and Gates Durban

Driveway gate clad in balau

Click to enlarge

Wooden gates Durban

Click to enlarge

Wooden Screens Durban

Click to enlarge

Wooden balustrades and pergolas Durban

Click to enlarge

We were asked to quote on wooden screens, wooden pergolas, wooden decks and wooden gates on a new build in Prestondale, an area north of Umhlanga, at a development called Izinga Ridge. We originally quoted in about June 2013 and the work was awarded to us for s start date of about 1 November 2013. The job consisted of various screens between brick columns on the boundary wall, a pergola on an open balcony on the first floor, external and internal balustrades, garden gates, a driveway gate and a pool deck.

All the timber we used was balau hardwood with the exception of the substructure of the pool deck which was H3 and H4 CCA treated pine. In other articles you can read about how we have managed to keep our prices down by using this as a substructure whilst still being able to offer up to a 50 year guarantee on this treated timber.

Most of the screens were pretty straight forward with balau cleats on the wall and then clad using a non reeded 19 x 68 deck board. We used non reeded so that both sides would look the same, but we did battle to find non reeded boards as most of the deck boards available are already reeded, or grooved on one side. There were two screens that proved a little more difficult as the wall we were attaching them to was angled. So the boards had to be cut at that angle and secured to each other whilst still remaining level and the join remaining plumb.

The external balustrades were different to our normal vertical picket style balustrades as the client requested horizontal slats instead. Again we used non reeded deck boards for this with a normal post system. On each post we attached vertical cleats to accept the horizontal deck boards or slats. They were installed in line, or on top of the concrete slab, rather than being attached to the front of the concrete slab. The tiles had already gone down so we had to drill through the tiles without cracking them. We installed an “ankle” on the middle post to provide support which is attached to the vertical post and is then shaped to fit around the slab to attach again to the vertical of the concrete slab. This, in effect, allows the post to be attached to the outside but still allows the balustrade to sit on top of the slab. It is much neater but does require a bit more thought and re-enforcing.

Wooden decks durban

Click to enlarge

The pool deck was relatively simple as it was a low-level deck around the pool with a simple frame system using 38 x 114 joists and beams. Extra posts had to be concreted in as it wasn’t high enough to slot an under beam, or main beam, of 50 x 228 in.

The driveway gate was fun. We had the steel made up in a design that would work well by cladding it with wood. We had to source long enough non reeded boards to run the full width of 4m. One cannot join boards in this type of gate unless there is a centre steel vertical support which would spoil the look of the gate a bit. We had run out of standard non reeded boards and so had all suppliers so we sourced a 20 x 140 board and ripped it in half, length ways, to arrive at two boards of 20 x 68.

Wooden balustrades Durban

Click to enlarge

The pictures alongside show some work in progress and some completed work. It was an interesting but challenging job as there were many contractors on site all trying to work, and finish, before the handover of the house. The worst part of the job was fighting traffic from north Umhlanga to the freeway in both the morning and afternoon.

For a free, no obligation, quote on wooden decks, pergolas, garden gates, balustrades and all other outdoor timber work, please call us on 082 496 5444 or complete the form below.

Go back

Your message has been sent

Warning
Warning
Warning
Warning
Warning

Warning.