Wooden Balau Deck built in Cotswold Downs, Hillcrest

This wooden balau deck built in Cotswold Downs in July 2019 was built primarily to cover the JoJo tanks which were being housed below. There were various challenges in getting the beam across the span around the pipes that led into the tanks but with a few tricks we managed to hang a beam from above rather than secure it from below.

Wooden Balau Deck Cotswold Downs HIllcrest Wooden Balau Deck Cotswold Downs HIllcrest Wooden Balau Deck Cotswold Downs HIllcrest Wooden Balau Deck Cotswold Downs HIllcrest Wooden Balau Deck Cotswold Downs HIllcrest Wooden Balau Deck Cotswold Downs HIllcrest Wooden Balau Deck Cotswold Downs HIllcrest

The balustrade was built using balau and marine grade stainless steel wire rope which always works best when you don’t want the view to be obscured when in a sitting position.

There are a few strict rules at Cotswold Downs in Hillcrest with regard to the maximum height of the deck so we had to stagger it and create a split level deck. This resulted in some benches with removable lids for storage and a small flight of stairs to access the lower section.

For a free no obligation quote please contact me Garrick Dunstan on 082 496 5444 or use the contact us form below.

Wooden Deck Gillitts – July 2019

The pics here are of a wooden deck we have just completed in Gillitts. The client wanted an old deck removed, dumped and a new one built with slight changes. It was built in the normal way using an H3 CCA treated substructure and balau deck boards of 19 x 68mm which is the most affordable way to build a wooden deck that will last. The H3 CCA treated pine has a minimum life span of 50 years outdoors in the rain and the balau, being balau, will give one many years of use. The balustrades are all full balau in a vertical picket style and the stairs are open risers in balau. These were slightly wider than normal so as to tie into the posts of the balustrade on the deck.

Wooden Deck Gillitts Wooden Deck Gillitts Wooden Deck Gillitts Wooden Deck Gillitts Wooden Deck Gillitts Wooden Deck Gillitts Wooden Deck Gillitts Wooden Deck Gillitts Wooden Deck Gillitts

Screw holes were filled with epoxy to stop water ingress and sanded flat and the deck was oiled.

There are many other articles on this site that will give you the pros and cons of the different materials that we use. Please feel free to browse.

For a free no obligation quote please use the contact form below or you can call me Garrick Dunstan on 082 496 5444.

Wooden Balau Screen Pietermaritzburg

This slideshow requires JavaScript.

This wooden balau screen was installed at a property in Victoria Club Estate in Pietermaritzburg. The purpose of the screen is to offer some privacy between the neighbours. The brick wall does not offer enough privacy so the wall was in essence extended with a screen on top of it.

The wooden screen needed to be installed on top of the wall as opposed to being fixed to the face or front of it. It is much neater this way but it does mean that the posts need to sit on top of the wall rather than the face, so lateral strength becomes a concern. We use a 200mm piece of thread bar drilled and epoxied into the top of the wall 100mm and into the bottom of the post 100mm. The thread bar we use is 14mm so as to give it enough strength and prevent any bending of the pin itself. The holes need to be drilled perfectly straight and square otherwise the post will not sit perpendicular to the top of the wall. The epoxy that is used is the Sika or ABE product as it is extremely strong. We don’t use the same epoxy to fill screw holes as that epoxy is more pliable and doesn’t offer the same strength.

A simple post and rail system is then used to provide structure to fix the deck boards to. We used balau as a structure so that the back end of the screen also looked good. This as opposed to using a treated pine structure. Pine structures work just as well in terms of strength but are not as visually appealing.

The top was finished off with a deck board placed flat as a capping. Screw holes are filled with epoxy to limit water ingress and in this screen the screws were installed from the back end of the screen so they are not visible on the good side. In the pics you can see the epoxy that has been used and the pics were taken just before it was sanded flat.

This screen was left unoiled so that it could grey naturally. There are various articles on this blog regarding oiling or leaving it unoiled and the pros and cons of each system in terms of maintenance, longevity and appearance.

For a free no obligation quote on your timber decking, balustrading, screening and stair needs please call us on 082 496 5444 or use the contact us form below.

Balau pool deck and walkway – Kloof, Durban

This slideshow requires JavaScript.

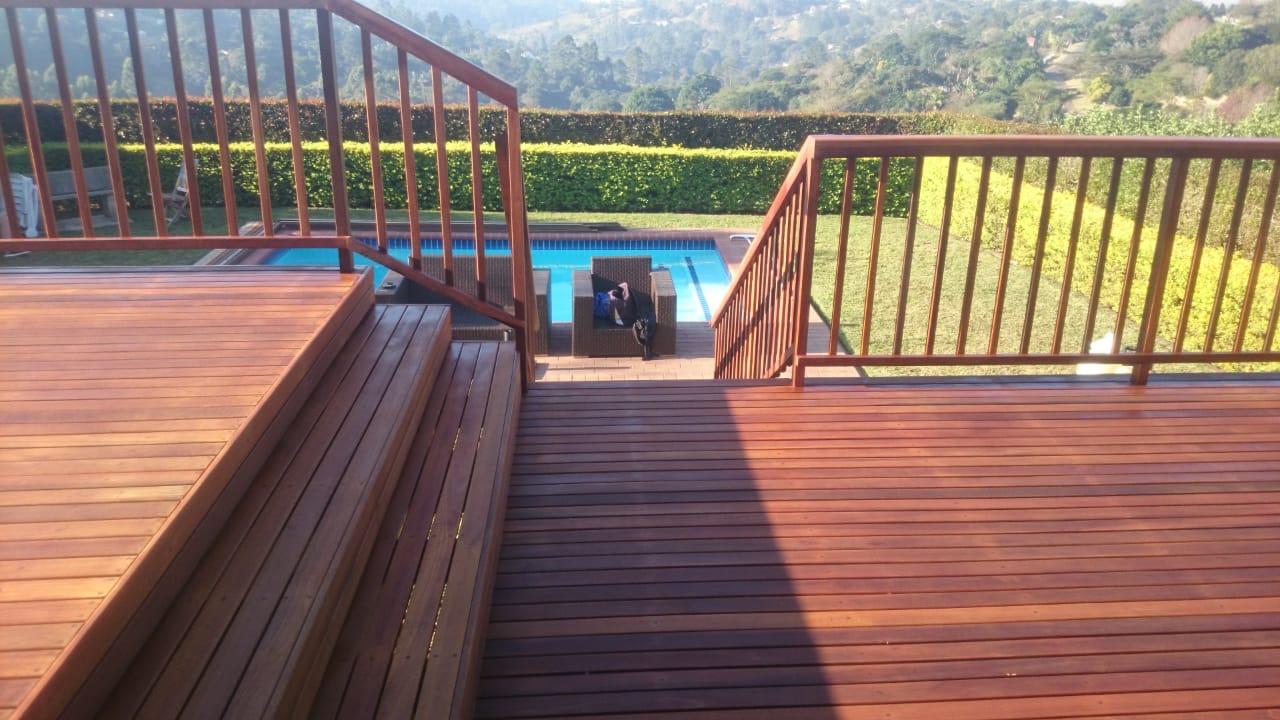
We engaged with Masslandscapes, a landscaper and garden designer (082 468 3759) on this balau pool deck project in Kloof, Durban to provide a solution for the client who wanted an area alongside their pool that they could utilise more. Before the project started there was the standard paved area of about 1m alongside the pool which was bordered by grass of about 1m and then a flower bed, before dropping down a small bank to the rest of the garden. The client wanted to increase the size of usable area alongside the pool.

Initial designs were to have a very similar layout as per the pics above with a semi-circle sort of node protruding over the bank to gain height and create a look out area overlooking the Kloof Gorge. This proved to be out of budget and would probably have resulted in doubling up sitting area as there was already a large tiled verandah extending out from the living area doors. The final design was settled on which is what you see in the pics.

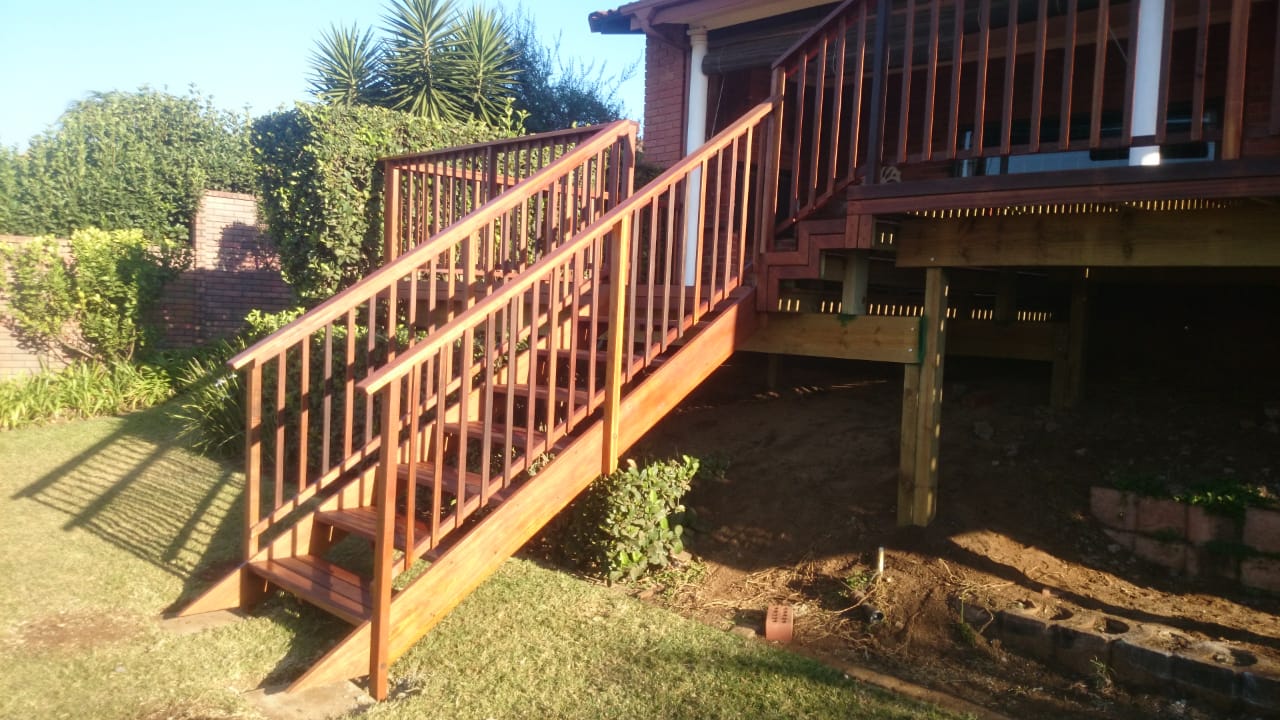
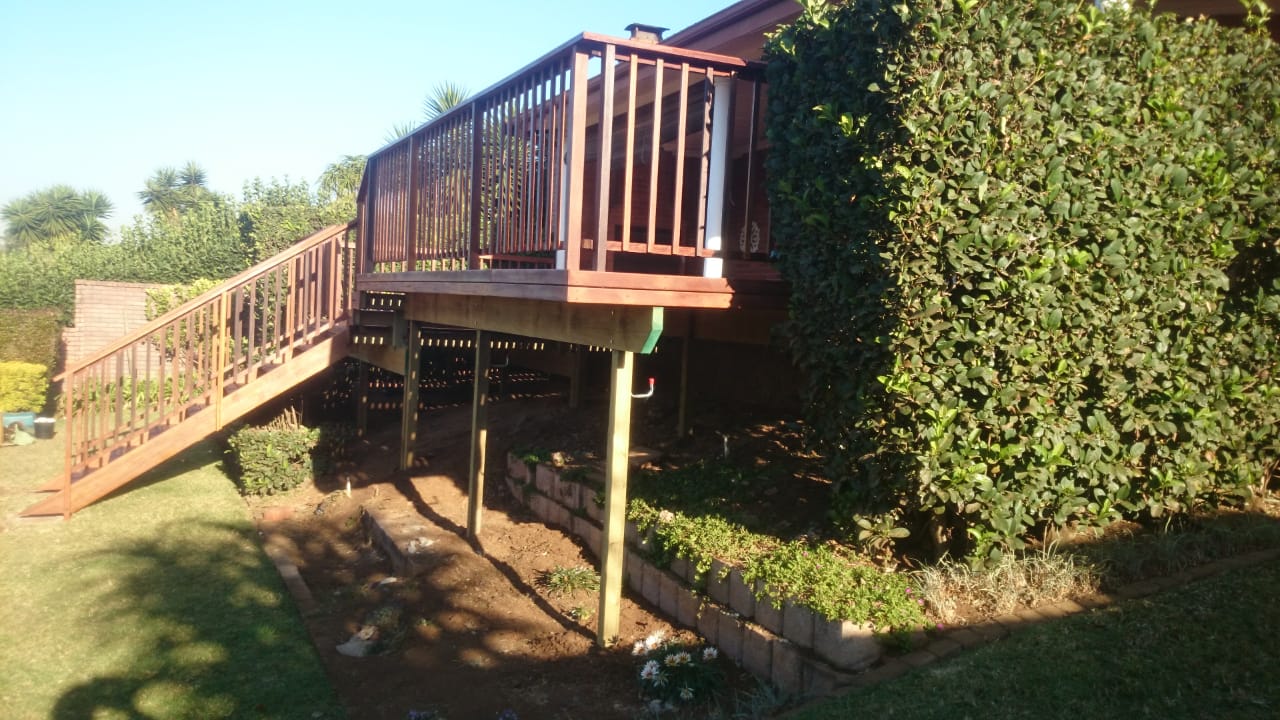
We needed to excavate some of the garden down and move this top soil for use in another area of the garden. It is always recommended that sufficient space be left below the deck and below the bottom of the lower most bearer or joist to allow enough air flow to dissipate and evaporate any water that settles below the deck. Too often I have seen deck boards rotting prematurely due to insufficient space being left below. Water gets trapped below and the underside of the deck and structure remains damp. I normally recommend at least 150mm below the lowest point of the structure. Once we had enough space below we installed our structure using H3 CCA treated pine. Please see here for an article on the use of CCA Treated pine as structures for decks and balau as deck boards. All cut ends of treated pine, as a matter of course, are re treated with an approved end sealer. When a CCA treated piece of pine is cut it exposes a section that is not treated and can accelerate rot.

Post to ground are set in concrete and installed at the correct distance on the bearers to stop any bounce in the bearer and to provide enough support to prevent the bearer breaking. There are guidelines supplied by engineers for distances that these supports need to be installed. These posts need to be H4 CCA treated pine as they are in constant contact with wet soil.

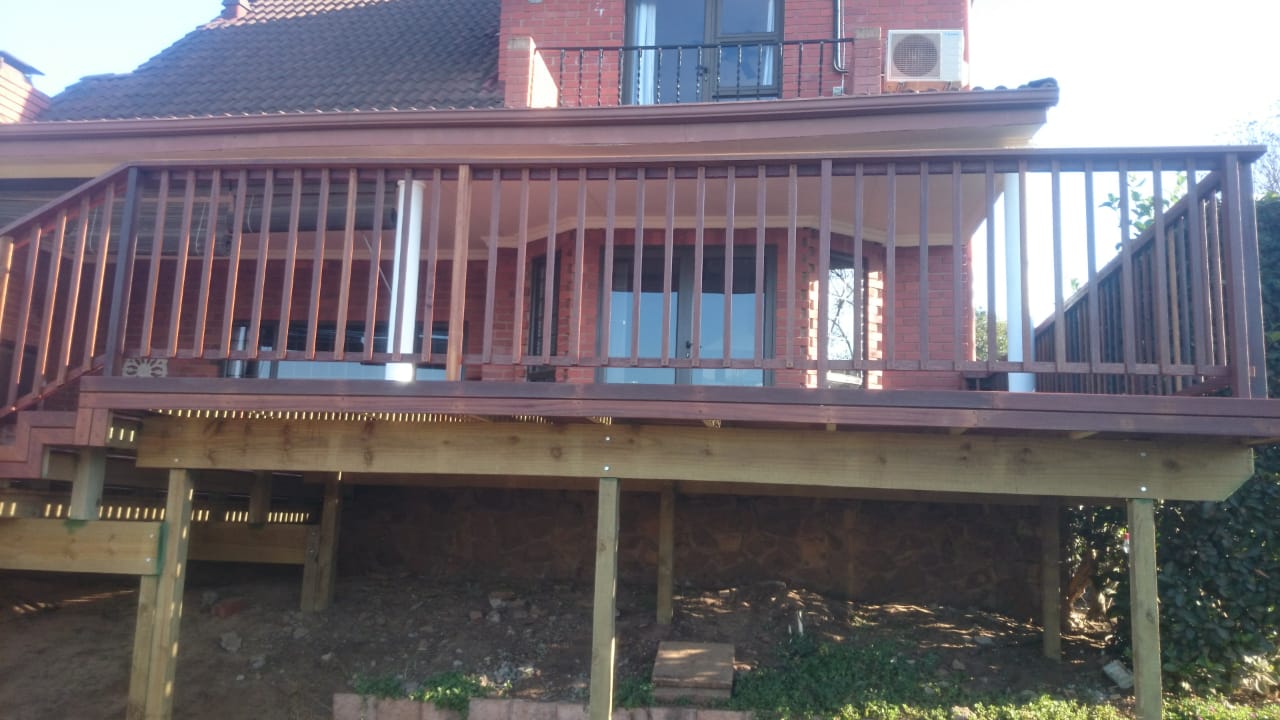
A lot of this job involved lining up existing paving, pool copings, patio etc. to the deck so the lines were seamless and everything ties in neatly. A walkway, as can be seen from the pics, was created to run alongside the existing raised patio for access to the rest of the garden.

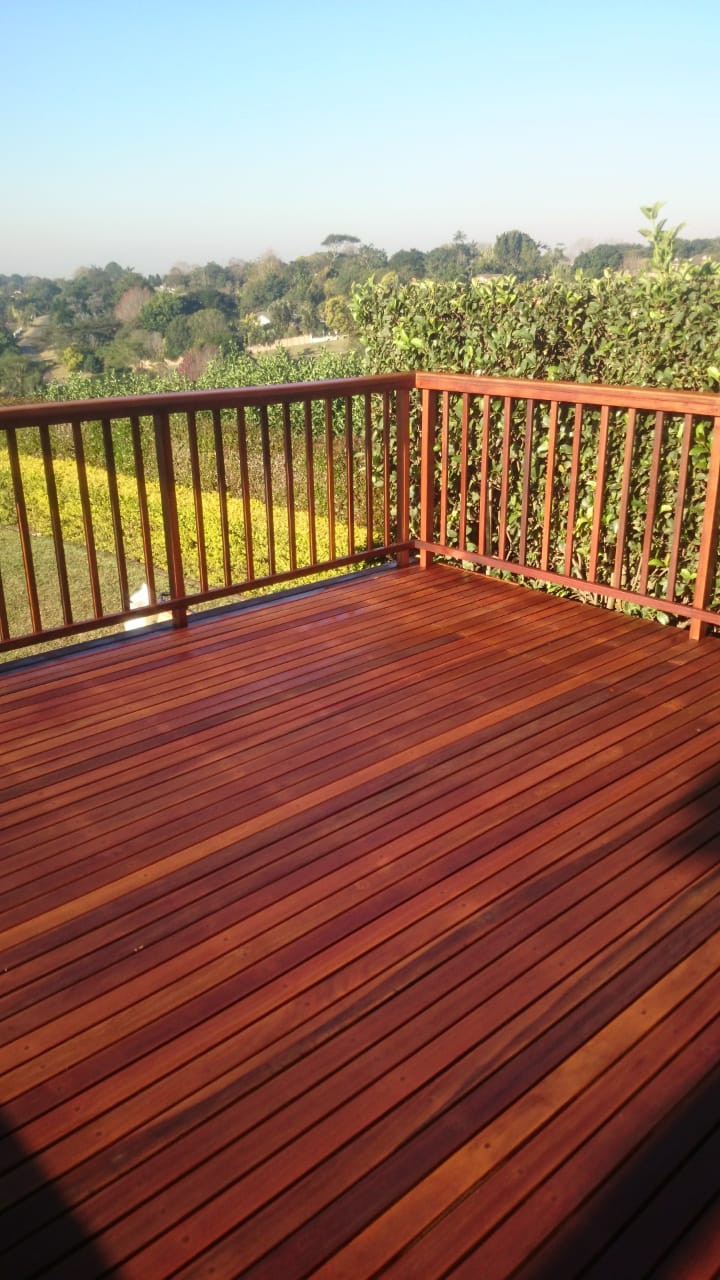
In finishing our decks we fill the screw holes with a clear epoxy mixed with saw dust to match the colour as closely as possible and then grind and sand it flat. Standard wood filler doesn’t quite do the trick and fails with exposure to weather. The filling of screw holes is a very important aspect of deck building. It prevents water sitting in the counter sunk screw hole which would then travel up the end grain of the balau and cause early rotting of the balau deck boards. We use a clear epoxy so that we can match the colour to the deck boards. Off the shelf epoxies are either grey or white in colour and don’t take the saw dust that well to match the colour. Also these epoxies dry very hard. It is better to use an epoxy that is semi pliable when dry. Through seasons of dry and wet, hot and cold, the inside diameter of the counter sunk screw hole will vary ever so slightly. If the epoxy has dried too hard it will cause it to pop out leaving a weak spot on the balau deck board. During maintenance intervals these should be checked and replaced if they have in fact popped.

The deck was oiled using a zero wax content product. The beauty of oil is that it soaks into the wood and therefore cannot peel and flake. A peeling deck is an expensive deck to maintain because you would need to sand off the coating completely to avoid a patchy finish when re-applying the coating. Whereas an oil simply degrades due to exposure to UV over time. A pressure wash and re-oil is all you need to do at maintenance intervals which is relatively inexpensive and easy to do as opposed to sanding the deck again. The oil also allows the natural beauty of the wood to shine through resulting in a more natural wood looking product. Coatings give them the effect of a painted deck especially over time when layer after layer has been applied.

For a free no obligation quote on your timber balau decking, walkways, pergolas and other outdoor timber products, please call us on 082 496 5444 or use the contact us form below. We operate throughout KZN.

Wooden Balau Decking Companies in Durban

This slideshow requires JavaScript.


Here’s a wooden deck we at The Wood Joint built in Durban recently. The Wood Joint is a wooden decking company situated in Durban and servicing most of KZN. It was a low-level wooden deck basically at ground level joining the pool to the patio and semi surrounds. The site was situated in la Lucia Durban.

When building a wooden deck that will join a verandah to a pool, one needs to be careful to set the height of the pool correctly. The height to the verandah is of course pretty much set based on what the threshold of the sliding doors are. So working from a datum line of the top of the tiles of the verandah one would set the top of the concrete ring beam of the pool down 70mm from the required height of the deck. This will allow for a substructure of 50mm and a deck board thickness of 20mm (19mm in fact but to keep things simple rounded to 20mm). A 50mm batten fixed to the top of the concrete ring beam of the pool will give sufficient space to allow water to evaporate properly, keeping below the deck as dry as possible, and enough structure to create a positive fixing of deck board to bearer. The distance created between top of deck and pool should be minimal. It is not advisable to go much higher than 70mm because it creates a very big “climb” out the pool (from water level to top of deck).

In this deck pictured you will see we ran the deck boards perpendicular to the verandah and pool side. Using this method it is not that important if the side of the pool is parallel to the verandah as the length of the deck boards can be varied quite easily without noticing any difference in length. On the other hand when the deck boards are run parallel to the pool side and verandah one needs to be careful to get the two as perfectly parallel as possible. Any difference will be visible because a deck board will need to be cut in a wedge shape to complete the space. If the difference is not that great then one can “fan” the deck boards to take up the difference in space by making one end’s gaps slightly bigger than the other end. So on one end a 6mm gap can be left and on the other a 4mm gap (normally 5mm throughout). This gains 1mm per deck board run. After 20 deck boards one can adjust for a 20mm difference in spacing. Another “trick” when running boards parallel to the pool side and verandah is to try to end on a full board rather than a half board. Again space between boards can be adjusted either up or down to try to end on a full board. It is much neater and won’t cause as many problems going forward. From the pics you’ll see we ended the deck on a half board which in this case was unavoidable because of the configuration of paving and deck.

You’ll see from the pics that the garden is mostly left for landscaping until after the deck has been built. Trying to build a deck with newly laid grass and not damaging it is near impossible. Always get you building work done before landscaping.

For a free no obligation quote on your decking requirements in Durban please call us on 082 496 5444 or use the contact us form below.

DIY Timber Decking in Durban

Timber decking companies DurbanAlthough we are professional installers of timber decks in Durban, we also offer a DIY service whereby we will supply the materials required to build your own wooden deck. We will also provide a brief outline of what is required and how to go about installing it.

As an introduction to this service I will offer some basic guidelines of how to set about building a wooden deck.

The most cost-effective method is to use an H3 and H4 CCA Treated substructure and balau deck boards. H3 timber is guaranteed, by the supplier, for 50 years and H4 is guaranteed for 30 years. This is of course subject to certain conditions that need to be fulfilled such as sealing cut ends with an approved end sealer and using H3 and H4 where they should be used. You can see a list of H classifications on www.sawpa.co.za. Provided the correct H level of timber is used in the correct application your deck will probably out live you.

Wooden decking companies Durban

First few rows of balau deck boards down

Substructure construction will vary depending on the height of the deck and some other criteria, but basically you will be aiming to install joists at about 450mm to 500mm centres. This will vary depending on the total length you need to install joists over. The joists are generally built using 38 x 114 S5 H3 timber. S5 is minimum SABS structural grade timber and refers to the number of knots per square metre that are present in the wood. H3 is the level to which it is treated at the treatment plant. H3 is suitable for outdoors. If you are placing timber in the ground, or in constant contact with wet soil, it should be treated to a minimum of H4.

Should you require main beams to support your joist structure you will typically use a 50 x 228 H4 beam and you can use 76 x 76 H4 treated square posts to support these beams. Your beams will be installed at 3m centres. If the structure is higher than about 2m I would suggest using gum poles to support it as they are harder and stronger. Again use H4 CCA Treated as they will be placed in the ground.

Timber decking companies DurbanIt is best to use balau deck boards as they are a lot more stable than pine and will not bow and cup as easily as pine. I use the 19 x 68mm reeded deck board as they are relatively inexpensive in comparison to the 19 x 90 deck board. They need to be reeded and the grooved side must face down in order to allow water trapped between the bottom of the deck board and the joist to escape, thus preventing premature failure due to rot. One can also use other timbers such as Massaranduba and Garappa, but they are more expensive. Balau is fine for coastal regions. Garappa and Massaranduba work well in the Highveld where the temperatures range from very cold to very hot.

Deck boards should be spaced with a 5mm gap between them in order to allow water on the surface of the deck to drain away quickly.

For a free no obligation quote on timber supply or supply and install for your decking needs, please contact us on 082 496 5444, or use the contact us form below.

Wooden Deck Built in Hillcrest, Durban

Here’s video of a wooden deck we built recently in Hillcrest, Durban showing the different stages of the build.

Give us a call for a quote on your wooden sun deck, wooden pergolas, walkways, bridges, floors or fences on 082 496 5444 or use the contact us form below.